After last evening’s 90 minute swim (back and forth a gazillion times), it was time to quickly pack up the automotive transition area and head over to the coach’s place to go through transition ‘refinement’ and practice.
Translation: He must think my transitions suck.
Actually, to be fair – my transitions are like most others, I bumble along from the water to the mount like and again from the mount like to my shoes. Sure, I’ve picked up a slew of little tips along the way to make things semi-efficient, it was time for an overhaul.
People often wonder why bother to refine transitions? Well, it’s ‘free time’. Ok…so you’ve heard the ‘free time’ thing before, but what does that really mean? Let’s look at an Oly Race where I splice off 70 seconds on T1 (swim to bike) and 20 seconds on T2 (bike to run). That’s 90 seconds total. So how does that translate to increased speeds?
Well, if I took that 90 seconds and put it into the run (10K), that’s 15 seconds/mile faster. For example, now a 8:00/mile time is a 7:45/mile time. See…it adds up?
Anyway, onto the evening…
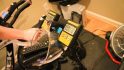
First we walked through the bike racks, item by item. Little tips – like wrapping brightly colored tape on the end of your transition row, and marking off your bike’s space. (Actually, before we even started walking through – he made sure I have a checklist of stuff to bring, which I do. If you don’t…start making one and just keep updating it after every race.)
Then we talked through towel placement and exactly where to place it – off to the side of the bike so I can stand on it and wipe my feet *WHILE* also putting on sunglasses, and then my helmet. (At this point, I’m assuming you’ve removed your wetsuit along the way and just needed to finish it off at your final spot).
Speaking of which, my helmet is upside down and so are my sunglasses. They are just easily pulled off the straw and straight to my head. 5-7 seconds later – done. If I put them on my seat or handlebars they could easily get bumped off by some other peep trying to un-rack their stuff. (I could insert a joke here about simply solving that problem by being out of the water first, but I’m not a very good little Nemo…so that won’t happen)

At this point, my socks are rolled back onto themselves, and I simply roll them back onto my feet. I run with socks, I can’t do it without them. It doesn’t matter if you put on the socks now (T1) or in T2 (bike to run) – but it’s slightly easier to do it now because your feet are wet and will slide in easily. Total sock time: 4-8 seconds if done correctly.
After the socks, it’s off we go, grab the bike and start cruising toward the mount line. For those not familiar, this is the point in which you are allowed to mount your bike, usually right outside the formal transition area.
Now this is where it gets fun. As you may have noted above, my shoes are on my bike already. I’ve never tried the moving mount before. So we started easy – first trying the running mount with my shoes already on.
The key is to grab a hold of BOTH handles firmly, then place one foot (in my case, left foot on left pedal) on the bike and push off. As you are going forward (hopefully), swing your back leg up over the back of the bike to the right pedal. Done, now pedal your way to T2.
Ok…but now we got to do it again WITHOUT the shoes on. Roughly speaking – same process, except this time you MUST BE SURE to NOT PEDAL until you have both feet secured on top of your shoes. If you pedal before both feet are secured on top of the shoes, you will crash when your clamped in shoes hit the ground.
Once you’ve gotten your feet on your shoes and are moving forward at a good clip, then you *STOP PEDALING* and reach down and slide your foot into one shoes. After you’ve succeeded in that venture, you regain speed and repeat the process for the other side. Simple, ehh??? Just don’t crash. Massive loss of style points if you do.

(Note in the above re-enactment photo, that my shoes are hanging down. This is actually fine – although some folks use dental floss to keep them perfectly straight)
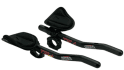
One key to this whole thing though is the shoes themselves. Here are a side by side comparison of my previous shoe and my new shoe:

- Note the Velcro strap – only one in the new shoe. Now note the small little groove/notch on the strap (right edge of strap). This keeps it EXACTLY in place until I tighten it once I’m riding. Just one quick pull of the strap and I’m done.
- Note the little pull tab on the second shoe, this allows me to grab ahold of it while I’m riding it.
- Note the lack of tongue on the second shoe – nothing to get in way when I slide my foot in without looking.
When we were bike shopping a few weeks ago he saw my cycling shoes and said “Well, those aren’t going to work…we need to fix that”, and I didn’t know what he meant until now. Now it all makes sense.
So – there ya have it. As for T2 – well, you basically just do the whole shoe dismount thing in reverse (again, avoid crashing to maintain those hard earned style points). It’s much easier coming in than going out. Once off the bike, ditch the bike and helmet wherever the heck you want to, put on your shoes (and in my case, grab my gel flask, race belt and Garmin and sort out on the road) and off I go. Just a few seconds spent at my spot.
So there ya go – that’s what I did last night…over and over. And I’ll keep practicing it until I’ve got it completely seamless. It’s a bigger issue for my next race (an Olympic distance), because of the shorter nature of it from a time management perspective. Those 90 seconds drop my effective run time a lot – and I’ll need every second I can get.
Oh, and as usual – thanks to my coach for filling in all the little tips I didn’t know of along the way – he completely rocks!
FOUND THIS POST USEFUL? SUPPORT THE SITE!
Hopefully, you found this post useful. The website is really a labor of love, so please consider becoming a DC RAINMAKER Supporter. This gets you an ad-free experience, and access to our (mostly) bi-monthly behind-the-scenes video series of “Shed Talkin’”.
Support DCRainMaker - Shop on Amazon
Otherwise, perhaps consider using the below link if shopping on Amazon. As an Amazon Associate, I earn from qualifying purchases. It doesn’t cost you anything extra, but your purchases help support this website a lot. It could simply be buying toilet paper, or this pizza oven we use and love.


Nice analysis of the transitions. I keep trying to expand my number of “tricks” as I practice riding and transitions, though I have seen many people bite it hard trying to get their feet in the shoes. The problem is they are simultaneously trying to avoid the other riders around them while trying to get their feet in their shoes. I think this trick works well at courses where you have a long flat start to the bike, so you can pedal out of the chaos zone first and then get your feet into the shoes once you have some space to breathe. Prior to each race, I will also try to identify the spot on the return to T2 where I will begin taking my feet out of my shoes. You want to make sure you are past any hills so you can just cruise on in. The running mount/dismount though is still a work in progress.
It sorta cracks me up that your coach has a practice transition rack…
This kind of post ROCKS. I love to imagine a world where I could do a barefoot running mount on my bike, pedal with my feet on top of my shoes, and then manage to get my feet securely in those shoes at some later point. Sadly – this is a dream world and probably always will be for me. I have trouble walking my bike without running into stuff; I have fallen over more times than I’d like to admit at normal stops with no one else even around; and? I have the kind of bike shoes that tie. With laces. Yeah – I’m just going to have to admire pro’s like you from afar. :D But still, I LOVE these posts. I love knowing how all this works, even if I can’t personally accomplish it!
Good post. Even though I’m not a triathlete I find this kind of prep work, strategizing and streamlining fascinating. Finding new ways to be more efficient is always cool. I look forward to seeing just how big of a difference this makes on that olympic triathlon you’re training for.
Ack. I say leave the shoes-on-bike thing for the pros. I’ve seen too many crashes coming out of T1 as a result. Only takes one major crash to kind of ruin any time advantage (plus also it tends to ruin the day of whomever else crashes at the same time).
That’s what I say … leave it to the pros – totally agree. My philosophy is that I trained my butt off for months to get to the starting line. Once I get in the water I want to have fun, race hard and avoid anything that will DNF. I crashed because of a pothole on the bike during San Francisco Alcatraz Tri a few years ago. I managed to finish the race with a bloodied shoulder. I do a lot of preparation for transitions – but avoid the little things that could add up on race day. I still take away something from all these – in particular how to use the new product advances to my advantage!
Great post! I definitely need to work on mine. And learn how to get on and off with my shoes clipped in…purely b/c think how cool I’ll look?! ;)
You need to find a sponsor:
“Now for Rainmaker’s Automotive Transition Tips, brought to you by Toyota.”
I wish I could do the whole shoe on the bike thing, but I can’t find a good (read Sidi) tri shoe in a size 15.
this is brilliant. exactly what I needed–and I haven’t seen such a great explanation any other place.
i’m thinking i will skip the whole shoes-already-on-the-bike thing. I have enough other ways I can crash, I don’t need to add to them.
and nancy t: d.c. rainmaker IS a pro! c’mon!
Very good overview of the transition process. I am not a fan of having my shoes on my clips. I am not that fast anyway. LOL
This reminds me of one of the first chapters in “Cheaper By The Dozen”. Dad is an efficiency expert and he would love these time saving tips.
Loved that book! You are so right though, that Dad would have been great as a triathlon coach!
I have read about people using elastic bands to keep their shoes parallel to the ground for the transtion, of course this only works until you pedal.
Great post though useful even for a non triathalete
Nice transition setup!
Do you ever get that amount of real estate at the rack at an actual event? I think I’m jealous.
Thats just the cutest little bike rack the coach built…
but the tips were very good.. nice post.. I have done the running mount a few times and its worked okay.. other times, I put the shoes on and stumble through trans #1
Now you didn’t mention the part where your coach kept bumping into you repeatedly while you were trying to stand on one foot to get your running shoe on the other.
If he didn’t, you didn’t practice. ;)
Good rundown of some very important processes.
Very thin rubber bands. They hold the shoes until you pedal, then they break.
I however, prefer to take a nap during transition, paint my nails, think about daisies and daffodils … for like 7 minutes.
I will continue to live vicariously through your speed.
THANK YOU THANK YOU THANK YOU!!! I have been WAITING for somebody to describe it to me in the detail you did.
NOW I feel like I can actually practice it, even though I’m still scared as hell to do the whole swing-your-leg-over-while-moving thing. *Big breath* Just gotta get over that fear.
I’d like to be able to dismount that way for Vineman…can’t really do it for exiting T1 – there’s a hill.
Keep practicing! Thanks for such a great post!
Nice post. Swing you leg over…that would be quite a feat for me! Interesting post – I’m just about to embark on my first tri, so tho I am not practicing the finer points, the list will help!
I clip my sunglasses between my water bottle and bottle cage. I put them on while i am already riding. It saves about 3 sec.
Number one on the top 25 useful posts and I just happened across this tonight.
I’ll show you how to save time in T1! :-)
Fortunately a flatted on the bike and realized then what I’d done when changing the tire. Less pictures of me riding back in to T2 with 6 eyes the better! LOL
That’s awesome! All the better to see you wit
Anything you can do whilst moving should be moved to the bike. I now have glasses on the bike too so it is just helmet on, grab bike, run. Glad to see you do the scoot version of mounting, left foot on first, couple of scoots, swing right foot over. The superman flying leap can be dangerous. I’ve seen someone go over the handlebars and scrape all the skin off their palms, I’ve landed too heavily on the seat. Added bonus, the more stuff is on your bike, the less the stuff can get mucked up by other racers. I can even leave my set up overnight in some races (eg NYC) and get myself an extra hour or two of sleep.