This time a year it can be hard to find motivation to go out in the cold (assuming you don’t live or train in Hawaii), so it’s understandable you may be stuck training indoors. While a lot of you out there have Garmin watches/units that you likely use outside when the weather is nicer, you can actually get quite a bit done inside – and still get all the same great data as outside.

No matter which sport you do most indoors, the first thing I should mention is that the standard Garmin ANT+ heart rate strap works universally across all sports indoors (except recording while swimming). So even if you don’t run or bike, but instead wander around the gym using all the other shiny equipment, you can still use that inside to record your efforts. For example, my girlfriend uses her HR strap indoors when she’s lifting weights, just as a matter of tracking her time later on in training logs. Makes it much easier that way.

(Above is a typical HR profile graph while indoors.)
Running:
Probably the most common sport folks do inside this time of year is running or walking – usually on a treadmill (though some lucky folks get a Superdome to run around inside). But regardless of where you run around/on, the first order of business is deciding whether or not you want to know the distance or speed during/after your workout.
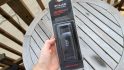
In order to do that you’ll need a little footpod that ties onto your shoe in between the laces and records information related to how often and how frequent your foot touches the ground. For all Garmin Forerunner’s out there, you have a few options (especially if you poke around a bit). They range the price gamut from reasonable to sorta expensive, depending on the size of the unit. The oldest footpod (discontinued) out there is the cheapest, which can occasionally be found on eBay and sometimes a few other places, for about $35. It’s not the prettiest, but it works just fine:
![IMG_9684_1280_x_853[2]](https://media.dcrainmaker.com/images/2010/01/how-to-train-indoors-with-your-garmin-device-5.jpg "IMG_9684_1280_x_853[2]")
The next option is a slightly different older model (also discontinued, below) that’s usually found for about $65 (eBay and elsewhere), but it works equally as well. It looks like this:

Finally, there’s the current version (below) – which is tiny, about the size of a quarter, and simply clips onto the shoelaces in a matter of seconds. I know some folks are worried about losing something so small. Thus far, in a small crapton of running I haven’t had mine slip off yet (My running crapton = 150+ miles a month for 6-7+ months since I got this model). I love this version because it’s tiny, and I wear my running shoes everywhere, so with this one, nobody notices it’s on there.

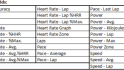
Once you’ve got it on there, you’ll go through a quick pairing process. It takes only a second. Here’s my condensed chart for how to do this on all of the Garmin watches I have lying around my house at the moment. If you have a different model than the ones I have handy, you’ll want to check my manuals list at the end of this post.

Ok, so you’ve got it all paired. Perfect! Now, you can further calibrate it once on the treadmill (or track) to get better accuracy. I recommend doing it, it only takes half a mile of running (800m), and you’ll really get much more accurate numbers.
Once you’ve gotten the watch on yourself, and yourself on the treadmill, we want to turn it on (the watch, not you). Now, depending on the structure of the building you may pickup satellite reception – or you may (after some time) get some variant of the following warning message:

What that message means is it can’t find a GPS satellite and thinks you’re indoors, therefore it wants to switch to indoors mode (turns GPS off). Choose Yes if prompted.
But for me, I’m not patient enough to wait for that message most of the time. Instead, I want to go NOW! So I always manually turn off the GPS when indoors.
Why do I do this? Well, for two reasons. One, if you don’t, you get dorky looking graphs like the below:

And two, some sports applications don’t correctly process the pace/distance data with it GPS on but the real data coming form the foot pod. This is because they see GPS points splattered all over the place and simply assume that’s you running around like normal (and ignore the foot pod data). So ALWAYS turn off the GPS indoors if you want good data.
Now how do you turn off the GPS? Here ya go – another handy little chart I put together for turning it off (click to enlarge):
 (Don’t worry, the next time you turn on the watch the GPS will automatically turn back on again.)
With the GPS off, and the footpod paired, your ready to roll…err..run. Here’s what a typical run looks like indoors on a treadmill (Heart Rate = Red, Pace = Blue):

And here’s what the same structured run looks like outside (though, with a tiny bit longer cool-down at the end):
 (Both charts done via Sports Tracks)
See, basically identical – the only difference is that I don’t have elevation (or grade on a treadmill). Plus, the paces are a bit smoother on a treadmill than on rill hills in real life. Pretty sweet, ehh?
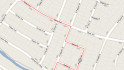
Of course, if you hate the treadmill as much I do – you may want to check out these great ideas for keeping yourself from falling off the back of the treadmill (or getting bored).
Cycling:
Like running, if you use your Garmin Edge or Forerunner inside, you’re going to want one particular accessory to record distance and speed – as well as cadence. The good news here is that unlike running, the wireless speed/cadence sensor is comparatively pretty cheap at about $39. It comes with a few parts that simply zip tie onto your bike in a matter of a couple minutes:
![IMG_5354[2]](https://media.dcrainmaker.com/images/2010/01/how-to-train-indoors-with-your-garmin-device-23.jpg "IMG_5354[2]")
It runs completely wirelessly using ANT+, so no messy wires to untangle or deal with. And the unit’s battery lasts approximately forever. Though, if you last longer than forever, the battery only costs about $3-4 at your nearest Drugstore.
Once you’ve got it all zip-tied to your bike, you’ll want to go through a quick pairing process – just like any other ANT+ accessory. Here’s a handy chart I put together for pairing the Speed/Cadence sensor for a models (click to enlarge):

So, with it all paired, it will display that the sensor is found – with a message similar to this:

Now, go ahead and put your bike on a trainer. What…you don’t have a trainer? Doh!
(Ok, quick detour. If you don’t have a trainer, there are a TON of options out there. Some of it depends on your bike skill level. For example, the cheapest trainer out there (Little Red from Performance) is a great intro trainer, but I’ve found that it works well up until about 275w of power (which is a fair bit for most cyclists), beyond that, it just can’t provide the resistance needed. As a secondary indoor trainer I transitioned to the next level up, which offers a way to modify resistance on the fly. Whatever trainer you consider, you’ll probably want to start out cheap before going full boar into the most expensive options out there – just in case it ends up collecting dust. For me though, I use my trainer 3-4 times a week…even in the summer.)
Ok…detour complete.
Like running, you’ll want to ‘calibrate’ the speed sensor to your bikes wheel size. If you happen to go outside first, the Garmin watches will actually do this for you via GPS automatically. But assuming you don’t want to go outside, it only takes a quick second. Simply look up the wheel size on your tire sidewall, and then use this handy chart to map that to the size in millimeters (also located at the back of the manual, this is from the Edge 500 manual).

Then just follow the steps to tweak the wheel size on your bike:

Another detour…
I want to mention something really important about speed & distance inside on a trainer. It just doesn’t matter. Meaning, because resistance is controlled by the trainer and/or your gearing, you can change gears and make the speed or distance increase/decrease without changing effort. In other words, if you give me a bike on a trainer, I can make it show 35MPH, or 15MPH – with the same effort – just by switching up the gears I’m using. So, don’t fret or obsess with speeds and distances on a trainer – they mean nothing. Focus on time and quality.
…ok…detour complete.
Now, let’s turn off that GPS sensor – just like when running – otherwise we’ll get more of the same whacky graph/pace/speed distance issues. Here’s the steps for how to do that (click to enlarge):

So, with the GPS off, let’s get a cookin’ and finally riding. Press start. And pedal.
Soon, you’ll have a pretty looking graph just like this:

(Actually, the graph from Garmin Connect (above), isn’t nearly as cool as the one from Training Peaks (below))

See? Simple!
Want some ideas for good indoor bike trainer workouts to keep you entertained? Check out this recent post from Mainesport….or this one from Joe Friel.
Round-up:
At the end of the day you can use your Garmin watch/device for all sorts of indoor activities, these are just two examples of the most common ones. If you need more detail on any of these steps, here’s a pretty detailed list of links to the manual’s – including models I don’t have handy:
Garmin Forerunner FR-50
Garmin Forerunner FR-60
Garmin Forerunner 205/305
Garmin Forerunner 310XT
Garmin Forerunner 405
Garmin Forerunner 405CX
Garmin Edge 205/305
Garmin Edge 500
Garmin Edge 605/705
If you’ve found this (or this type) of post useful, feel free to let me know. I tried to show as many devices as possible – in hopes it’s one of yours!
You may have noticed I also linked to the various accessories on Amazon. Like many sports bloggers you probably read and love, I’ve been recently toying around with linking to relevant Amazon products as a method to try put a tiny bit back into the triathlon bank for some of the time I end up spending putting together ‘How to’ guides like this and the product reviews I write (which are how most people find my little place on the internet). For example, this write-up took a touch over four hours to put together (pictures, tables, validation, typing, Presidential State of the Union distractions, etc…). For now I’m just testing with the idea, so if it’s bad – let me know. If you see any of the items listed above and utilize those links, I’ll earn a few pennies as a result.
But please – pick them up wherever is cheapest and easiest for you – be it Amazon, eBay, or your local running/shop (or ‘borrowing’ them from your running partners shoe…)!
Thanks for reading (and stopping by)!
FOUND THIS POST USEFUL? SUPPORT THE SITE!
Hopefully, you found this post useful. The website is really a labor of love, so please consider becoming a DC RAINMAKER Supporter. This gets you an ad-free experience, and access to our (mostly) bi-monthly behind-the-scenes video series of “Shed Talkin’”.
Support DCRainMaker - Shop on Amazon
Otherwise, perhaps consider using the below link if shopping on Amazon. As an Amazon Associate, I earn from qualifying purchases. It doesn’t cost you anything extra, but your purchases help support this website a lot. It could simply be buying toilet paper, or this pizza oven we use and love.