
It’s been a while since I’ve written about a random ride in an epic spot. But in years past in the deserts of Jordan, or the coast of South Africa, or the Pyrenees, I’ve been lucky to sneak in some amazing rides. And this past week, while working my way back home from Eurobike, I set aside a few hours (ok, a lot of hours) for a climb up the majestic Grosse Scheidegg in Switzerland. All of which resulted in the photo I took of myself above.
What’s funny is that I hadn’t planned that to be the route that day. However, a DCR reader reached out to me via Twitter after I posted my run around a nearby lake and suggested I tackle Grosse Scheidegg the next day. Given the weather looked promising I plotted out a course and set my plans in motion. My initial plan was about 60 miles (96KM) and made a giant-ass loop from my campground.

I generally prefer loops, partially because I get unique scenery the entire time, and partly just because I think loops look prettier on Strava. Don’t judge.
In any case, my ride started off immediately with a cool ~1,300ft (400m) climb to get over the first mountain pass. No better way to get the juices flowing than 6-10% grade immediately.
From there I descended down into the valley for a couple miles of flats. Maybe 8-10 minutes worth at most. Just enough to feel good about yourself and your paces before you hit the wall.
In following the Edge 1030 after the flats, it told me to turn on some random little 1.5 lane road. Which was exactly what I wanted: No traffic. And within moments I was straight into 8-12% climbs. For a long…long…long…time.

I actually almost turned around at one point, because the road briefly changed to gravel. Having played the gravel game before on other climbs in the Alps; usually gravel is a precursor to rough dirt track, which in turn is a precursor to no track at all. Said differently: On a road bike, it often ends in the death of a good climb.

But thankfully after a few hundred meters the asphalt resumed. No worries, the incline never decreased, it sucked all the way up.
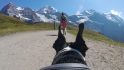
Though, there was a mile or two where the incline briefly paused as you wandered through a stunning valley. I took a moment to take a photo of myself:

I also took some of a few DCR readers that paused to say Hi. They were from the Seattle area as well and were on a multi-week cycling trip in the region. We ended up climbing the majority of the way up together on and off. Great guys!

Speaking of that climb, once you left this small valley, it was up, up, up!

Of course, probably my most favorite photo I’ve taken while cycling I did here on this section:

A lot of folks have asked how I took it. The first thing to know is that I actually did it on the way back down, not the way up. In general, I don’t like stopping to take photos during ascents (or most other training endeavors). I prefer to just keep going and make it work. So instead on the way up, I was mentally scouting locations for it. There were two specific turns like this that had epic backgrounds. This one seemed to have just the right amount of road fading off into the distance on the left.
I then launched the DJI Spark drone (full review here for sport usage). That drone fit in my back jersey pocket, and I just used my phone to control it (so basically, just the usual $499 base package, though that’s even on sale right now):

Now while you could theoretically use DJI’s Active Track technology to maybe make this work, I instead wanted a very specific shot with everything perfectly framed and the road turn as the center point. So I used the timer function on the drone to just take a photo every 2 seconds (the lowest you can set it). Then from there, I simply rode that corner three times, taking maybe 30 seconds each. Here’s a pile of all the photos it took:


The photo I ended up using was actually from the first of the three passes. If I could have set the timer to 1-second intervals, I’d likely only have ridden it once or twice.
And that was that! The photos automatically transfer to my phone as they are taken, but I did spend a second to transfer the high-resolution version when I got back. A quick pass through Instagram and I was done:
Back to the ride though before we got distracted, we were ascending up to the top of the pass, and upon reaching that the views were pretty solid:

I was mostly using my iPhone or GoPro Hero5 Black for photos. I didn’t bother to take the drone out at the top – just too many people milling around.

Oh, and I had a beer with the guys from Seattle. Because…why not? I was in no hurry.

Thanks guys! And enjoy the rest of your trip!

After that, I headed down the mountain. I had planned to do a loop, but that was basically 40 more miles of descending and flats, plus a solid 1,300ft/400m ascent I had to do either way. And I still wanted to get back in time to swim or do some other filming. So I ended up just coming back the way I came up.

I finished up the ride in a touch over 5 hours, albeit inclusive of the beer stop. I usually leave my Garmins rolling so I can capture power data across all devices exactly the same. Strava cuts out the stopped time anyway.
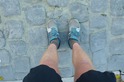
Oh, and yes, I technically got a swim in:

Random Trivia: The bike actually fell in the water just before I went to jump in. Figures.
In any case – for those curious, I put together this bit of video on the ride. It started off as a tutorial on how the navigation and climbing portions worked on the Edge 1030 in the Alps, but I also dive into all the gear I used and some of the thinking behind it. It’s a bit different than my normal product-specific tech videos, and almost a bit more like a podcast might be if done while climbing up a mountain at 13%.
With that – thanks for reading! Got a week of reviews and other backlogged stuff stacked up!
FOUND THIS POST USEFUL? SUPPORT THE SITE!
Hopefully, you found this post useful. The website is really a labor of love, so please consider becoming a DC RAINMAKER Supporter. This gets you an ad-free experience, and access to our (mostly) bi-monthly behind-the-scenes video series of “Shed Talkin’”.
Support DCRainMaker - Shop on Amazon
Otherwise, perhaps consider using the below link if shopping on Amazon. As an Amazon Associate, I earn from qualifying purchases. It doesn’t cost you anything extra, but your purchases help support this website a lot. It could simply be buying toilet paper, or this pizza oven we use and love.


What an absolutely amazingly beautiful place! Stunning!!
Great views and a nice post, enjoyed reading it, thanks!
I’d say you’re wearing the Polar OH1 and Garmin Vivosport quite tightly attached, the OH1 looks as if it bites your skin – is it you or do the optical sensors require that? I was wondering since my Garmin 235 shows me rubbish HR data and perhaps I’m just not wearing it properly, though the sensor leaves a mark on my skin, just the strap doesn’t bite in so much
The Polar OH1 might be a bit tight, but it works well for me. While you never want it crazy-tight, I find that snug is generally the most successful for me. Any movement at all is bad.
The Vivosport may be tight, but feels about right for activity. I loosen it up after the ride. Also, they sent over what I think was the small band size, because I honestly can’t make it much looser.
If you’re having optical HR issues, I’d definitely start by tightening it up. One simple test is that you shouldn’t be able to slide a pencil under there.
No pencil you say? That must be it – I wore it such that I could slide my index finger under the strap (though the watch didn’t move). Will try to tighten it up then, thanks!
Any ideas on chest straps sliding down after some miles except for sewing in additional bra-like straps? (did try that, and it works perfectly, but it does make me feel awkward as the obvious choice was real bra straps).
Sorry for making such an off-topic comment. Please make more posts like this one with such great views!
Yes, definitely tighten that up!!! That will likely fix it for ya!
As for chest straps, I find for some chests (such as mine), that they work better above the nipple than below. For me if I do it lower on chest either I have to crank it super right, or it’ll slide down eventually.
Above the nipple? But then I’d have to shave my chest… :-o
Sacrifices have to be made for science…
Cannot imagine putting my chest strap above the nipple. I put it just below the pecks like they say and show. Don’t think I tighten it horribly and never had an issue with it slipping. Guess everyone is different.
Damn, that scenery puts just about every ride I’ve done this year (OK, ever) to shame.
What a spectacular route!
Welcome to Switzerland :-)
Fantastic ! Could you please do this ride again and make an ELITE Myrealvideo out of it :-) ?
I’m with you on making my routes a loop, whether riding or running. Even if it’s mostly a straight shot to my “turnaround point,” I try to meander over to parallel roads to head back. The sights can be very different, and yes looks much better on Strava! :)
Glad you enjoyed our nice country and its scenery ;)
What are you using to keep your bike standing in the swim picture?
I used the little GoPro 3-way tripod/selfie stick thingy. I jammed it into the back wheel/frame, and then into the rocks. You can actually see it in the lower left corner of the picture just barely.
It’s actually funny, this is where you notice the very slight difference of the legit GoPro 3-way pole (link to amzn.to), compared to the knock-off one I was using (link to amzn.to). The knock-off had much more flex that took a while to setup, whereas when I do this with the legit GoPro one, it’s far more solid. Of course, for $2 less, you get an entire backpack too with the knock-off, versus just the tripod from GoPro. :-/
Nice pics.
I wish I could get that kind of screen from Garmin Connect. I get a small map with a bunch of extraneous data elements; plus a big, generic Edge 520 image on the right. Is there a specific mode you have setup, or is their a beta for the web similar to their iPhone app beta?
That looks like the course-planning screen, which does have a much bigger map than the activity viewing screen. That’s a recent change; maybe they’ll let us expand the activity map view in future. Would be nice, wouldn’t it?
Correct, the new course mapping screen actually quietly rolled out about a week before the Edge 1030 did. Somewhat surprised nobody caught it. A heck of a lot better. Combine that with the planned GCM route planning stuff over the next 3 months and it’ll finally be a useful function.
I’ve hammered for years at how pitiful the entire GCM/GC route planning story is…for a company that is literally all about routing.
Totally agree, and it’s good to see they’re finally listening to you. I am slowly drifting back to using GC for course planning, after only using 3rd party solutions and even writing & distributing software to help with this over the last few years. I still think their turn support is weak compared to other sites.
Superficially its a significant improvement and they’ve certainly started to add the basics that free sites have had for years, but there are still some major issues (unless I’m using it wrong).
You can’t add Left/Right type course points and when you import courses it loses all the course points!
Plus, when I try and use a course on my Edge 520 (which works fine with courses from others sites) the course points are shifted along your route – initially by 20-30 metres, but by 10km in by almost 300m!
Also, something automatically adds a direction course point (left/right) after the course point you’ve added. Which, even if the notifications weren’t late, would still be useless as you want to know the direction to turn before the junction not after it!
I’ve reported all these issues to Garmin; they’ve passed on the course point type selection to their developers ‘for consideration’ but I’ve not heard back on the course point import or late notifications yet.
Alex, I think the shifted course point problem has been fixed now. The distance values on the coursepoints were being miscalculated somehow, and the error would get progressively longer as you went along the course, and the watch or edge was taking the distance as definitive, rather than the time stamp or position. Result, what you saw. I downloaded a couple of courses yesterday and found the distances were correct.
Agreed about placing left or right coursepoints. Not knowing where it’s going to alert until you’re actually doing the course, and not being able to select where your fifty coursepoints go, are serious flaws in the UI. Perhaps weak wasn’t a strong enough word in my earlier post.
Thanks, Dom – Its good news about the drifting course points – that was a major issue…
Are you saying that if I create a course without setting any course points it will add some at junctions automatically?
I did wonder if that was what had happened, but on my test course I only added junctions that I wasn’t familiar with (thus there were a good mix of junctions with ‘manual’ course points and without) – but the only ones that had the automatic course points were the ones that also had manual ones… I suppose that could just be a coincidence.
I’ll have another try on a route I know and just see what happens with no manual course points – although that would seem like playing russian-route-roulette if I were using to navigate a course I wasn’t familiar with!
Are you saying that if I create a course without setting any course points it will add some at junctions automatically?
Exactly that. It’s actually been doing that for a while for an increasing number of devices. I haven’t tried this on any Edge, but from what you say it sounds as though it’s definitely happening for yours (and I think they were the first to get it, along with the FR 920xt).
I’ll have another try on a route I know and just see what happens with no manual course points – although that would seem like playing russian-route-roulette if I were using to navigate a course I wasn’t familiar with!
Too true. When I create courses on other sites, I always check the points before using the route. I suppose with Garmin’s move to more dynamic courses, where you set a starting point and a distance, this is harder to do. Be interested to hear how it works out for you.
Tried a 20km route tonight that I do regularly; I didn’t add any points manually and let it try and do the course points automatically.
I think it managed about 2/3rds of the junctions – it managed to miss fairly major junctions including 4 roundabouts! In the odd place I wonder if it was confused by a road name staying the same despite their being a give way/definite turn.
Unfortunately as it stands its unusable on a route you don’t know / without having the map screen open all the time.
Guess I don’t need to retire my code just yet then!
How much time did you invest in the done shot from the initial stop to putting the drone back in your jersey and going on with the ride?
About 8 minutes. My flight log shows 5mins and 56s in the air. So average about a 60-90 seconds to turn on, place, connect to WiFi and get in air, and then about 45 or so seconds to put in jerseys pocket.
And really, the last 3 minutes of that 6 minutes in the air was getting some video footage (you can see some of it in the video), and a few other stills I didn’t use.
Thanks. Less time than expected.
route load time: yes looks slow. edge 820 is definitely underpowered, would you say the 1030 is underpowered for the same sort of tasks?
I would have been interested to see how the 1030 recovered and replanned if you made a deliberate navigational error. following the only road on the hill is not so challenging I guess. again, edge 820 very bad at that.
Images: …very nice. almost makes me want to buy a drone (almost)
I have to point out that I did hear you say Edge 830. (I know , I know, Freudian slip)
I think it might be a little underpowered, but at same time for tasks like re-routing it does generally go fast enough – and certainly I could have left within a few seconds and not waited for it to calc whole route. I think a lot of people want phone-like speed, but don’t realize there’s a trade-off with battery. As noted in the video there’s no major phones that can last 20 hours of screen-on & gps-on time.
As for re-routing, I didn’t include it in the video as I was descending. But on the outbound portion I semi-purposefully missed a turn (I apparently had selected a questionable sorta-trail-steps-thing to descend my road bike on), so I just followed the main road instead and it soon re-routed me properly at the next turn. It was about 12% grade down at the time on a more trafficked road so not really safe to film.
(And yes, just to be clear, no Edge 830, really. Just so many products in my head that occasionally I blend them together.)
Beautiful
Very well done. Great pics.
If you’re still in the area, the paved climb to Männlichen from Grindelwald (start of west side of Grosse Scheidegg) is fabulous.: link to cycling-challenge.com
Or from near the start of the east side of Grosse Scheidegg are climbs to Sustenpass (link to cycling-challenge.com) and Grimselpass (link to cycling-challenge.com). also fabulous:
Very nice. Gone now, but definitely want to get back. And nice site – I used it in some planning of this route. :)
What is it with you and bar tape? Every handlebar pic has the nastiest looking tape. Are you diametrically opposed to ever replacing the stuff? :)
Loved this, BTW. Nice work!
Haha…yeah, I’ve actually got the new bar tape boxes sitting in the cave and all. I kinda want to do it the same time I swap out to the eTAP system that I bought a year ago that’s also sitting there, simply so it’s all nice and clean.
But I’d been hesitant to do any of that with the massive influx of power meters I needed to rotate through this summer that I didn’t want to screw something up and have a bike out of commission. This week though is actually looking good since I’ve largely got all the data I need for all the units I need done on that bike
Pics or it didn’t happen! :)
I agree with your priorities. I’m looking to finally get my first power meter so I’m anxiously awaiting your upcoming posts.
Dang! That is spectacular!
Do you have a higher-res version of that first DJSpark photo with the stream on the left? That’s wallpaper-worthy!
Ask and you shall receive: link to dcrainmaker.com
Wow, that is amazing scenery Ray and very nicely photographed. Made me nostalgic for my last adventure nigh on two years ago now – link to cyclelogical.tv
Welcome to Switzerland!
You’re still here or already back in Paris?
Great pics!
Back in Paris now. :)
“I generally prefer loops, partially because I get unique scenery the entire time, and partly just because I think loops look prettier on Strava. Don’t judge.”
and
“The first thing to know is that I actually did it on the way back down, not the way up. In general, I don’t like stopping to take photos during ascents (or most other training endeavors).”
I also like to take pictures on my way down (except on very loooong climbs when I take pictures just for taking some rest :D ) but in case of a loop ride, do you do the climb twice? :)
If you feel adventorous: the Inferno Triathlon (www.inferno.ch) is passing the Grosse Scheidegg.
I can only second that Ray. The Inferno Triathlon is an absolutely awesome event – and the Grosse Scheidegg is just one out 3.5 climbs you get to enjoy ;)
See you there next year
Great post, love that ride! Felt like the climb would never end. I haven’t watched the video yet, but I assume you captured the sounds of cowbells?
Wish I had! On the way down I was capturing some video near the cows…and then one of the local buses came through at that same moment (basically, the only vehicle allowed on the road).
My family and I took the bus up to Grosse Scheidegg a few weeks ago on vacation for the start of a hike. I was imagining that cyclists dreaded hearing the (very distinctive) horn.
Hi Ray,
couple of question regarding the spark drone which I am interested of buying for my cycling trips.
1.) Is it safe enough for the drone and its moving parts to keep it without any box in the back pocket of your t-shirt?
2.) What about permission of flying a drone in different countries? Especially when you just go for a holiday abroad, or just spontanously decide to ride somewhere, how do you treat the local permissions?
1) Yup, no issues I’ve seen. The Spark’s gimbal is far better protected for this than the Mavic. I generally point the gimbal downwards, merely in case I sweat the sweat doesn’t end up straight in the gimbal. But since the arms push outwards, it actually forms a little cocoon over the drone from your jersey.
2) I do a bunch of research on rules where you fly. The app in theory will tell you some of it, no-fly zones and airports. But realistically DJI does a crappy job there compared to what they could do. I’d say if you listened to the app 100% without doing research you’re likely to get in trouble. For example in Paris here there’s a big no-fly zone over the whole city (and they take it incredibly seriously, like, they’ll arrest you). Whereas the DJI app just smiles and lets you fly if you wanted to.
But you can generally just type into Google the name of the country and figure out the drone rules pretty quickly. Usually someone has done the work for you. And honestly, as long as you use some basic common sense (don’t fly next to important buildings, don’t fly over crowds, don’t fly near airports, don’t get too close to people), then you’re usually fine.
thanks for reply
@1 – great news, that makes it then easy to carry and have it allways with
@2 – in my country [Austria], you need licence for any size drone as long as it has camera. Calling a police is also a national custom here so you must be carefull if there is anyone nerby. Sharing the whole stuff on social media makes it even more dangerous. But I hope the law will go towards small drones more beneficial and the rules will be less strict. But thanks for the reply, doing a research on where to fly is then crucial
Hmm. Interesting on #2. I wonder how the new upcoming EU law (comment period ends today actually) for drones overrides that. I can never keep track of which law takes precedence.
link to easa.europa.eu
Did this route in the summer, amazing ride apart from the off road section which detracted from a really good day.