


It’s been a bit over 2 months since Wahoo announced the KICKR CORE 2, and in that time, both my wife and I have put an absolute boatload of miles on it (or kilometers) to see where it works well, and where it falls short. After all, the Wahoo KICKR CORE 1 was a mainstay in the trainer industry for 7 years. I’d struggle to think of many products in the sports tech realm that have that kind of staying power.
Thus the question is, will the KICKR CORE 2 remain around that long as well? And more importantly, at the moment – are the changes worth it, for either existing owners or owners of other smart trainers? And lastly, does it work as described? After all, it’s exceptionally rare for me to go out and buy another copy of a product during the review cycle, because I have concerns about the loaner one that was sent to me. While I virtually always buy my own copies later to replace the loaner ones, the circumstances here were pretty unique.
In any case, let’s dig into things!
What’s New & Key Tech Specs:

First up, let’s run through what’s new about the KICKR CORE 2, compared to the now 7-year-old KICKR CORE 1. That thing went the distance, so kudos there. But it was also getting a bit long in the tooth. Here’s what’s new:
– Added WiFi connectivity (helps in certain environments, and auto downloads firmware updates)
– Added Race Mode (faster update rate)
– Added ‘Sensor Hub’, aka Bluetooth bridging, helpful for Apple TV users especially
– Added secure/bonded/encrypted Bluetooth pairing for EU security compliance (EU RED)
– Added new trainer LEDs for trainer/WiFi status
– Tweaked the legs to be flat-shaped (versus rounded previously)
As you can see above, the main thing here is really the addition of WiFi, Race Mode, and the Sensor Hub. The WiFi helps keep it up with others in this price range, who were undercutting Wahoo (namely JetBlack and to a lesser degree Elite), adding in WiFi & Race Mode, but not having the global reach of Wahoo (in terms of support/distributors/etc…). Obviously, but from a core trainer design standpoint, it really hasn’t changed any. This was about electronics swapping, and better assembly. And that’s fair enough.
In any case, here’s the main specs in a simple guide:
– Direct drive trainer: This means you remove your rear wheel
– Flywheel: It has a flywheel weight of 11.9lbs/5.4kg
– Cassette: Equipped with either Zwift COG or 11-speed (11-28) cassette (also compatible with 8-13 speed cassettes – some cassette types will require adapter)
– Sound: Essentially silent. Only the sound of your drivetrain is heard
– Handle: Sadly, still no
– Flexible Feet for Motion/Sway: No
– Protocol Compatibility: ANT+ FE-C, ANT+ Power, Bluetooth Smart Trainer Control, Bluetooth Smart Power (everything you need), Direct Connect WiFi, Zwift Protocol
– WiFi: Yes, built-in, Direct Connect to all apps via WiFi
– Zwift Race Mode: Yes, 10 Hz in WiFi (and Bluetooth for Zwift)
– Heart Rate Bridging: Can rebroadcast your heart rate sensor within a single channel, ideal for Apple TV Zwift users (who are Bluetooth channel limited), as well as some Zwift controller bridging compatibility.
– App Compatibility: Anything and everything
– Skewer Compatibility: All the skewers and adapters you could ask for: Road 130mm, 135mm, 142x12mm, 148x12mm
– KICKR CLIMB Compatible: Yes
– Max Incline: 16% simulated grade
– Max Wattage: 1,800 watts resistance
– Stated Accuracy: < +/2.0%
– Max Rider Weight: 250lbs/113kg
– Unit Weight: 30lbs/13.6kg
– Power Cable Required: Yes, power block compatible with 100-240v
– Pricing: $549USD / €549EUR / £499GBP
As you can see, the specs otherwise remain in the mostly mid-tier category for trainers. What’s interesting here is that the KICKR CORE had started out 7 years ago in the mid to high-tier range. But with the KICKR CORE 2, this puts it solidly in the mid-tier realm, to just slightly lower than that, depending on which specs you look at. For example, the Elite Rivo is at 18% incline, though lower overall wattage. The JetBlack Victory is at the same 16%, though at $150 lower price point ($399USD).
But the point is, I do wonder if Wahoo could have increased the specs a little bit here, to give this trainer longer staying power. There’s no way these specs will hold up another 7 years, unless the competitors just give up altogether. However, perhaps Wahoo knows that, and would prefer to get back into an every 2-3 year cycle, to encourage upgrades. In any case, more on competitors later on.
The Two Core Models:
While it might be obvious that there are effectively two models of the KICKR CORE 2, I wanted to call that out, and be a bit more clear on it. Under the covers, they are the same units, and you can always switch cassettes later (it’s the same software/etc…). But from a purchasing standpoint, you do need to make a choice upfront:
A) KICKR CORE 2 with Zwift COG/CLICK
B) KICKR CORE 2 with standard 11-speed cassette
Again, you can always switch from the cassette version to COG/CLICK later, or vice versa. Likewise, you can switch from an 11-speed cassette to a 12-speed cassette later too, which is actually exactly what I did.
In short, here’s why you’d purchase one version versus the other:
KICKR CORE 2 with Zwift COG/CLICK: The Zwift COG means that it works with basically any-speed bike. Thus, I can put on my 12-speed road/triathlon bike, but also my 13-speed gravel bike, and even an older 11-speed bike. Zero issues with that, whereas a normal non-Zwift COG cassette means I have to swap the cassette between bikes in order to get shifting in the rear cassette. However, the downside to Zwift COG/CLICK is that it officially only works with Zwift for virtual shifting. Thus, if you use other 3rd party platforms (e.g. Rouvy, Kinomap, TrainingPeaks Virtual, etc…), they don’t officially support virtual shifting. For structured workouts in ERG mode, no shifting is required. So, you can use all those apps, including TrainerRoad, without any issues on the Zwift COG/CLICK in a structured workout. And likewise, if you’re willing to yolo it, apps like Rouvy have made virtual shifting work on their platform too, though, it’s possible it could be broken by Zwift with a software update.
KICKR CORE 2 with standard cassette: In this case, you’ll need the cassette for your bike. By default, it comes with an 11-speed cassette, which is the most widely used cassette type for older bikes. But if you’ve got a newer road bike, it’s almost certainly a 12-speed. Cassettes cost about $50, and the tools another $10-$15, so it’s not a huge deal to swap it out. That’s what I did for my cassette version, as I’ll cover below. The benefit to a traditional cassette is that it works with every app ever made, without any funkiness or lock-in. The downside is if you have multiple bikes of different cassette types. You can also debate the pros/cons of virtual shifting (more on that later). I personally like the real-shifter feel of using my actual shifters, over virtual shifting buttons (the CLICK), but to each their own.
In general, my guidance here is simple: If you only use Zwift, and have multiple bikes, just get the Zwift Cog/CLICK version. Inversely, if you don’t use Zwift, definitely don’t get that variant, and get a cassette instead. If you use Zwift for regular riding, but then use something like TrainerRoad for structured workouts, get the Zwift version – since that’s perfectly fine. But if you use an app like Rouvy, even with their creative workaround for the Zwift CLICK, I’d still recommend just getting the regular cassette unless you have multiple bikes. That way, when Zwift breaks it on some random snowy winter day, you don’t have to deal with the hassle.
Either way, to be super clear: The underlying hardware and software of the CORE 2 is *IDENTICAL*. It’s merely which mechanical cassette they’ve stuck on the side of the unit. The unit itself literally has no idea what’s on the side of it, even with the Zwift COG/CLICK, you can actually use that CLICK with a regular cassette, since it’s merely controlling software in the trainer, not actually interacting with the COG.
Make sense?
Unboxing & Setup:

Getting things set up is super straightforward. First up, above is the box. Wahoo has revamped the box bits, like their other recent/new products. This includes a bunch of tutorials and such. But frankly, if you’re reading this – you won’t need any of that. At the end of the day, all you’re doing is attaching two legs to it, plugging it in, and you’re done. Mostly.

Here are all the parts laid out:

That essentially is divided into two categories:
A) The Wahoo trainer bits
B) The little Zwift box, with the Zwift CLICK bits.
If you didn’t get the Zwift version, fear not, I’ve got you covered there, too. You’ll have a cassette already instead, and won’t have the extra little Zwift CLICK box bits:
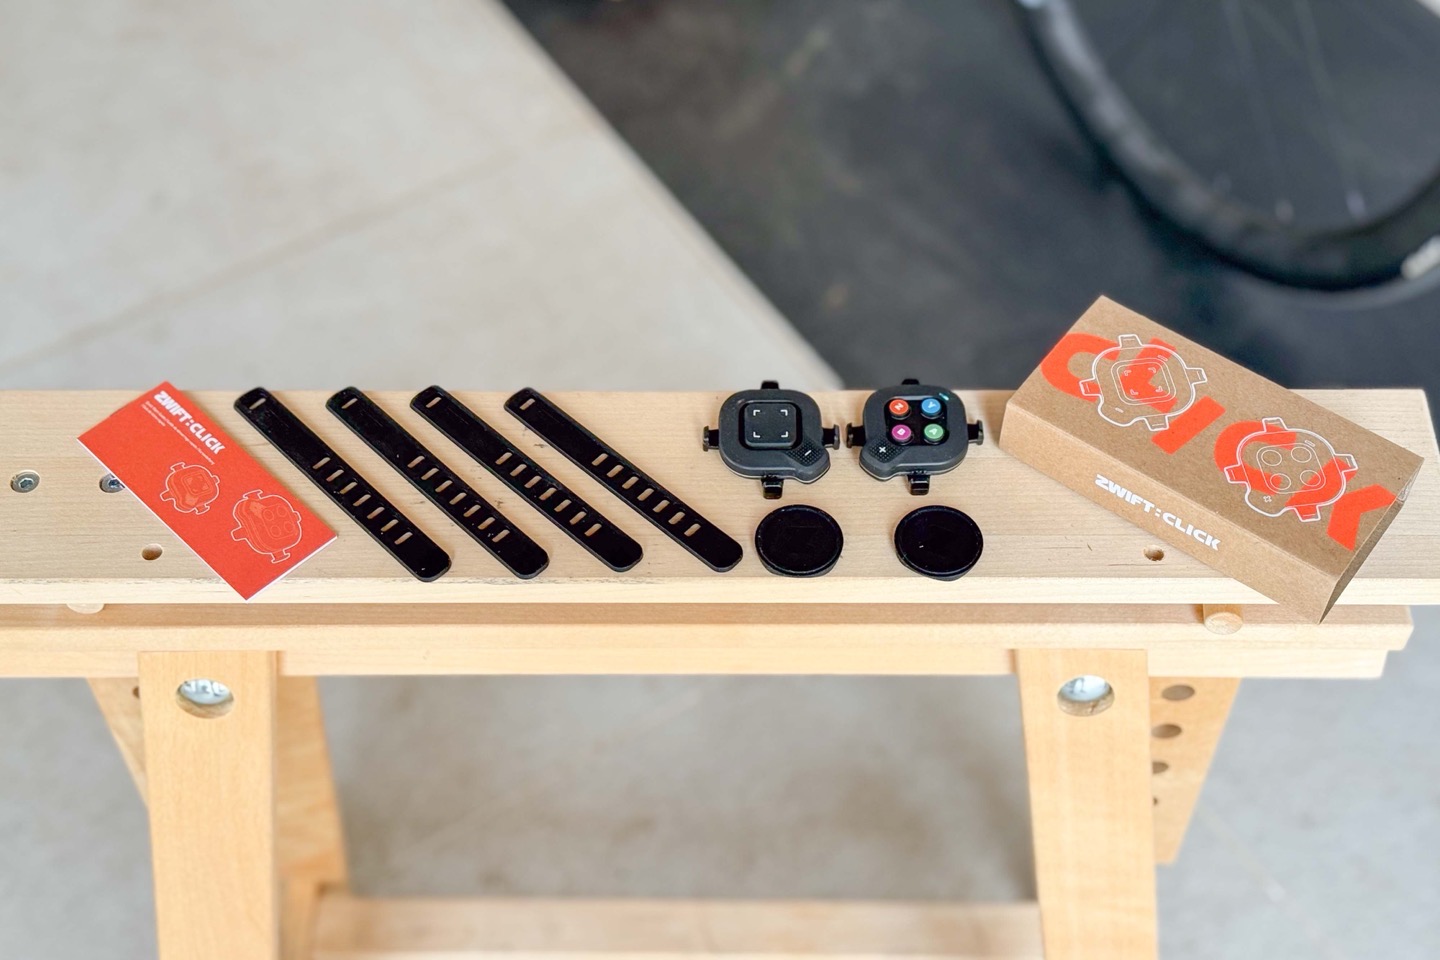
In any case, the other thing of note here is this cardboard piece. This has two sets of axle adapters in it. One for a thru-axle, and one for a quick-release skewer. It explains how to figure out which one you have, in case you’re unsure. In short, a quick-release skewer will be very skinny, like you see there, whereas a thru-axle will be roughly the thickness of your finger.

Setting that aside for a moment, you need to attach the legs. This is rather simple, and you’ll notice they’ve color-coded the legs to the frame, to avoid putting the wrong leg on the wrong side/direction. Likewise, you’ll notice the legs are now ‘flat’ versus rounded. This is to match with the flat design of the KICKR RIDE. Way-back-when, Zwift had matched the Zwift Ride frame to match the flat-look of the Zwift Hub, but the newer Wahoo KICKR CORE had round legs and no longer looked picture-perfect.

This was a change that Zwift had made with the Zwift Hub a couple of years ago, and now Wahoo followed through too.

Once that’s set, you’ll attach the right adapter for your skewer/axle. This takes approximately 3 seconds:

That said, let me point out one of my biggest annoyances here: The drive-side (right side) adapter literally just ‘sits’ there. It doesn’t screw in, doesn’t lock. Just hangs out on the edge of the cliff. So every time you remove your bike or move the trainer, it falls off. Like, what the actual fudge?!? Every other trainer ever made has managed to not have this just fall off (thru-axle adapters). This is especially annoying if/when you pack up or move your trainer, because it will very easily fall off and then you’ll never realize it, since it’ll also conveniently roll away and under something. C’mon, do better.
Once that’s sorted, you’ll plug it in. Meanwhile, they’ve updated the status lights on the other side, so you can see whether it’s connected to WiFi, as well as a multi-color light for general status:

The CORE 2’s status lights can mean a whole host of things; there’s a giant page here to decode them all. But here are the most common ones you’re going to see for the regular status light:
Yellow: Trainer booting up
Green: Idle/Ready
White: Flywheel Turning
Orange: Zwift paired
Purple: Zwift paired + Virtual Shifting enabled
Red: Just give up and eat ice cream, something broke
Meanwhile, there’s that WiFi icon status light, which is actually all connection types, so here’s the quick version of what it can show:
1 Blue Flash: One Bluetooth Connection
2 Blue Flashes: Two Bluetooth Connections
3 Blue Flashes: Three Bluetooth Connections
Blue flash + white flash: Bluetooth + WiFi Connection
Red Blinking: ANT control connection
Blue, Red, and White Flashing: The cops are coming, ride faster
Ok, with that all set, one quick diversion over to folks who got the regular cassette version. By default, that includes an 11-speed cassette. But if you’ve got a newer bike, such as one with a 12-speed cassette (or an older one with 10-speed), you might need to swap it out. That’s what I did (to 12-speed). This is easy enough with just a cassette tool:


You can purchase any cassette you want as long as it’s the same speed. Manufacturers will argue you need a SRAM cassette for SRAM drive trainers, or a Shimano cassette for Shimano drive trainers. But frankly, you don’t. That’s demonstrated quite handily by the fact that these trainer companies themselves ship neither Shimano nor SRAM cassettes with their trainer, but rather just generic cassettes. Point being, I just go on Amazon and usually just buy whatever mid-tier cassette is available to arrive the next day. Sometimes that’s a 12-speed SRAM one, sometimes it’s a 12-speed Shimano one. There’s very slight noise/wear benefits to aligning it to the brand (mainly on SRAM), but don’t overthink it.
With that, let’s start using it day to day.
Daily Riding Basics:

To begin, we’ll get our bike mounted to the trainer. For this, you’ll remove the rear wheel, and then place your bike on the trainer. If you’re using the Zwift COG, you’ll want to shift your rear derailleur to roughly the middle of the cassette, to align with the Zwift COG.
Oh, and of course, that little thru-axle cap will probably fall off at some point in this dance. If you’ve got a regular cassette, then it doesn’t really matter where you put it on, though for certain bikes (especially triathlon bikes that tend to have rearward dropouts, as opposed to straight-down dropouts), it’s often easier to first shift into the smallest/hardest gear in the back.

Now, back on the Zwift COG edition, you’ll notice there’s a small ring with a number on it. All this does is simply adjust (very slightly) left/right the exact position of the Zwift COG itself. Meaning, if you think you’ve got it all lined up, but it still doesn’t sound perfectly silent, simply rotate this one position at a time until it’s spot-on. Again, super-duper easy.

Also, as a reminder, there’s no electronic technology whatsoever within the Zwift COG itself. It’s literally the equivalent of two kid IKEA bowls with a single cog (from a cassette) in the middle:

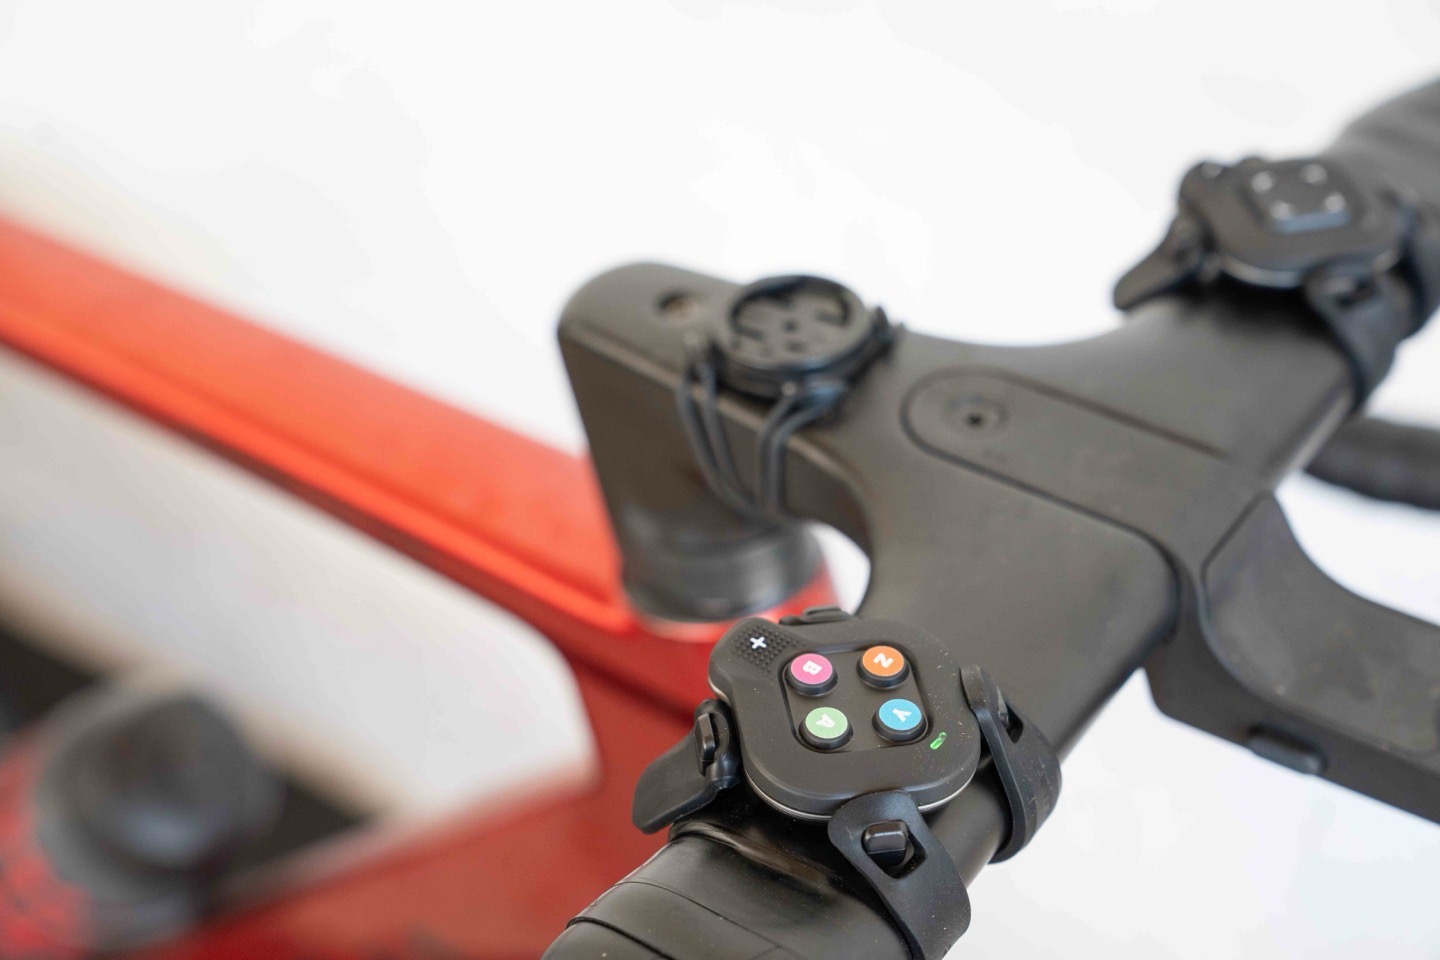
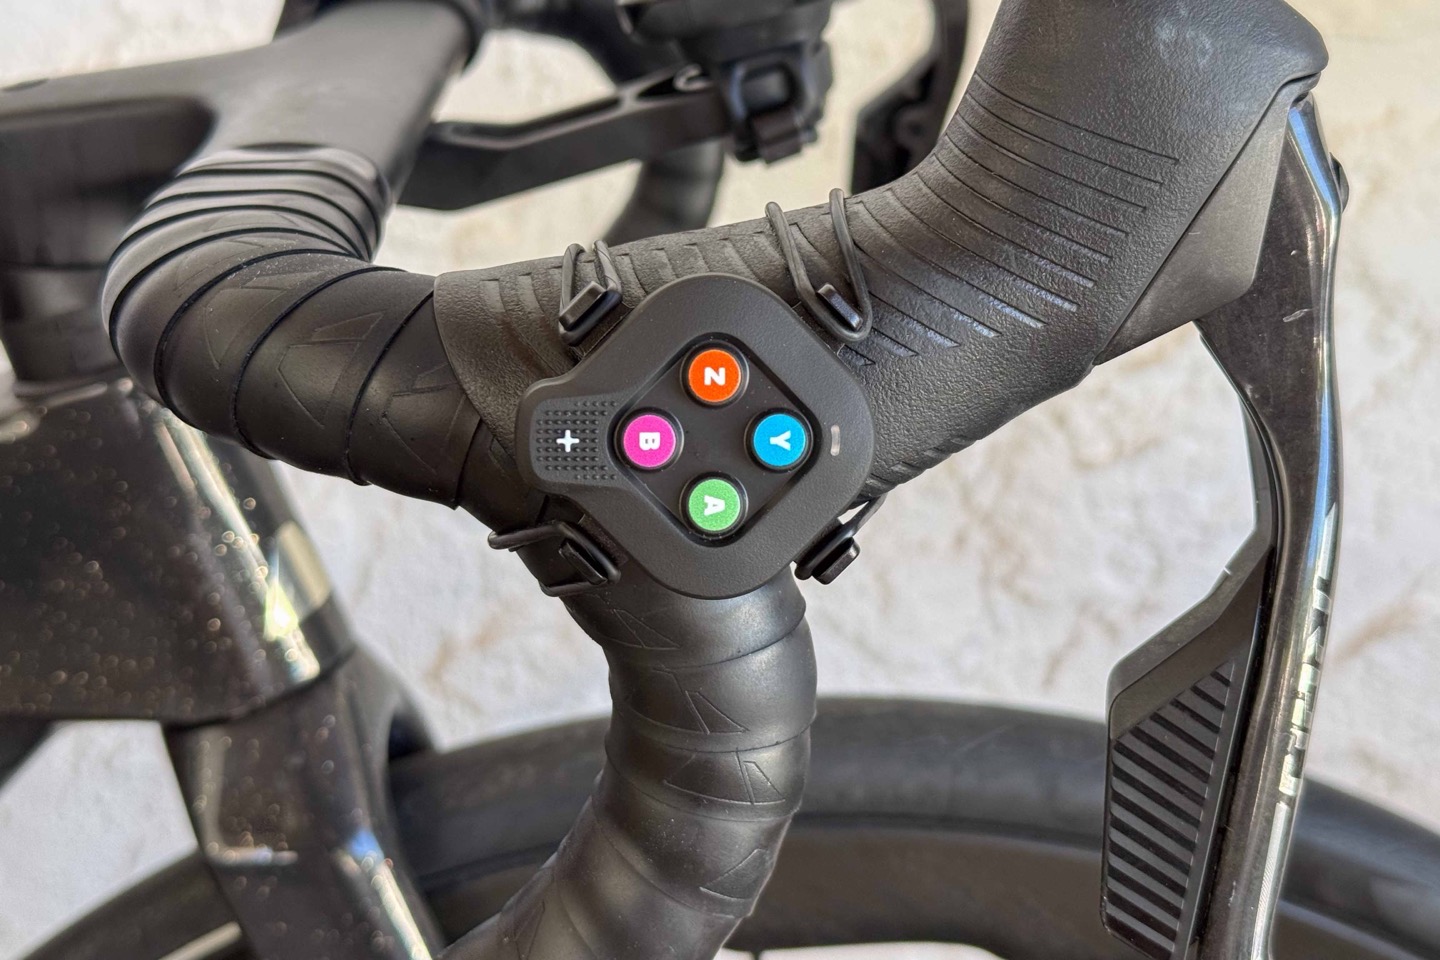
Instead, the virtual shifting piece happens entirely from the handlebars with the Zwift CLICKs, which control shifting between Zwift and the trainer. Thus, if you have the Zwift COG, now is a good time to install those CLICKs. There are a few different places you can stick them, which is entirely user preference. Generally speaking, the ‘best’ place is on the inside or outside of your handlebars, like so:

Or, the outside of the shifters:
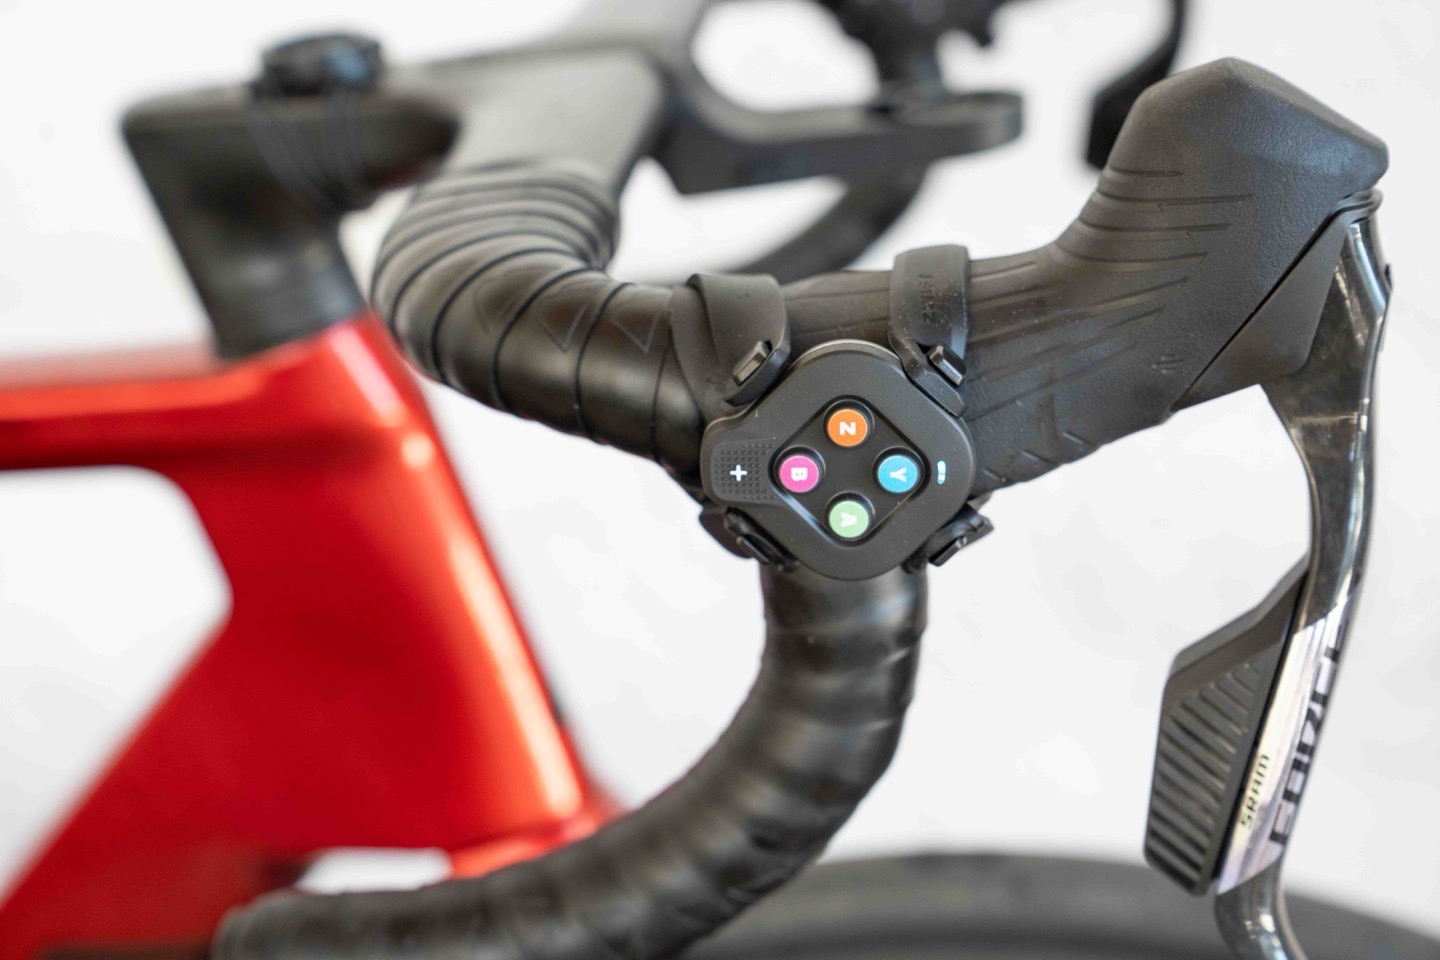
However, if I’m doing a structured workout where I won’t be shifting, but might want other controls, then the top bars might work better. My wife often puts them here on her rides.
As I noted in my Zwift CLICK V2 Review, overall these are great, though I find the bands absolutely suck (mostly from a taking on/off standpoint). Instead, I prefer to use the extra rubber bands that come with Garmin bike computers. You can buy a package of them here.
Meanwhile, if you have the cassette version, then none of this matters (ok, technically speaking, you can still use the Zwift CLICK just fine, though Zwift doesn’t offer just the CLICKs at this point, but you can use Zwift Play instead). Again, because the trainer has no idea whether or not you have a Zwift COG or physical cassette on there, it acts the same once you enable virtual shifting with the CLICKs.
With all that noted, we’d normally start riding. However, if this is your first time using the trainer, you’ll want to set up WiFi first, and then ensure that the firmware is updated. You’ll do that within the Wahoo Fitness app:


This is quick and easy, and then behind the scenes the trainer will automatically connect and check for new firmware every 11 hours, ensuring all is good. Likewise, you can turn on/off any smoothing settings here (I turn off ERG mode smoothing, which is on by default), as well as pair using the sensor bridging.
The idea behind sensor bridging is primarily for Apple TV, in that Apple TV is limited to two concurrent Bluetooth connections (+ the remote). So if you had a smart trainer, and then the Zwift CLICK, you’d be at your maximum and couldn’t also pair a heart rate strap. To solve that, the trainer will then pair to your heart rate sensor on its behalf, and funnel the data to Zwift (or any app) as part of that single cohesive trainer channel/connection. That channel can include power, cadence, heart rate, trainer control, and more.
To set it up, you’ll go into the sensor bridging menu, and then it’ll search for sensors it can pair with, both ANT+ & Bluetooth Smart (this is also useful if you have an older ANT+ only HR sensor). From there, you can pair them into the app:


Once that’s done, you’ll see the heart rate data channel, but coming from the Wahoo KICKR CORE, in your pairing menu:

Now, my experience with this in reality has been anything but smooth. I’ve had all assortment of failures here. On some rides, the heart rate doesn’t come through at all. On others it stops and hangs halfway, others it updates once per minute, and so on. Who knew it could fail so many ways? Below, notice the lack of HR in the upper left corner.

In talking to Wahoo, they haven’t seen any of these failures. Though I’ve seen them across two different trainers. In those discussions they noted that it may be tied to the secure channel aspect of the Garmin HRM-600. Both Garmin & Wahoo are required to implement secure Bluetooth connections under an EU directive. And as I’ve seen with countless vendors over the last year, whether or not these companies do that correctly can be iffy. Garmin has had this out for about a year now, though this is Wahoo’s first product with it. Wahoo says they’re working to figure out what’s going on, and I’m guessing they’ll solve it, but in the meantime, I’ve had to switch to an older heart rate strap that doesn’t have the Bluetooth security features (which to be clear, is totally fine, if my neighbor over the fence wants to creep on my HR, so be it).
So on Wahoo’s advice, I switched over to a less-smart heart rate strap, to try and side-step some of the cutting-edge tech issues, selecting the Polar H10. I got it paired up in the app easily:


However, back in Zwift, it was hanging yet again. You can see this below with the bike GPS showing the current HR (139bpm), and Zwift showing a stuck value (97bpm):

I then did what any toddler does, and randomly hit a bunch of buttons. Specifically, I selected from a slate of different options on the pairing screen, and after a bunch of clicking, the one that listed the Polar H10 (but with the trainer icon) did seem to hold. But all the other trainer icon ones in that HR section had various failure states (hang on connecting, shows null, shows stuck value, etc…).


In any case, I’m sure Wahoo will sort things out on these newer straps.
With that, open up whatever app it is you’re going to ride. I’ll talk about apps and connectivity and such down below in the next section. But for the purposes of this section, let’s just assume it’s Zwift. We’d pair up the trainer in the pairing screen. It’ll offer the recommended connection types, which can include ANT+, Bluetooth, and WiFi, depending on what’s configured/available.

Once that’s done, you’ll start riding. The trainer will automatically control the resistance based on what the app is sending. When it comes to smart trainers, there are really two core modes that you’ll be using:
ERG Mode: Setting a specific power level – i.e., 175w. In this mode, no matter what gearing you use, the trainer will simply stay at 175w (or whatever you set it to).
Simulation (SIM) Mode: Simulating a specific outdoor grade – i.e., 8% incline. In this mode, it’s just like outdoors in that you can change your gearing to make it easier or harder. Wattage is not hard-set, only incline levels. For a Wahoo KICKR CORE 2 configured with the Zwift Cog, this mode will officially *ONLY* work with Zwift, via the Zwift CLICK. Rouvy works today, but that could change at any moment. With a regular cassette, this works in any app.
In the case of simulation (aka slope) mode, the Wahoo KICKR can simulate from 0% to 16% incline – the same as the JetBlack Victory, but slightly less than some of Elite’s mid-range trainers at 18%. Tacx doesn’t have anything in this realm/price point you’d wish on your own worst enemy, all of which is horrifically outdated. In any case, while other higher-end trainers can simulate above 20% these days, I continue to question how many people actually want to ride such a gradient. When I’m outside doing any road rides with more than about 12% gradient, it just sucks – let alone 14%, 16%, and more. But a 24% incline? There’s just no reason I want to relive that scenario voluntarily indoors.
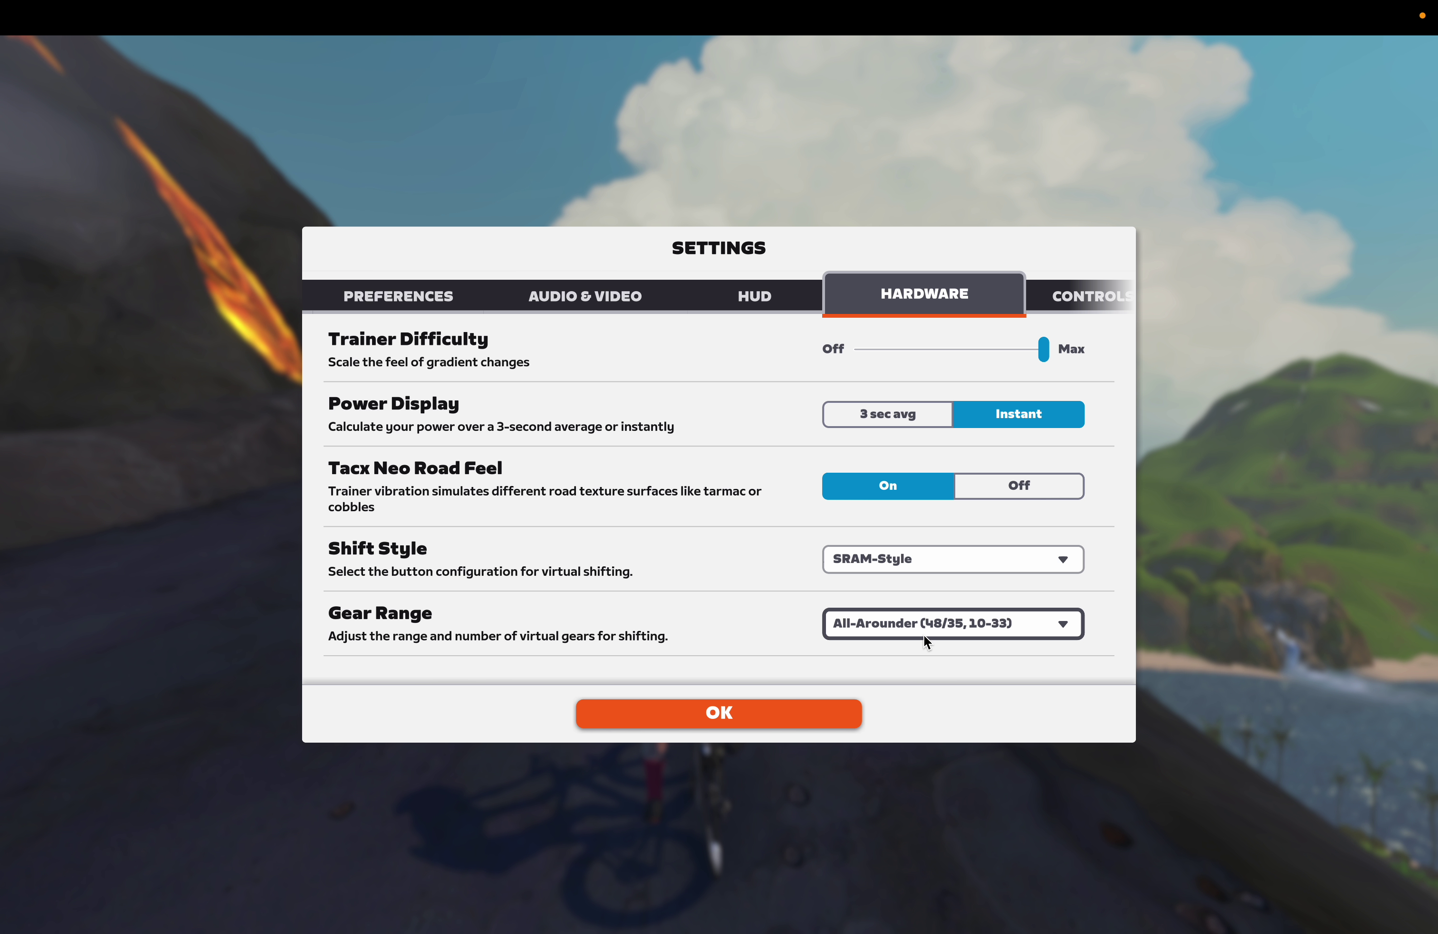
Next, most apps, Zwift included, have a ‘Trainer Difficulty’ setting. Note that by default Zwift will be set for 50% trainer difficulty level. This changes how the game simulates gradient. To understand what this means, assume you’re coming up on a 10% gradient climb, it’ll actually only feel like a 5% climb (if set for 50% trainer difficulty). This won’t impact your in-game speed (since that’s based on wattage), but does impact how the climb feels to your legs, and which specific gearing you’ll use.

I prefer setting it to 100%, since the whole point of buying a fancy trainer to simulate the outdoor rides is to actually feel those hills. But, that’s just me.
Now, to shift as you go up/down these hills, if you got the Zwift COG edition, then you’ll use the Zwift CLICK. This simply iterates through one continuous 24-speed virtual drivetrain. One tap makes it one increment harder, tap the other way, makes it easier. Pretty straightforward. You’ll see your current gear located in the upper left corner of Zwift – shown here in “Gear 17” or “Gear 2-8”:

With the CLICK V2, you can also configure it in a 2x configuration (two virtual chainrings up front), which is what I prefer, allowing me to shift similar to SRAM style shifting. You can change this in the menu as well:
Meanwhile, if you have a regular cassette, then you’ll simply use your bike’s shifters to shift. In many ways, I prefer this too. There’s absolutely nothing wrong with the Zwift CLICK buttons, but again, these manufacturers have spent all this effort to recreate the outdoor riding experience, and you as a consumer have spent money buying these products; why take away that experience by going to a non-realistic game controller button? Again, nothing wrong with the Zwift CLICK, and if you’ve got multiple bikes with different cassette types, it makes a ton of sense, but still, I like regular shifters.
In any case, as for road feel, the KICKR CORE 2 feels just like the KICKR CORE 1 did, which is perfectly good. The flywheel weight is enough to keep the inertia up, and my guess is that most people in a blind test wouldn’t be able to tell the difference between a KICKR CORE 2 and a KICKR V6. Likewise, in my testing of the JetBlack Victory, even with the smaller flywheel, I didn’t notice any difference there, because the flywheel weight is only one component, as differing gear ratios internal to the trainer can make the inertia feel substantially different.

As for sound, again, the same as before. It’s mostly silent/quiet, depending on exactly how clean your drive chain is, and that exact interaction with the cassette or Zwift COG. But the trainer itself isn’t making any meaningful amount of noise. 2012 this is not. Your fan will far out-volume the trainer itself.
Overall, the KICKR CORE 2 works pretty much exactly like the KICKR CORE 1 did, except it has a few more protocol bits behind it. But in terms of day-to-day riding, you won’t really notice those once paired up. However, those bits can be super important for users on Apple TV, or if you want Race Mode, and so on. So, let’s dig into them a bit more closely.
App/Connectivity Compatibility:

The Wahoo KICKR CORE 2 supports virtually all of the industry standards when it comes to smart trainers, across ANT+, Bluetooth Smart, WiFi, and more. This means that from a hardware standpoint, you can use the KICKR CORE 2 with any app out there. Though keep in mind if you have the Zwift COG edition, that’s a bit more limited in terms of apps that require shifting (simulation mode). But you can always switch the cassette later on.
The Wahoo KICKR CORE supports all the following technical standards:
ANT+ FE-C Control: This is for controlling the trainer via ANT+ from apps and head units, and includes power & cadence data. Read tons about it here.
ANT+ Power Meter Profile: This broadcasts as a standard ANT+ power meter, with cadence and speed data baked in.
Bluetooth Smart FTMS: This is the industry standard for apps controlling the trainer via Bluetooth Smart, and includes ANT+ power and cadence baked in. Additionally, with heart rate bridging, it’ll include that data too.
Bluetooth Smart Power Meter Profile: This broadcasts as a standard Bluetooth Smart power meter, with cadence and speed data baked in.
Wireless (WiFi) Direct Connect: This uses WiFi built-in, to apps on the same WiFi network, this includes power/speed/cadence/heart rate data, along with trainer control.
Zwift Protocol: This is the control protocol that Zwift uses to support Virtual Shifting, and other Zwift-specific features. This is used between the trainer and Zwift, to control the trainers resistance.
From a connectivity standpoint, it supports unlimited ANT+ connections, and supports three (3) concurrent Bluetooth connections. The three Bluetooth connections is useful if you have a watch (such an Apple/Polar/Suunto/COROS Watch) that connects to the trainer to read your power data for training load/recovery, and then you’ve got the Zwift app reading your data, this ensures that even if your phone is still randomly paired to the trainer behind the scenes, it doesn’t block any connections.
Additionally, as outlined in the earlier section, it supports bridging of sensor connections via the trainer, including heart rate.
Further, the KICKR CORE 2 supports so-called ‘Race Mode’, which means that it transmits your power data at a much higher rate than once/second. In Race Mode, it transmits at 10hz (10 times a second), when connected via WiFi or Bluetooth (Zwift only for Bluetooth). You can toggle this in the settings of the Wahoo app first, and you’ll simply notice it updates the number in Zwift far faster/continuously while riding.
In terms of compatibility with the KICKR CORE 2, I’ve used it with the following apps:
– Rouvy (regular cassette and SIM mode)
– TrainerRoad (ERG mode)
– Zwift (SIM & ERG mode, both Zwift COG & regular cassette)
– TrainingPeaks Virtual (regular cassette and SIM mode)
I haven’t had any issues with any of those apps in terms of connectivity and such. Here’s Rouvy:

I did have one issue worth mentioning: the resistance unit would ‘lock’ and stop changing resistance. Meaning, it would randomly stop changing the incline/gradient for the remainder of the ride, or until I pulled the power cord out for a second. This occurred in both Zwift & Rouvy. In talking with Wahoo a few weeks ago, they also discovered this bug about the same time I did. A fix for that actually went out yesterday in a firmware update. In my ride today, I didn’t see the issue, so hopefully it’s now solved for good.
With that, let’s dig into the power accuracy bits.
Power Accuracy:

At this point, I’ve got a bit over 1,000km of riding on the KICKR CORE 2 between my wife and me. Plenty of miles across plenty of different bikes, scenarios, and apps. I’m going to sprinkle a bunch of different data sets in here, though by and large they’re all basically the same in terms of accuracy/etc..
Now, it’s this entire section that led me down the path to buy a second unit from a random retailer to validate the accuracy. I did that because there were certain aspects about the media-loaner KICKR CORE 2 that Wahoo sent me, that caused me to substantially question whether or not the results were representative of what you, as consumers, would actually get. Specifically, the following items:
– Media Loaner Unit High Ride Mileage: The unit they sent me as a media loaner had some 262KM ridden on it (per the nifty odometer feature). Whereas the random retail unit I bought had a mere 0.82km (basically, automated tests). 262KM is an incredible amount of validation riding, which indicates it was heavily tested and/or calibrated to be absolutely perfect. Now, as often as people like to think companies cherry-pick reviewer units, for most product categories, that rarely matters (as history has shown, repeatedly). But for power meters and trainers, it can matter, because factory calibration (or lack thereof) is a very real factor – especially for budget/mid-range trainers where companies may do minimal factory validation, compared with higher-end units that typically get more extensive factory validation/QC. Whereas with a watch or bike computer, it’s almost always the software that sucks, not the hardware.
– Substantial hesitance/delays in getting initial unit to me: Despite early summer initial discussions on getting me a review unit far before launch to test, things kept sliding, repeatedly, with kinda odd excuses each time. Some of that was my travel, but most of it wasn’t. Ultimately, the unit only arrived on the day of launch…while I was traveling (though, kudos to them on getting it to my hotel). This is pretty unusual for Wahoo, and combined with other reviewers reporting early accuracy challenges, would seem to indicate some hesitance to get me a unit. Many companies are hesitant to send units until they know the product is solid, but this factor, combined with the others, is more notable.
– Every Launch Reviewer Had to Use Pro Spindown Calibration Tool: Almost every single reviewer for launch-day reviews across YouTube and various written publications noted having to use a secret ‘Pro Spindown’ option in order to get usable/accurate data. Given that the heavily tested unit that ultimately arrived for me didn’t require this, my assumption here was that Wahoo had already done it on this unit. While I have no problem with a trainer requiring some sort of calibration, this feature is basically hidden unless support tells you to use it. Thus a normal user without comparative data would have no idea if their unit was awesome accurate or sucky.
– Various readers reporting accuracy issues: A number of DCR readers had contacted me with accuracy issues on the CORE 2. Now, to be honest, I don’t really trust anyone except a very limited number of people to do accuracy testing correctly. I can count these people on one hand. And even more frankly, the vast majority of accuracy complaints I get are iffy at best. Still, some of these were pretty notable.
In any case, with all those factors above, I went to a random Spanish online 3rd-party retailer and ordered a KICKR CORE 2, which shipped later that same day, and arrived two days later. I’ve included both data sets in this review. Those dated October 30th and earlier are from the media loaner, and those dated October 31st and later are from the unit I bought.
Starting off first with a 30×30 trainer test that I do on all trainers. There are two parts to this test. The first is testing trainer responsiveness, as well as validating control of the flywheel inertia. The second piece is accuracy. Starting off on the first portion, which is how quickly it arrives at the set point, going from ~150w to 450w. The ideal timeframe here is 2-3 seconds. Doing it in 1 second is actually too fast, and is like hitting a brick wall. Whereas anything more than 4 seconds starts to eat into the interval time.

Above you can see the full set. On the first one, I wasn’t quite in the gearing that’s best for ERG mode. You ideally want one of the ‘easier’ gears in the back cassette (or, small ring in the front). Basically, you want to reduce the ‘speed’ of the flywheel to allow the trainer to have better control. Think of it like being on the highway at a reasonable speed, versus out of control.
In any case, if we look at the 5th interval, both my gearing is good, and my legs are getting used to the 30×30 piece (after yesterday’s dumb-idea hill repeats). So that’s the one I’ll judge it on. Here we can see it takes 2 seconds to arrive, and then more critically, it is nice and stable after that. Good job.

Next, looking at accuracy, no issues there. All three units (Wahoo KICKR CORE 2, SRAM Force crankset power meter, and Garmin Rally RS-210 power meter pedals) are within a spread of 1.5% (at worst). Good job.

It’s worthwhile mentioning that Wahoo says they’ve tweaked the power profile slightly on the KICKR CORE 2 to account for drivetrain losses. This means that normally you’d see about a 1-2% drivetrain loss in power from power meter pedals/cranksets, to a trainer (meaning, the trainer is lower). Whereas Wahoo has accounted for that in their algorithms. One can have an entire debate about this, but for now, it is what it is.
Here’s another ERG (structured) workout, this one with some 3-minute repeats, and you can see it’s exactly matching the Garmin Rally XC-210 power meter pedals:

And if I look at cadence for that particular workout, it’s spot-on as well (all of them were spot-on for cadence):

Next, another ERG workout, this one from my wife for about 90 minutes, against her Quarq/SRAM RED power meter, without any issues, spot-on across the board.

And here’s another ERG workout of mine, again, without issue.

I will note that on one of the bikes I was on, I had a SRAM/Quarq unit that seems to be reading (consistently) high. I’ve left it off these sets while I figure out what’s going on there. But for these comparisons, I’ve got multiple bikes and multiple different power meter pedal sets I’ve been mixing and matching.
Next, turning our attention to SIM mode (simulation mode), where you’re shifting, rather than a set power wattage. Here’s a first example on Zwift, and as you can see, again, without any issue. This is on a different bike with different pedals and a different crankset. All are very close, and within the +/- 2% margin of error:

If I look at a few sprints, it’s near spot-on as well. Keeping in mind it’s virtually impossible to get three power meters to agree on a single 1-second value at the top of a sprint. In most cases, doing so is just dumb luck, due to the differences in transmission and recording rates (again, an entire topic you can spend hours on).

But you can see these are very close:

Here’s the mean-max plot for that particular ride:

Switching to another ride, here we can see all three are within the 2% again. That Fenix 8 one is the Rally RS-210. Notably, the KICKR CORE 2 is just a couple of watts lower here. That’s actually where I’d normally expect it, setting aside Wahoo saying they slightly adjust/inflate the power to account for drivetrain losses.

And finally, another ride, this one on Rouvy (cassette in SIM mode), on a bit of a rolling course.

Again, seeing this particular bike’s SRAM unit reporting a touch bit high (maybe 1-1.5%), but otherwise the CORE 2 and Rally pedals agree spot-on.
The point is, despite going out and buying another KICKR CORE 2, I don’t see any differences in accuracy between either unit. They’re performing identically. Overall, I’m happy with the accuracy on both the media loaner CORE 2, and more importantly, the one I bought from a random retailer.
(Note: All of the charts in these accuracy sections were created using the DCR Analyzer tool. It allows you to compare power meters/trainers, heart rate, cadence, speed/pace, GPS tracks, and plenty more. You can use it as well for your own gadget comparisons, more details here.)
Wrap-Up:

The KICKR CORE 2 is almost entirely about keeping the trainer competitive, without having to make major changes. It ultimately boils down to a new electronics stack and some new legs. Which isn’t to say those aren’t appreciated, because they are. And in fact, as I’ll touch on in a second – I don’t need some fancy new physical design on a mid-range trainer just to jack up the price. In this case, Wahoo delivered on the handful of things people wanted. Things that made it easier to use the KICKR CORE day to day, and ensured it kept up with technology. For the most part, smart trainers are a very mature product category – and this shows that.
From an accuracy standpoint, despite my initial concerns (and buying a second unit), both units have ended up being spot-on, as-is. Across multiple bikes, multiple riders, multiple apps, and multiple trainer modes, it’s been consistently accurate at all assortments of power levels.
In terms of issues, about the only remaining issue for me is the heart rate sensor bridging. This wasn’t available to reviewers (or anyone) when the KICKR CORE 2 first launched, as they noted they were still working on it. At this point, for me, on both two different units with two different heart rate straps and brands, I’m still seeing everything from non-functionality to weird quirks. Hopefully, they can sort that out, though practically speaking, that would only impact you if using Apple TV. Setting that aside, everything else is working quite nicely for me.
Looking at pricing, this will be an interesting product to see where it lands. Right now it’s priced at $549, which is higher than most other similar-spec’d competitors. But equally, just two weeks ago Wahoo already had the KICKR CORE 2 down to $439 (20% off). Which is a fantastic price, and very competitive (well, more than competitive). I get the impression here that the $549 price is leaving a lot of room for future price shifts and sales. Which is good for consumers. After all, the KICKR CORE 1 basically sat in the $400-$499ish range the last few years. And from a manufacturing/components standpoint, this thing is nearly identical to the CORE 1.
In any case, I’ve got no problems recommending the KICKR CORE 2; the core functionality has worked well for both my wife and me, and the ride feel is what people expect from a Wahoo trainer.
With that, thanks for reading!
Found This Post Useful? Support The Site!
Hopefully you found this review/post useful. At the end of the day, I’m an athlete just like you looking for the most detail possible on a new purchase – so my review is written from the standpoint of how I used the device. The reviews generally take a lot of hours to put together, so it’s a fair bit of work (and labor of love). As you probably noticed by looking below, I also take time to answer all the questions posted in the comments – and there’s quite a bit of detail in there as well.
If you're shopping for the Wahoo KICKR CORE 2 (Zwift COG/CLICK) or any other accessory items, please consider using the affiliate links below! As an Amazon Associate I earn from qualifying purchases. It doesn’t cost you anything extra, but your purchases help support this website a lot.

Here's a few other variants or sibling products that are worth considering:
Wahoo KICKR CORE 2 (11sp Cassette)

And of course – you can always sign-up to be a DCR Supporter! That gets you an ad-free DCR, access to the DCR Shed Talkin' video series packed with behind the scenes tidbits...and it also makes you awesome. And being awesome is what it’s all about!
Thanks for reading! And as always, feel free to post comments or questions in the comments section below, I’ll be happy to try and answer them as quickly as possible. And lastly, if you felt this review was useful – I always appreciate feedback in the comments below. Thanks!


You’ve put boat loads of hours on them, but not a single mile.
The built-in odometer feature would disagree. ;)
Hi Ray,
thanks for another insightful review. One question not directly related to the trainer: what sort of table are you using as a support for your computer (in some of the pictures with your wife)?
Hello! It’s just this cheap $25 projector stand: link to amzn.to
We got two of them last year, since I didn’t want to re-purchase the trainer desks I have a fleet of back in Amsterdam (but hadn’t yet moved to Spain).
Surprisingly, they’ve actually worked great for holding laptops. Not a lot of room for holding much else (laptop+phone is about all that fits). But it’s reasonably sturdy. The one thing to note is that these are pretty well ‘proteced’ in that they’re kinda wedged up against the bike/wall/table in front. So bascially, nobody is going to walk past it and trip on/over it, causing the laptop to fly. Whereas in a more open scenario, you might want something a bit more resilliant.
But yeah, works great!
Thank you for that tip ;) I am currently looking for something small and compact that would fit into my little pain cave and those dedicated trainer tables seem to be overkill for me.
Thanks once again!
Best, b
Nice write up. I’ve had the trainer myself for a month putting some 370kms on it. I noticed a couple early day dropouts where it or Zwift had a problem keeping the connection and I’ve experimented with ANT+ dongle, phone pairing, direct BT, and so far native laptop BT has been working fine.
I haven’t noticed any HR issues and maybe I ‘cheat’ by pairing my Garmin 965 directly to Zwift as well in broadcast mode.
I have noticed however that the built in cadence sensor doesn’t always like to pair, but this seems to have gotten better as well. I try to pair with Zwift before pairing with my Edge, but I’ve never had an issue picking up the cadence there (though I get the ‘unmodified by Zwift data’ there too).
I previously had the original direct drive wahoo trainer and this feels like an upgrade through and through. I wasn’t prepared to spend upwards of $2K for power levels and hills that I’ll never see. They’ve really captured the market I think with this and incorporating the Zwift cog. I have an 11 speed and 12 speed bike that I swap between, and one is quick release and the other is thru-axel so I lol’d at the piece falling off and rolling under something – it’s done that plenty. But no other trainer would allow me to switch bikes so easily (it’s relatively under a min to change all of that).
Yeah, in that case if you’re direct pairing the HR side, it’s shortcutting past the Bridging feature.
Cheers!
Any chance of a trainer software roundup? Would really like a non-subscription option… miss some of the older ones that no longer work on newer ios devices.
“Chance”? Yes, a chance.
Or, more accurately in the words of Dumb & Dumber: link to youtube.com
Regarding accuracy. Mine V2 is quite bad. The difference with Assioma Duo’s is 8% with C2 underreporting in Zwift (182W vs 197W) and difference grows with higher power. I gave up on V2 power and just stick to what my pedals are showing 🤷🏻♂️
You sure that ain’t drivetrain loss?
Mine is similar in comparison to my Assioma’s. Frustrating
That would be huge for freshly lubricated chain running over Zwift cog. There’s nowhere to loose those 15+ watts with the super straight chain line. I’d say that it’s a problem on V2 side 😔
“[…] who were undercutting Wahoo (namely JetBlack and to a lesser degree Elite), adding in Wahoo & Race Mode, but not having the global reach of Wahoo (in terms of support/distributors/etc…).”
I guess you meant “adding in WiFi and Race Mode” 😊
Just too many Wahoos in that sentence…
Good catch!
Question: as someone who uses a PC for Zwift, is there any pro (or con) to using the Core 2 bridge vs going via Ant or Bluetooth to PC for heart rate? I’m also curious to test if I can now use my Fitbit Charge 6 for heart rate – it never worked before with Zwift because it also sends data encrypted, but maybe the Core 2 bridge could decrypt it on behalf of Zwift. (Once Wahoo squashes bridge bugs)
In theory Wahoo will accept the secure BT channel. But whether or not both Wahoo & Fitbit properly implemented things is the real question.
I was thinking about it the other day, the whole encrypted thing is kinda like having to people learning Swahili for about a week, and then without an instructor, telling them to go off and try to negoiate a real estate transaction. It’s probably not going to end well.
Eventually all of these companies will figure this out, but it’s gonna probably be a few more years of pain. Which isn’t to blame Wahoo (or Fitibit, or Garmin), but more some of the spec pieces (and the complexity of it).
Thanks for the comments, and also for all the effort on this review!
It’s genuinely weird to me how competition in the smart trainer space continues to push down prices while improving specs while in the actual bike market, accessory market and in the bike apparel market, prices only ever seem to stagnate or even drift upwards.
Smart trainers are still a relatively new / niche technology and with any new and niche technology as it gets more popular the prices go down. Don’t forgot the early smart trainers were well over $1000 if I recall.
Has or lost Control w/ ANT+ power meter feature?
Unfortunatelly it seems the feature is lost. :(
Mine is similar in comparison to my Assioma’s. Frustrating
Does the “Race Mode” actually make a difference? I’m looking at upgrading from the Core 1 just for that reason. But if it doesn’t react faster/better, might not be worth it. I’m looking specifficaly for racing or high power sprints.
It depends on who ask. If you ask me, as someone who rides Zwift, does structured workouts, casual rides, etc… then nope, not one bit. Sure, in theory the avatar would respond faster to a sprint, but in practice, most wouldn’t notice it
Now, if you ask someone who is racing very competitively and can sprint to attack and win the race, then certainly, that split-second difference might matter.
Is there any reason to not just leave it in Race Mode all the time?
No reason, just leave it in Race Mode forever. :)
I found that the Zwift click – whatever version – is simply not that smooth w a SRAM flattop chain. Shimano stuff works great and you can really dial it in.
But SRAM red or perhaps it’s just the flat top chain make the riding experience rough and I just couldn’t deal with that level of friction and non-smoothness.
I assume you’re talking about the Cog (click goes on your handlebar)?
Which version did you have? The one that lets you adjust it, or the static one?
Certainly, as noted above, some people have different smoothness/noise preferences, but on the whole, very few people notice the difference with the slight differences in roller diameter of the flatop versus non.
Sorry! I meant the Cog. I actually got the Kickr Core 2 and it just wasn’t smooth. I tried with the micro adjustments but I just couldn’t get the friction to stop. I realize everyone is different but for me it just wasn’t something I could deal with from October thru April every year.
I have also read some stuff about chain wear but I was more concerned about the roughness of the ride.
I had big accuracy issues with my Core 1 already (showing 30W less) and that was only last year, when I had to replace my good old Neo. Only after a while found that “secret spindown” instruction on the internet, but you always have a bad feeling when you have to adjust a trainer at home. Bought a Kickr 6 then and never looked back.
With current pricing would you go with the Core 2 or newest Kickr V6 if upgrading from an 11 year old Kickr? Wish I could buy the V6 with the cog as don’t have anything running 11 speed.
Feels like with that 20% discount on the Core 2 earlier maybe that will Black Friday too so waiting might be a good plan.
Came to ask same question. $440US for Core v2 vs $787US for Kickr v6 right now..
Honestly, that’s a tough question.
Yes, the V6 has ‘better’ inertia with it, and some people will notice, and others won’t. It also has the ability to connect Wired ethernet, in the event both WiFi & BT/ANT+ is somehow bad at your house (in which case, i would have burned the place down long before that). Finally, it has barely noticeable movement in it (you’ll get more movement out of a trainer mat, as I showed in my video).
But beyond that, there’s very little the V6 can do that CORE 2 can’t. Though, it does have a handle, and I very much like the handle.
I went from a 2016 Kickr 1st gen direct drive to the Core 2. It’s obviously a lot more light weight but I haven’t seen any stability issues and it doesn’t take up any extra room than I previously gave it. Also when I first bought my gen 1 it was a similar price point to the Core 2. I couldn’t see spending that kind of money for features I wouldn’t really get a benefit out of.
The cog works very well and I switch between an 11 speed and 12 speed bike pretty easily.
For ATV users, would if be possible to use one BT connection for HR and the other connection for the Kickr Core V2 taking care of power, cadence and Cog’n’click duties?
Just a thought (or prayer) as someone who struggles with the Companion App bridging and randomly disconnecting!
Yup, that’s the theory.
For what it’s worth, my wife and I each I bought one of these to handle Apple TV connectivity quirks. What we do is use the Bridge feature of the trainer to connect to our HR straps, and then use WiFi from the trainer to the Apple TV (for trainer power, control, cadence, and HR). Then the only slot needed for Bluetooth on the Apple TV is the Click controllers. This leaves a slot free for Airpods or whatever else and works really well.
Thanks Ray, going to keep an eye out for Core2 deals over the next week or so, not seeing that $440 USD velominati talked about at the mo.
Means new connections for the rockr plate, but I think my 11 year old Kickr is due an upgrade (yay Thru axles) and noise downgrade.
Ive had issues with non responsive hrm. Changed batteries, changed monitors (older cateye & garmin). Never thought it was the trainer. Truly appreciate your reviews!
Hi Rai thanks for your review, as you are my go to sports tech and cycling, I’d thought I ask you, or maybe one of you guys can help me.
I bought the trainer, got erg mode and I’ll be working on the wahoo app, but after a Sprint, I find the resistance goes down to 0 so the wheel and my pedals just free spin for a bit, putting 0 watts for a little and I have to cycle and try to find a cadence that has resistance. Is it me doing something wrong or is my unit faulty?
Other than that, I take my time here to thank you for your reviews and hindsights.
I also found it strange that you say you normally just use a watch for heart rate but for the review you used a band..
What are the “disadvantages” of using the included 11 speed cassette if you have a 12 speed bike? I already spent almost $500 on this I don’t want to spend more if there won’t even be much of a difference if I just use it as it came.
You won’t be able to shift properly. Basically, the gears won’t line up, so roughly 10 out of your 12 gears will make loud sounds, skip shifting, drop down gears randomly, etc…
Now, the one exception is ERG mode, that will work just fine, once you find a gear that doesn’t skip/shift.
Understood. Thanks for the prompt response!
Hi Ray,
Thanks for review :)
Which of those 2 would you recomend: Elite Avanti or Wahoo Kickr Core 2 if the price is the same?
This would be my 1st trainer and I’m a bit concerned about 4kg flywheel in Avanti. On the other hand, I’m worrid that Core might be ‘too rigid’ without any flexy feet like the ones Avanti has… I don’t know what would be bigger disadventage.
My wife and I each bought one of these at the end of October, and they’ve been feeling great to ride, but one of them has developed an odd occasional vibration and is showing a bunch of silver residue on the belt and wear on the tensioner roller. Makes me think I’ve got a bearing problem in the tensioner roller.
I’ve got a case open with Wahoo, and they asked for a video of the problem, and now I’m waiting to hear back. It’s a busy time of year so I understand a bit of a delay, but it’s still annoying to have problems with a brand new trainer.
I wrote up a bit of the problem over here at Reddit, if any of you are interested: link to reddit.com
Fingers crossed Wahoo gets back to me soon and gets the unit sorted out. We’re just getting into serious winter here in the northern Midwest US and I’d really like to have a dependable trainer.
how does one access the pro spindown calibration tool?
It requires Wahoo support to send you an app link.
Hello! I am currently dealing with a knee injury that prevents me from running, but I discovered this summer and fall that riding my road bike doesn’t hurt it at all. Now I’d like to continue riding indoors, and think Zwift might be a lot of fun to try. So I wondered if you could answer two questions about the Core 2 …
– My 15-year-old Bianchi road bike has a 9-speed rear cassette, and I’m not interested in replacing the bike or any components in the near term. I assume that means I should probably just go with the Zwift cog. Right?
– I no longer have a HR strap and have happily relied on my Apple Watch for years. Is that going to work with the Core/Zwift setup if I try to use AppleTV? If I use my laptop instead (or iPhone/iPad) will it make any difference for support?
Thank you as always for such a great writeup.
The Cog is just a cassette with a single gear. You don’t need to use it, even if you’re using virtual shifting. But if all you’re going to do is Zwift or erg mode, it works fine. I have a Cog on my TACX Neo 2. It’ll save you the trouble of finding a 9 speed cassette.
The big problem is that the Apple TV only allows a limited number of Bluetooth connections, so that’s why people have trouble. I normally run Zwift on either my MacBook Air or my iPad mini, both of which allow multiple Bluetooth connections, so I have no trouble doing the 5 Bluetooth connections I normally use. The Zwift app has an Apple Watch component, the purpose of which seems to be to provide HR. I have a HR belt, so I’ve never even tried using it. All of the apps I’ve tried that claim to allow HR broadcast from an Apple Watch don’t actually work, so I don’t know if this one will.
Thanks, Paul. I have ordered a JetBlack Victory, which seems like a similar setup. I’ll see how the Apple TV/Watch thing goes and adjust accordingly. I appreciate the reply!
Hi,
It looks like the option to drive resistance in erg mode with an external ANT+ pwoermeter is gone from the wahoo app. Do you have any info about it?
Will the Zwift Clicks work without using the Zwift app? I don’t ride on Zwift — I only use my Garmin Edge to control the trainer. This works fine with a regular cassette and shifting on my old Wahoo KICKR, but will it work with the Zwift Cog? Can I use the buttons to change the trainer’s resistance/virtual gears? Thank you!
No, Zwift Clicks need the Zwift app (or, a handful of apps like Rouvy that are doing various workarounds with various success levels).
So without the app running, the buttons are basically just farting into the wind, with no tangible changes in resistance.
This would be my first smart trainer and I was wondering if there is any meaningful reason to buy this one over the Core 1. I am asking because the Core 2 is not currently in my country and I would have to order it online, pay custom fees, etc. Training for a half Ironman so planning to use it with Rouvy, Zwift, etc.
For most people, the answer will be no. I’d say check out that ‘What’s new’ section, and see if there’s anything in there that you absolutely need. About the only item in there that might be required for some is if you use Apple TV and then want to also use multiple Bluetooth accessories, this helps side-step that limitation.
Thanks Ray.
IMPORTANT NOTE: BLE (Bluetooth 4.0) is essential for CORE 2 and Zwift Cog/Click
After much trial and error I discovered that the computer running Zwift MUST be running BLE (Bluetooth v4) despite the fact that the computer appears to connect to CORE 2 KICKR BRIDGE over wifi.
This requirement does not seem to be listed in the KICKR CORE 2 documentation anywhere, the Click v2 packaging or Zwift website.
It seems that Zwift discovers devices (click v2, HR monitor) via Bluetooth and then somehow ‘hands over’ the connection to the KICKR bridge. Zwift also seems to use BLE to wake up the CORE 2 if it was powered on before Zwift started.
If your computer doesn’t have the correct version of Bluetooth you can actually force the click v2 to connect via the Companion app (using a phone with BLE) – but this is a bit hit and miss and needs to be done on every start up.
If you are using an old PC to run Zwift with a Bluetooth dongle you may well hit this problem
What is the optimum / most easy way of connecting it to Apple TV with a cospoo HRM or using Fenix 7x pro on hr broadcast. Currently I’m using my phone and the companion app as a bridge.