In a three-week period packed with an absurd amount of not just new product announcements, but highly complex products, I appreciate the simplicity that the Zwift Click V2 brings. But more than that, I appreciate the pricing. A mere $49 for not just the new Zwift Clicks, but also the entire Zwift Cog + Freehub adapter too. But, we’re getting ahead of ourselves.
The new Zwift Clicks take the popular Click V1, and adds the core features of the Zwift Play controllers. Oh, and it doubled from a single-button click to two Clicks. Twins! This new variant includes the ability to navigate within game menus, do things like drop burritos, and even use SRAM-style shifting and steering. All in a package that’s smaller, more versatile, and far cheaper. Further, it becomes the de facto Click version bundled with new trainers. For example, the recently announced Elite Rivo will include the new Click V2 edition as it begins shipping here shortly.
As usual, I’ve been putting this new version to the test, alongside my wife, who has also been testing it. So, let’s get into it.
In the Box:

The box contents are simple here, including the two Clicks themselves, four bands to attach them to your handlebars, and then two little rubber mounting plates (to keep them from sliding around, depending on your bar type). Further, there’s a piece or paper or two that you (or I) won’t bother to read.

Here’s a closer look at things:

Got all that? Good, like I said – this is not complicated.
A Quick Comparison:
Just for completeness, and because everyone likes more sections in a review, here’s how the new Clicks compare to the existing single-pod Click, as well as the larger Zwift Play controllers:

See, I told you this section was quick.
Mounting Them:

One of the advantages of the original Click over the Play controllers was that you could kinda mount it wherever you wanted. Meaning, it worked for road bikes, triathlon bike aerobars, mountain bikes, cargo bikes, and gravel bikes. It did, however, fail at unicycles. Sigh.
The same applies here with the Zwift Click V2, except now with twice as many things to mount. Starting with the road/gravel bike, you have three common positions. First, is on the upper portion of the handlebars:

Then, you can do it in my preferred position, on the inside of the shifters:


Or, the outside of the shifters:

Got a triathlon bike? No problem, you can mount it to the aerobars:

And an MTB bike? Stick it on the handlebars wherever the heck you want (Zwift’s image combines it with the TT image, so you can see another TT placement below):

Now, I will say, I have one complaint about the new Clicks, notably, the rubber straps. They suck. It’s as if Zwift looked at all the bike computer mounts that have been using industrial-strength rubber bands for the past 16 years without issue, and said, “Nah, let’s throw that away and make this fugly, cumbersome, and annoying AF.”

Or perhaps they saw equally annoying band-design inspiration from Garmin’s new top-tube MTB Edge mount, and decided to double down on it, with four straps worth.
First off, unlike a simple rubber band, this has less elasticity, and thus, you have to find the right hole. No biggie, except then said hole leaves some amount of leftover length just flapping about in the breeze:


So, you need to solve that by re-hooking that back onto itself, but of course doing so often under the edge of your handlebars, and with very little room to spare (and, it seems to frequently pop back out again). But even better, you get to do this four times (twice for each pod). What’s more fun, is that unlike a bike computer mount that stays there for years mostly untouched, you’ll get to do this every time you put your bike back on your trainer when coming from an outside ride. Woot!
Look, just go to Amazon and buy the pack of 2,938 Garmin rubber bands for $9. This solves all your life’s problems:

See, much better!
In-Game Usage:

Ok, with all that Zwift strap/band bondage sorted, let’s start playing games with it.
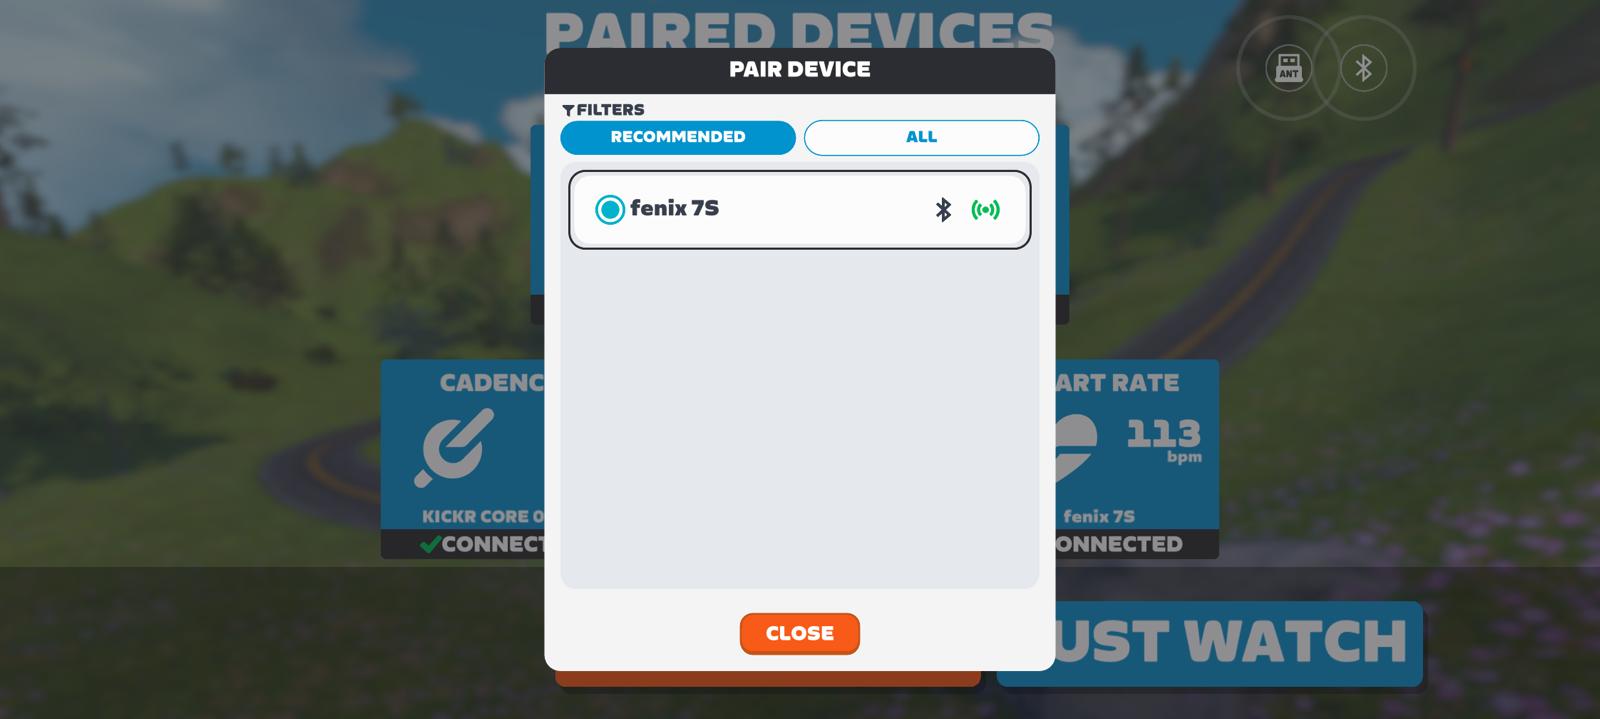
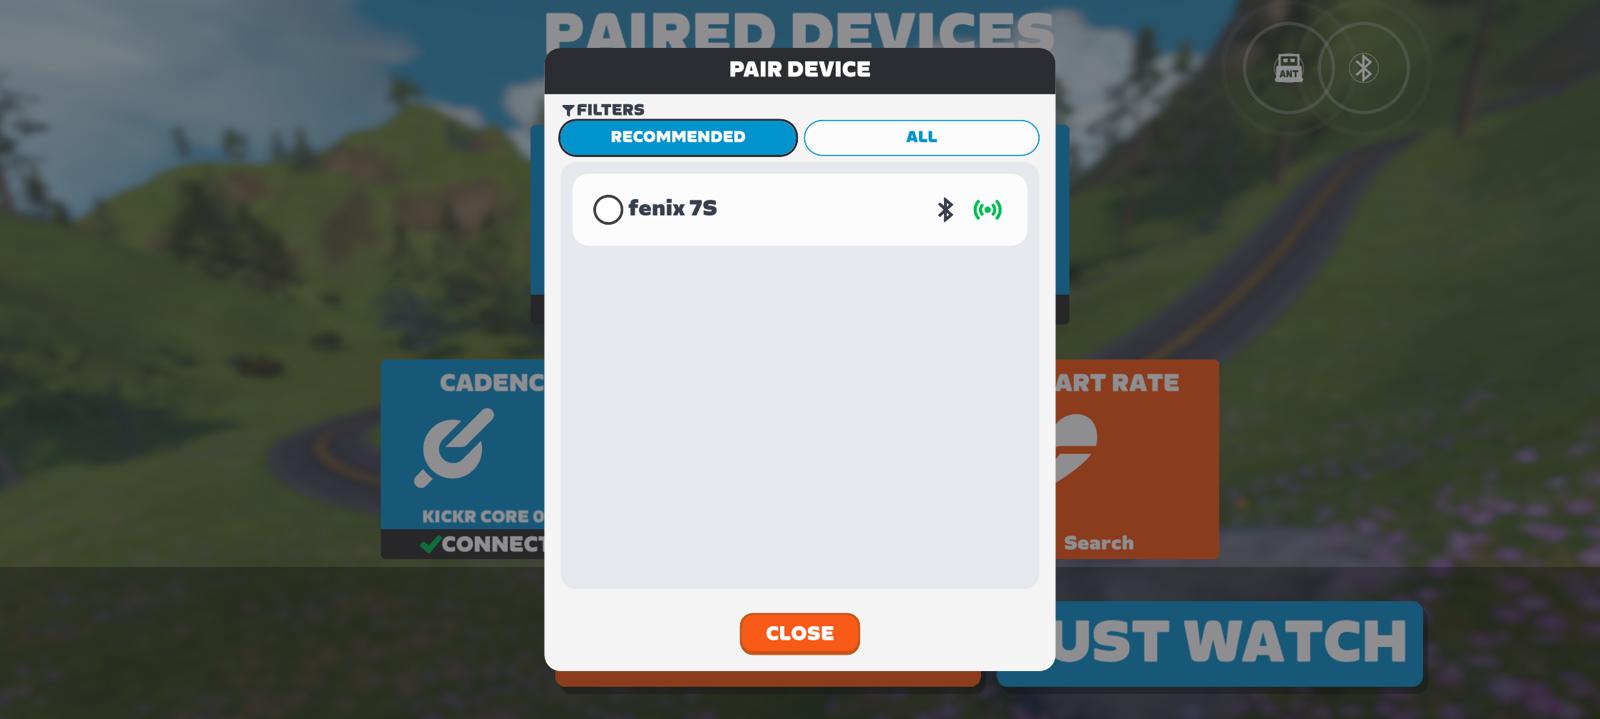
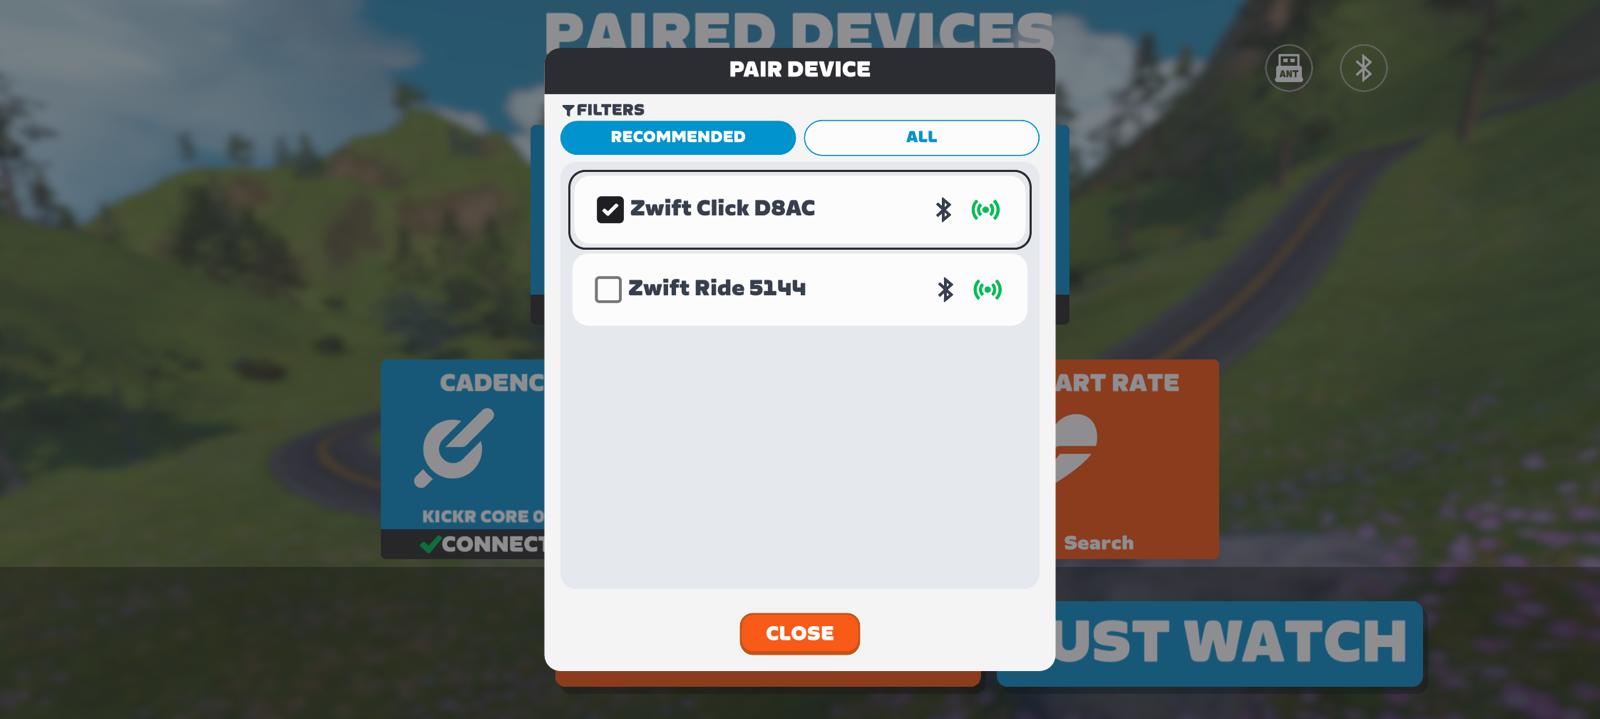
First up, you’ll need to pair it from the pairing menu like usual. While Zwift does have a new pairing screen coming later this fall (probably in about a week or two), that’s not there today. That new screen cleans things up a bit on the pairing pieces:
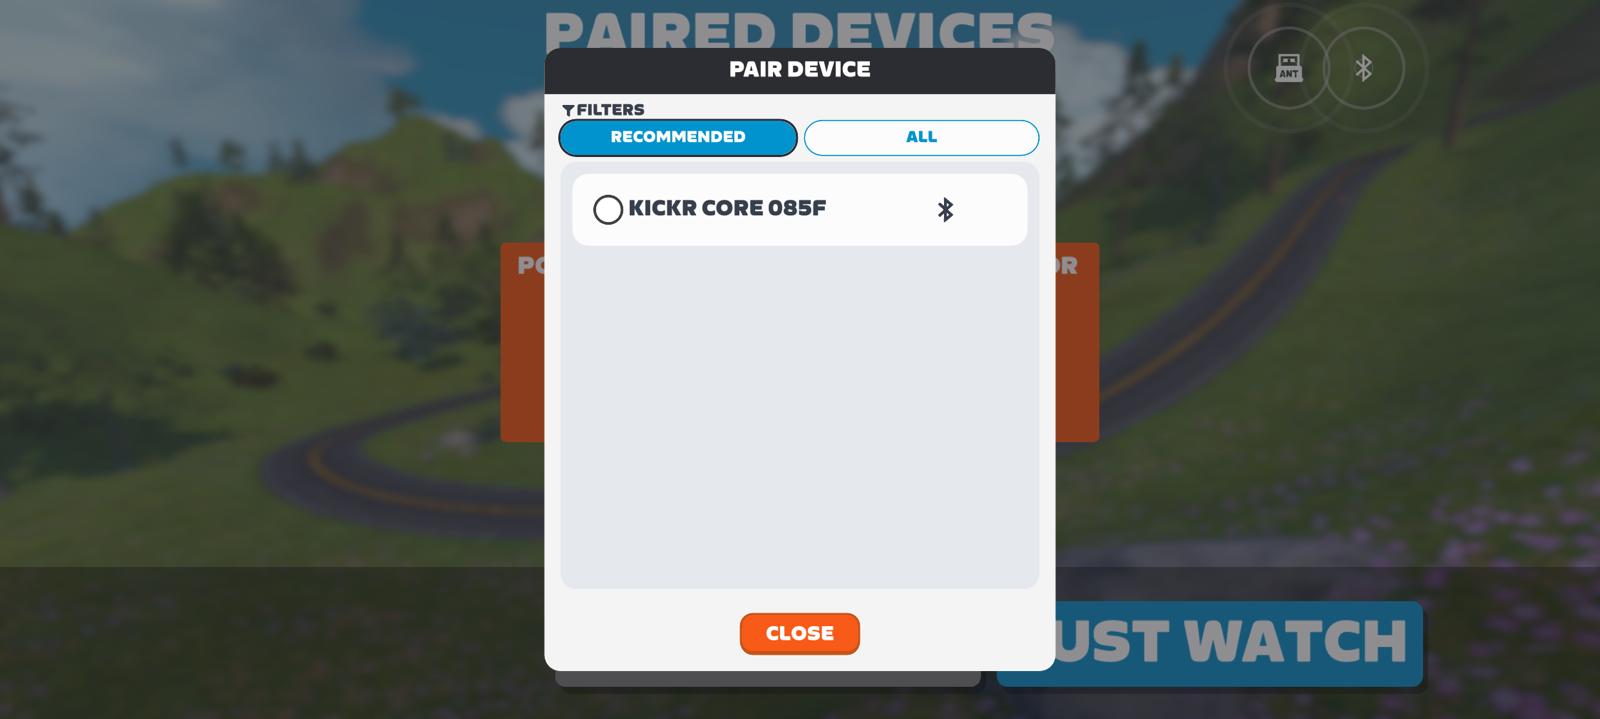
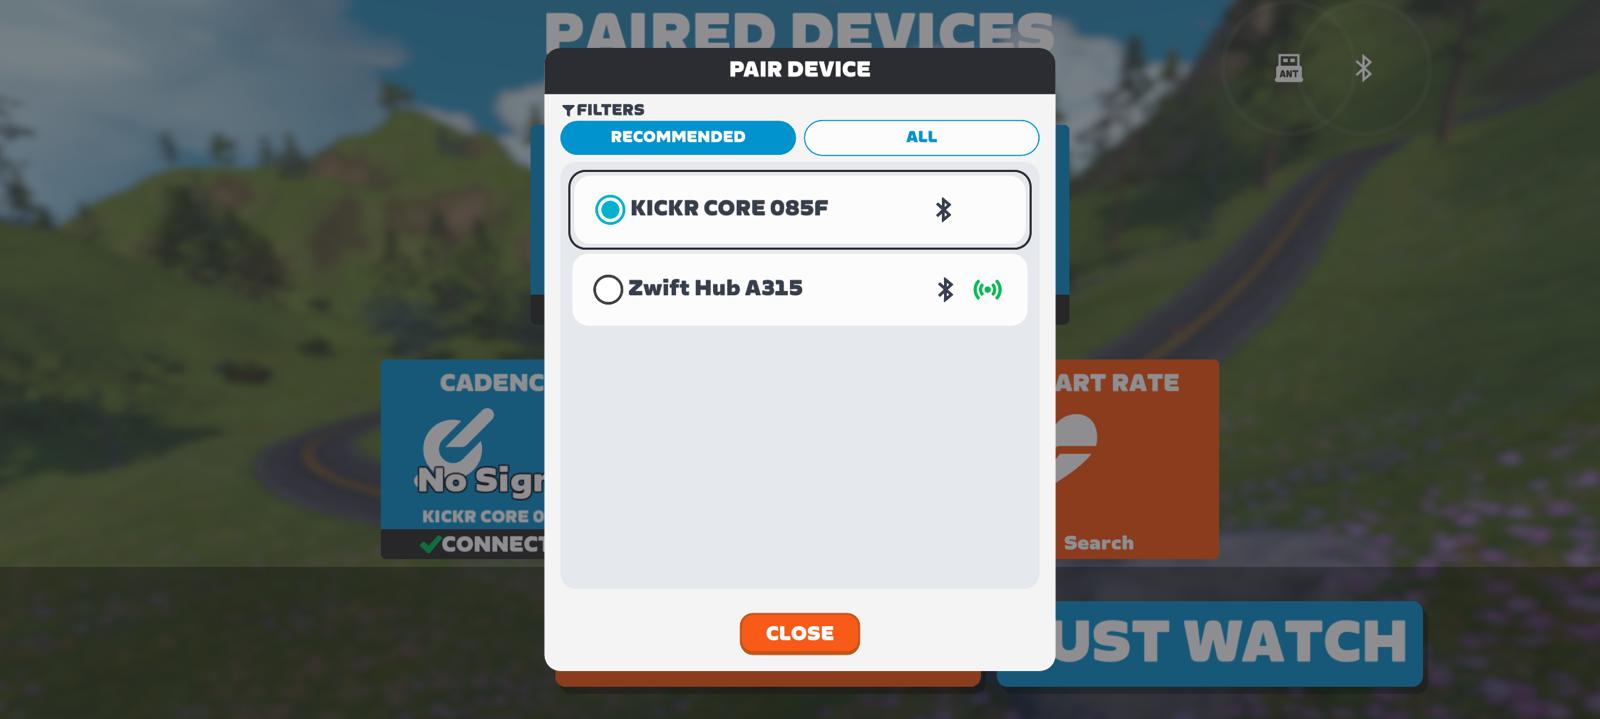
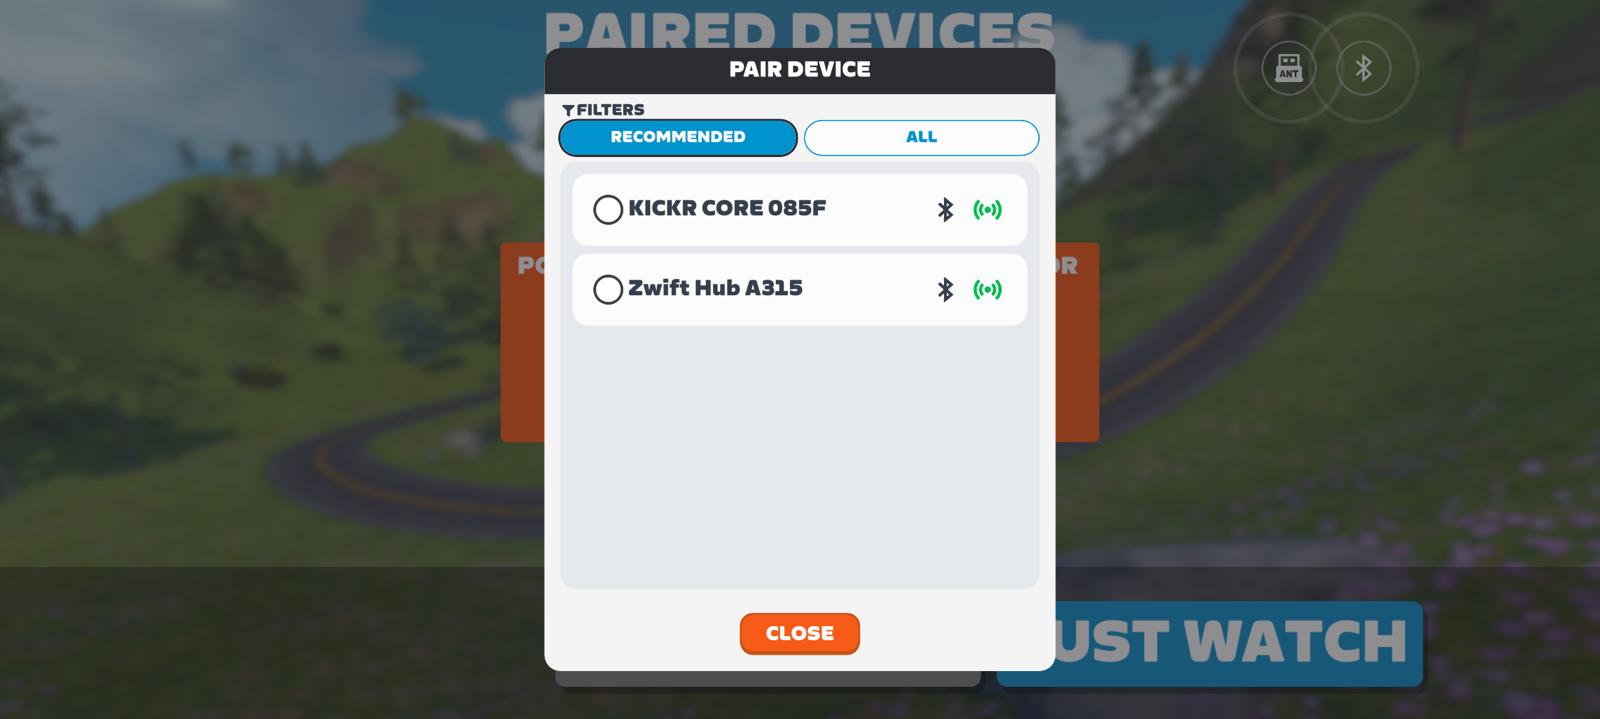
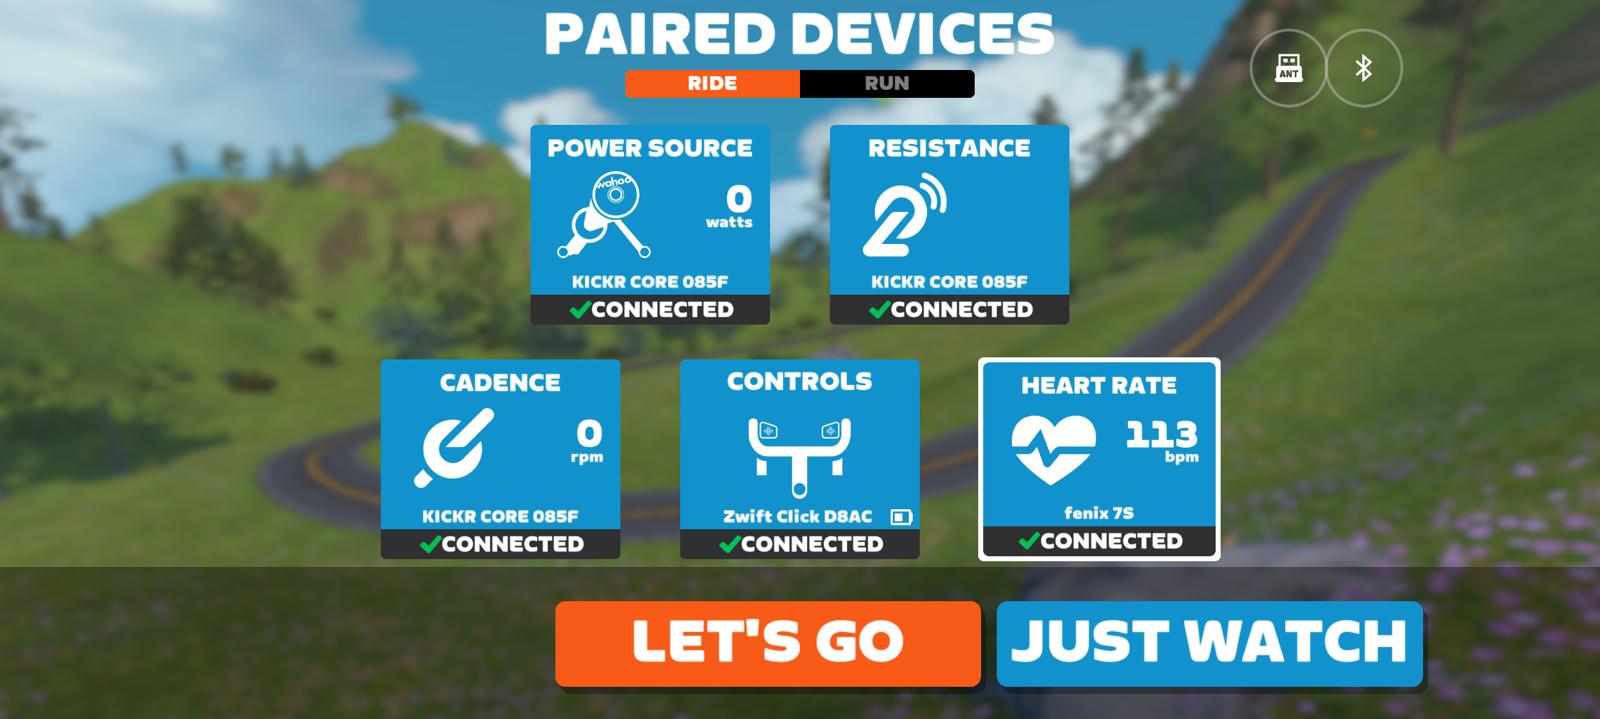
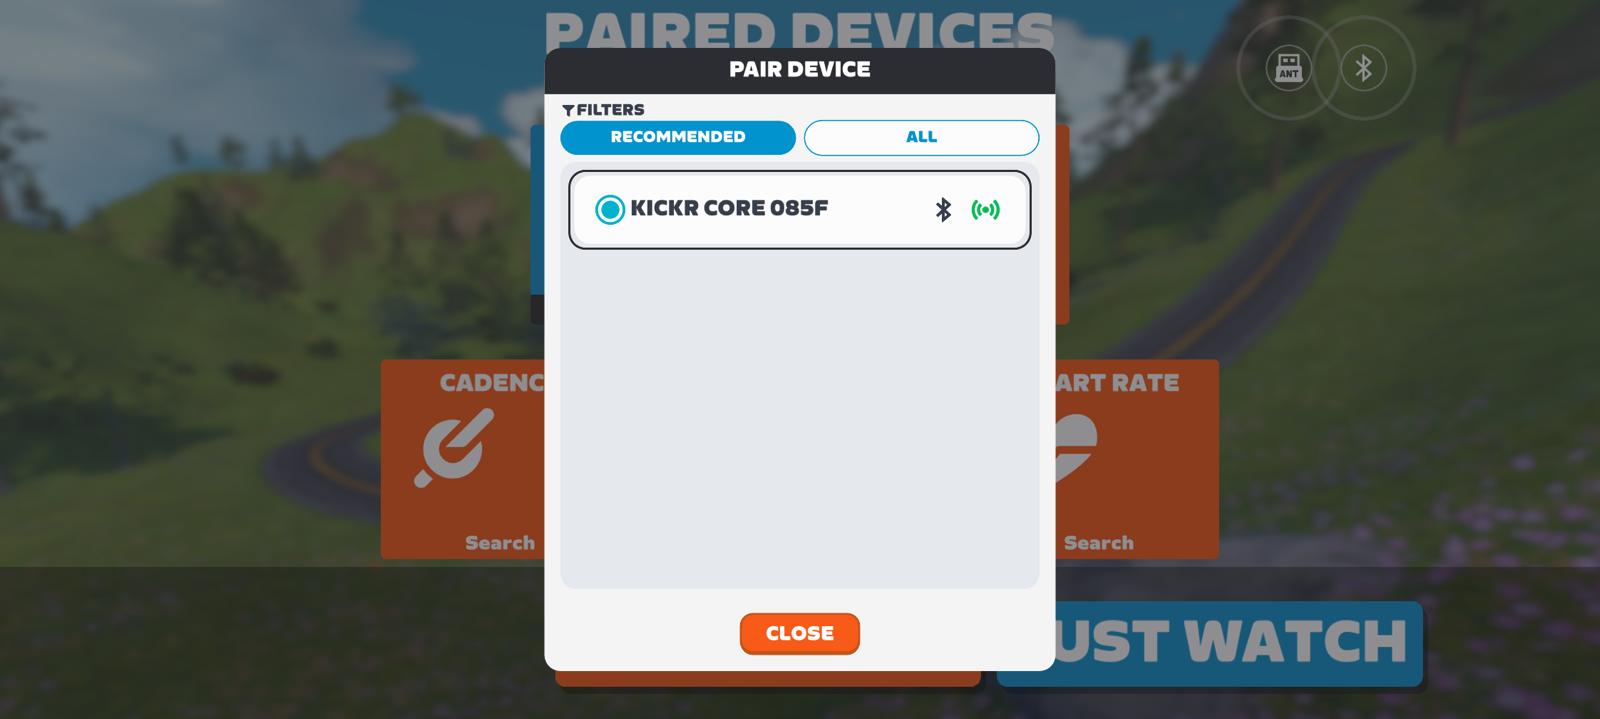
The first time you pair it, it’ll walk you through a bit of a tutorial as well:

At this point, you’re ready to go. However, I will first point out that if doing virtual shifting (with or without a Zwift Cog), you now have an extra option to use SRAM-style shifting, as opposed to the existing/default Sequential style shifting. With sequential shifting, you’ve essentially got 21 gears in order (1 is easiest, 21 is hardest) with no front chainring replication (aka 1x). However, with SRAM style shifting, you simulate a front chainring (aka 2x), plus the gears in the back. You can enable this under the hardware tab in the settings:

And, if using said SRAM-style shifting, then you can choose from a few different gearing configurations:

Keeping in mind that to a certain extent, the simulation of these gearing configurations is heavily influenced by the exact smart trainer you’re using, and the inertia of the flywheel on said trainer. But we’ll save that complexity for another day (I cover it in most of my smart trainer reviews that leverage Zwift Cog, if using that).
Next, it’s worth noting that there is actually a setting in the game in case you prefer to orient your Zwift Clicks in a different direction. You can tap to rotate it in four different ways:

Nifty!
So, into the ride we go. The first thing to take care of is virtual shifting, if you want that (it’s not required). To make it easier, press the ‘-‘ button on the left Click. To make it harder, press the ‘+’ on the right Click. You’ll see your gears in the upper left corner HUD.

If using SRAM-style shifting, and you want to shift between your two front chainrings, simply hold both ‘-‘ & ‘+’ at the same time (just like in real-world SRAM), and boom – it shifts to the front ring. You can see this in the upper left HUD.

You can access the Action Bar menu by holding down the ‘Up’ button:


From here, you can use the left side to navigate around, akin to a bunch of arrow keys.
Likewise, you can also enter the full-blown menus any time from the handlebars, and navigate around those too:

It’s handy, and really removes any reason to need another keyboard/mouse/controller mid-game, short of texting.
When it comes to steering, you can do that by pressing left and right arrows, which simply slides you left and right, like all other existing Zwift steering devices.
And finally, in ERG mode, the +/- keys will change your bias, thus increasing or decreasing the intensity of the workout (e.g, from 100% to 102%):

All of this worked perfectly fine for both my wife and me during our workouts.
However, as a reminder (that I’ve beaten to death in other posts/videos), the Zwift Click/Play/Bike officially only work with Zwift as an app. There are some apps that have reverse engineered the Zwift Click to work, but things could change at any moment and they break.
Wrap-Up:

Ya know, this September will be packed with expensive gadgets and sports tech products, but finally, this isn’t one of them. It’s not only priced reasonably, if not actually downright cheap for what you get in the package (remember, it includes the Zwift Cog too!), but more critically, it’s just super well executed. It solves the gap between the existing Zwift Play controllers that sometimes didn’t fit well on people’s handlebars, let alone mountain bikes and triathlon/TT bikes (or other smart indoor bikes). And it does so super well, allowing full control of the Zwift in-game functions.
Sure, I think the entire band/strap thing is a hot mess of overthinking a problem that I don’t think exists in real life, only to create a new problem. Thankfully, that’s easily solved by the bands you probably have stacked around your house/garage. If not, go steal some from a friend. If you’re riding Zwift, you definitely have a cyclist friend who has some spare bands.
Otherwise, props to Zwift for once again nailing a hardware product. For all the things people like to give Zwift crap about (sometimes well deserved), they continue to roll out excellent hardware products. Not just excellent in features, but also in price. This is another example of that.
With that, thanks for reading!
FOUND THIS POST USEFUL? SUPPORT THE SITE!
Hopefully, you found this post useful. The website is really a labor of love, so please consider becoming a DC RAINMAKER Supporter. This gets you an ad-free experience, and access to our (mostly) bi-monthly behind-the-scenes video series of “Shed Talkin’”.
Support DCRainMaker - Shop on Amazon
Otherwise, perhaps consider using the below link if shopping on Amazon. As an Amazon Associate, I earn from qualifying purchases. It doesn’t cost you anything extra, but your purchases help support this website a lot. It could simply be buying toilet paper, or this pizza oven we use and love.


Now if only wahoo can get it to work on a kickr v5 as promised I’d be happy to purchase it!
You can use an app called QZ on either IOS or on Android that enable the Zwift clicks on any trainer.
link to apps.apple.com
As soon as there’re up for pre-order I’ll be getting the Click V2 to use on my Wahoo Kickr V4
Glad I’m not the only one still pissed about that.
Does the click V2 work with the QZ app? Still a frustrated V5 user – not buying anything from Wahoo anymore – ever.
I’v got a new Jetblack Victory on the way, so I’m curious – is there any changes for cog itself?
Is there any reason to upgrade cog?
Thanks.
If you have the orange cog (V2) there is no change this year. Only the click has changed. On your Victory, you have the latest V2 Cog.
My big takeaway here is that I can go buy the garmin bands in bulk 8D
Looking at the screenshots of the pairing screen, it seems that the Zwift Click V2 only uses one bluetooth channel. Is this an accurate assumption? This could be interesting for Apple TV users.
yes, they’re paired out of the box. Only one BLE signal.
Thanks! This could be interesting.
What I came here to ask, as well. If single channel, any idea if the current Play will be getting a FW update to allow, as well?
Does it work with ROUVY like the V1 does?
The zwift page on the new click states:
“Note: Zwift Click is only compatible with Zwift.”
so I’m not massively hopeful. You can see why they’d want to make these incompatible with their competitors.
(link to uk.zwift.com)
Exactly what I came here to ask as well. I doubt Zwift is advertising that it works with their competitors. Hopefully someone will test this out, or Rouvy will announce.
unfortunately, zwift click v2 doesn’t work at all with rouvy, on rouvy only workouts with ERG mode enabled are working, let’s hope will be added soon by rouvy dev team, i use rouvy only as free ride indoor application
As a quick update after I contact Rouvy Support regarding Zwick Click v2 :
“At this time, the new version 2 of the Zwift Click & Cog is not supported within the ROUVY app. While we hope to add support within a week.”
Let’s hope will work on next Rouvy updates
is there any info on compatible trainers? Kickr v5 in particular!!
Hi Ray, I’m lost at end of video where you say it’s a $49 product but we can’t actually buy it, could you clarify please? It’s only bundled with new trainer purchases?
It would be awesome to finally get rid of the precarious laptop setup between the bike and my big screen!
I wish these features were simply added to the Companion app tho instead of pairing yet more hardware, but I guess this should be more responsive and natural to use than a phone screen.
I wanna put em on my wrist and pretend I’ve got a pricey sports watch paired to Zwift 🙃
This looks great!
Two quick questions that I didn’t see covered in the article:
1. How do the buttons feel? – that’s my biggest complaint about both the Click v1 and the Play controllers. The mushy buttons don’t give a positive tactile feel.
2. I assume these use 2 Bluetooth channels like the Play controllers? I guess it’s possible they have a wireless connection between the two Click v2 units but it’s more likely they have independent Bluetooth connections to the device running Zwift. This is important to users running Zwift on AppleTV.
1. Buttons are pretty ‘clicky’ with a thinner over mold than on Play.
2. One BLE channel, they come ‘paired’ out of the box
Wonder will they work better with my ATV than the play controllers. I had to use companion app as bridge (due to ATV 3 Bluetooth devices limit) and found that whole the connection controllers were instant increases in power etc from trainer always lagged by several seconds. Was such a mess I never really used controllers.
Nice, now I hope that the Elite’s Square frame review is closer since it launched. Hope you had enough time to try it out now that the indoor session is just around the corner
I think there are a lot of people waiting for this one but for some reason Ray went mum on this some time ago…
I assume there’s no braking functionality on these? I barely use my Play controllers because of braking kicking in randomly on its own (I know there’s been a software update to allow settings on this but I removed them before those were out).
These are interesting to me, but as a Saris H3 user there’s no compatibility with the cog for virtual shifting – any reason I can’t just ignore the cog, and just use the clicks for control?
I have the saris h3+ and click play controllers. no virtual shifting but the buttons work for menus and steering!
I’m considering doing the same thing. I have an original Tacx Neo so it’s not compatible with the Cog but I don’t really want virtual shifting anyway. I do want to be able to have controls on my aerobars on my tri bike though (the reason I never bought the Play controllers). For this price as long as it works standalone I’m fine with just buying it and ignoring the Cog, though it would be nice if they sold just the Click on its own.
My only question. Will is still shift gears on Rouvy. Don’t care if it doesn’t navigate menus…etc, just care if the +/- works for changing gears on Rouvy virtual shifting.
I bet they can be mourned to the seatpost of a unicycle.
The biggest problem with these Ver2 clicks is I got V1 installed on my bike and paired for the first time 4 days ago, and now they are already obsolete.
I have the original play controllers and the original click shifter and while I like the idea of the new controllers, I won’t be getting them for one simple reason: the click shifter that I have now runs the battery down in just a few weeks so now I have to replace the CR2032 every few weeks. The original controllers are rechargeable. So until they design the new ones to be rechargeable, I’ll stick to the old controllers. I’ve already stopped using the click shifter and just use the controllers for shifting. Their claim of 100+ hours of battery life on the click controller does not match my reality.
Has Swift made Wattbike Atom steering work yet?
A support ticket said they were working on it. I bought that bike because it was swift approved. It can’t even steer. That was 5 years ago and steering still doesn’t work. At £20 a month for swift, I cancelled my subscription and moved to Trainer Day. You can’t compete on swift unless everyone is on the same standard of control. If they can’t make a £2500 bike steer, they should have sent those owners these controls for free by way of compensation since their ‘supported’ bike didn’t work.
It’s seems they’re just cash grabbing now and things have just gamified beyond the level playing field racing and fun training it once offered.
Hi Ray,
I’m using the Wahoo Bike v2, and wondering how it can co-exist with the Zwift Click v2. Specifically:
* Will Zwift only accept the Controls of on of the two, either the buttons of the Wahoo Bike v2 or Zwift Click v2
* Since the Zwift Click v2 supports virtual shifting will this interfere with the inherent shifting profiles setup within the Wahoo Bike v2?
Thank you.
I have the same question/thought. I have the Wahoo Kickr Bike Shift and miss having the ability to fully navigate the Zwift UI from the handlebars (I used the Zwift play controllers on my old setup).
I assume that Zwift will only connect to one remote control device at a time, so that would mean having to choose between the Kickr controls (shifting, steering, limited selection buttons) or the Zwift Click controls, in which case I would lose the ability to shift with the Kickr levers.
Tough choice.
I assume the Zwift cog is still incompatible with Ekar.
Be good to know if it’ll work with Rouvy like v1 eventually did…
Hi – will I be able to use the Click v2 to my Elite Suito at the same time as connecting to my Elite Rizer gradient simulator?
If anyone else is interested …… all work fine together
Yes and both steering are working alongside.
I wish they sold this without the Zwift cog for 29.99 as an upgrade
Anyone got a link to a good bulk pack of the garmin bands anywhere? Please. Anyone
Hi. Relevant but not. DC or anyone out there in DC land have you tried the Vornado FLY MAX High Velocity Fitness Floor Fan? Seems like a great lower cost competitor from an established fan expert. Love get your thoughts. Obviously no smart features but looks like a great alternative. DC what do you think?! Also there is a sharper image version which is $49.99!?
Have. Great day any thoughts welcome.
Seems like it is only available in US and UK, so it probably won’t work in Europe without adaptors. Hopefully that changes because it looks like a good alternative to those overpriced smart fans.
Poor design. Requires changing a battery by removal of 4 tiny screws per side, the battery only lasting for 100 hours.
I’ll stick with the Play Controllers which I leave plugged into power, auto charging through a USB-C cable.
Is there any reason to consider the V2 if you have steering via a Tacx Alpine and you already installed a Zwift cog and click v1 (a couple of weeks ago)?
Primarily the action button and menu navigation.
Is there any ‘low-voltage, change batteries’ warning so you can pre-empt button cell replacement? I’m imagining the frustration of having to abandon a long, social/special group event cos one of them has stopped working mid-ride.
Hi,
I received today the v2 but it doesn’t work with the Rouvy App on my Apple 4K.
They are listed in the Bluetooth overview page, I can select these but it is still connecting for 10 minutes..
I tried as well Zwift and connected directly
Hi. I’m also waiting for delivery and have an Apple TV. Does it only use one Bluetooth channel? Can I use it only for control and not shift gears, and use the cassette as normal?
Yes, one channel with Zwift …
Thanks for the reply. Can I skip the virtual gear shift and just use Click for navigation? And change gears normally on the cassette?
As I would only use at Rouvy, I don’t installed on my bike.
I will return the product
Why not wait and give Rouvy a _little_ time to try and get them to work?
i can not understand why this can not be plugged with usb , the play controllers have a lot of connection problems since the begining
is this version also compatible with rouvy?
There is information on the website that the clicker is only compatible with Zwift
Not compatible sor far. I tried it out
But Rouvy informed at FB Community that the developers will work on..
I contacted Rough to enquire if the new click works on there platform, the answer was not at the moment, although they are working on it but can’t give a time line
Got mine right before a Zwift ride, quickly installed them and already love them. Although I realized about 10 minutes in they were installed at different heights.
Agree totally about the straps for after 1st ride, so reinstalled with bands on inside of shifters as high as I could get them with up/down buttons forward me. Had to go back and read the guide to remind me which buttons are which in that orientation..
Now I need to figure out what to do with the Plays and Clicker v1 (which I really didn’t like). Plays were OK but I was never happy with fit and placement
It appears that Zwift has rolled out firmware level encryption in a recent update to discourage the use of the Click V2 with apps other than Zwift. This was part of a recent firmware update that seems to be timed to allow for the “good” publicity of the product launch to complete its course before Zwift locked them down. See: link to github.com
Watch out with this!
Zwift is actively trying to make these as incompatible as possible with other apps! They are trying to lock users in in order to stifle competition.
THIS IS VERY MUCH AGAINST THE INTEREST OF EVERY USER!
Even if you never consider an other app. Without healthy competition the quality of Zwift will be worse and subscription prices will be outrageous.
@ Ray this would be a great moment to call them out on this BS! But not just Ray but every user – if they get away with this every user will be affected on the long run! We need to complain loudly about this!
Hallo DC and hallo everyone
just a simple question.. I can not find this information (or maybe I’m dumb in using “search”…)
If I buy a COG for my roller Wahoo Kickr V6, can I use it, in case needed, on other “approved” reoller? for example I’m considering to change a very old trainer I have at my mother house with a “refurbisched” kickr core… but I wouldn’t like to buy 2 Cog :-)
thank you in advance !
ciao from Italy
Yes, of course. Same process as moving a cassette from one trainer (or bike) to another.
Thank you very much for reply
I was a bit confused because Zwift ask you to choose from a list of trainer when buying and I thought there was somthing different with internal protocols of the COG
Yes, there are minor differences in sizing of the cog inside the COG, supposedly to account for the differing gearing/flywheel speeds inside the trainer.
But all the COGs mount on all the trainers (just depending on freehub) and by most accounts work the same (and in any case there is a calibration option on Zwift).
Ray,
Rouvy user here. Last night I successfully paired my Click V2 controllers with a new Kickr v6 and virtual shifting went without a hitch. Zwift even included 2 complete Clicks with the v6 trainer/Cog. I haven’t tested any other buttons besides shifting. But so far, all is good.
You might want to wait a couple weeks to see if it is still working successfully. I see a lot of reports of getting it working once and then having to reconnect to zwift to get it working again after a timeout (and repeating that pattern).
I’ve just missed a race as I have to change my zwift click batteries. This will be the second change in a week. I logged out of the apple TV app but didn’t turn the box off. It’s an expensive mistake to make. Surely they should power off.