
Today Garmin announced their latest GPS watch to their ever-growing cabinet of such devices – the Garmin Tactix, which is aimed at the military crowd.
The Tactix builds on the Garmin Fenix which became available a touch bit over a year ago. But it isn’t the first Garmin watch to build on the Fenix form factor. Since then we’ve seen the Quatix (marine) and D2 (aviation) units pop onto the market – all variants of the highly flexible ANT+ and Bluetooth Smart combo platforms.
In many ways, the software on the Tactix is almost identical to that of the Fenix. The Fenix contains about 95% of the software features of the Tactix. It’s really the slight differences in hardware that differentiate the two. They both have waterproofing to 50m, but the Tactix assumes specifications that more closely align it to a ‘Tactical Ops’ watch such as non-reflective surfaces including a curved mineral glass cover (the Fenix was mineral glass as well, just not curved).
But, let’s not get too ahead of ourselves. After all, we’ve still got to get it out of the box and beat the crap out of it.
Because I want to be transparent about my reviews – Garmin sent me a unit to try out. In the next few weeks I send the unit back to Garmin and then go out and get my own (to be able to support y’all in the comments section down the road). Simple as that. Sorta like hiking in wilderness trails – leave only footprints. If you find my review useful, you can use any of the Amazon or Clever Training links from this page to help support future reviews.
Lastly, at the end of the day keep in mind I’m just like any other regular athlete out there. I write these reviews because I’m inherently a curious person with a technology background, and thus I try and be as complete as I can. But, if I’ve missed something or if you spot something that doesn’t quite jive – just let me know and I’ll be happy to get it all sorted out. Also, because the technology world constantly changes, I try and go back and update these reviews as new features and functionality are added – or if bugs are fixed.
So – with that intro, let’s get into things.
Unboxing:
The Garmin Tactix comes in a box that pretty much aligns with the imagery you’d expect of a ‘Tactical Ops’ watch.

The backside of the box lists out its resume – with the top half being largely existing Fenix features and the bottom half being new Tactix-only features.

The box splits up into three components, like one of those little Russian nesting dolls.

Inside you’ll find four chunks of stuff. To the left, the watch, then the charger, then the charging block, before finally a pile of paper you’re unlikely to read.

Here’s the whole setup above, un-plastic-bagged below:

Least exciting first, we have the manual and safety information.

Then the plug for the USB charging cable. You can charge it from your laptop as well though – so whichever fits you best. Additionally, if travelling abroad simply add a $1-2 plug adapter, as it will easily switch between different power types.

The charging cable remains the same as the original Garmin Fenix, with it’s clip-in design:


Here, you can see it clipped onto the watch:


Last but not least, we’ve got the watch itself.

While incredibly difficult to photograph, the mineral glass screen is slightly rounded – not flat like the Fenix. And, as you’ll see in a bit, the unit is a bit heavier than the Fenix as well.

The back of the unit shows being waterproofed to 50m, as well as the various symbols related to ANT+ connectivity, Bluetooth Smart, and other certifying agencies.

With that, let’s dive into size and weight comparisons.
Size and Weight Comparisons:

There are really only a handful of downloadable units that compete in this segment (GPS + Altimeter/Barometer/Compass), and all of them are made by either Garmin or Suunto. On the Garmin side you’ve got the Garmin Fenix and now the Garmin Tactix. And on the Suunto Side you’ve got the Suunto Ambit (aka Ambit 1), Suunto Ambit 2, and then the Suunto Ambit 2 Sapphire. I call out the Sapphire specifically because it’s made with sapphire crystal, rather than mineral glass in the Fenix/Tactix. Albeit a flat surface, but still, people pay more for that screen glass rather than the lower-end models.
Below, you can see the units lined up from left to right: Garmin Tactix, Garmin Fenix, Suunto Ambit 2 Sapphire, Suunto Ambit 2 Black, Suunto Ambit 1.

You’ll notice above that realistically all units are pretty darn similar in size. There just isn’t a lot of variance there size-wise (style – yes, size – no).
The same is true when it comes to the wrist band. They’re all about the same thickness. The Suunto units do have a bit of a bulge though coming off the watch, where reportedly the satellite antenna is.

Now, just like the sizes of the watches, the weights are pretty darn similar as well. The Tactix intentionally had weight added to the backing to increase heaviness and make it feel more rugged. It weighs in at 91g.

Meanwhile, the nearest competitor to that – the Suunto Ambit 2 Sapphire, weighs in at basically the same 92g.

If you take a look at the Fenix, you see it come in at 83g:

And the counter-competitor to the Fenix, the Suunto Ambit 2 comes in at 89g. Fwiw, the Suunto Ambit 1 is 79g.

All of these units are substantially heavier than most other running watches (upwards and over double the weight in some cases). But that’s done somewhat on purpose. Some weight is added with more durable components, primarily metals and glasses over plastics. And other weight is added in selecting components that add weight to make the consumer feel as though a unit is more durable.
Unique Tactix ‘Special Ops’ Features:

As noted a bit earlier, the Tactix is is essentially a Garmin Fenix unit with a few modifications, mostly hardware. The goal for this device was to cater more towards the military crowd with specific changes they’d been asking for from previous GPS watches. In fact, even before the Fenix many military members used standard Garmin devices for various tasks that would generally be described as well outside the initial intended use of the device (say, a running watch).
Said a different way: Outside of this specific section – EVERYTHING written in this review applies to both the Fenix and Tactix. I sorta did that on purpose (section-wise) for folks looking to see how things changed on Fenix in the last year since my initial Fenix review.
With the Tactix unit, Garmin started out with making specific hardware changes. They are as follows:
– Inverted display (white text on black background)
– Curved glass on front of display/unit (eliminates/minimizes light reflection)
– Non-reflective surface on all aspects of unit
– Backlight is night vision goggle friendly
– Heavier weight (10g)
Next, comes the handful of software changes in the unit, which are:
– Addition of new Jumpmaster mode
– Tidal charts
Let’s take a bit of a diversion and check out those features. First up, the Jumpmaster option. This actually isn’t the first time a Jumpmaster option has been included in a Garmin product. In fact, if you roll back the clock nearly a decade, you saw it in some of the old Foretrex/Vista units. The unit supports three modes: HAHO (High Altitude – High Opening), HALO (High Altitude – Low Opening), and Static line. All of which are generally skewed towards military jumps rather than civilian ones.

In the HAHO and Static mode you’ll specify the DIP (using an existing waypoint you’ve set on the device), then the drop altitude, followed by the forward throw, wind, constant, and HARP.

Within the HALO mode, you’ll specify almost all of the same parameters, but also adding in the opening altitude as well.

Regrettably I lacked a military transport aircraft and parachute to test all these.
Meanwhile, on the tidal side of things there’s a new menu option to bring up tide information. Once in this menu you can specify to pull up tide information based on an existing waypoint, city, or just your current position.

Using the cities option for example, it then lists out a bunch of cities nearest you:

In my case though, due to being out of the US, the tide information wasn’t displayed (US only).
Beyond those Tactix-specific added software changes, all other software components discussed from here on out apply to both the Tactix and the Fenix.
So, you may be asking yourself which watch you should choose? Well, the answer (in my view anyway), is fairly simple. If any of the above are of interest to you, pick up the Tactix. If not, then the Fenix is the better answer since they otherwise share the same software platform. Further, the Fenix is still receiving firmware updates and functionality adds – as recently as two weeks ago in fact (admittedly, that’s likely driven by both the aviation-focused D2 and now the Tactix announcements).
Beyond that, I’ll talk at the very end about the larger market as far as comparing the Fenix/Tactix to other units out there (both Garmin and non-Garmin).
Use in Running:
We’ll start with running, even though I suspect that running may not be the most common use case for the Tactix (probably a blend of navigation functions). Still, it’s an easy concept to get warmed up on. To start a run, you’ll go ahead and press the middle left button, which opens up the menu.
From there you’ll start the GPS. Now this doesn’t start recording immediately, rather, it just simply turns on the GPS and searches for satellites. Satellite acquisition times can vary depending on how long and how far you are from the last time you turned on the unit. In some cases I had satellites acquired in 15-20 seconds. And in other cases it was 2-3 minutes. It’s definitely not as fast as some of the newer units that can do satellite pre-caching to speed up initial acquisition.

Once satellites are found, it’ll be ready to start your run. In my case, I’ve used a button profile that most commonly matches to the rest of the Garmin running GPS product line, with the upper right button being start/stop, and the lower right being lap. Except one minor difference: Depending on how long I hold it down for it changes the function. So a quick tap will change the display pages. Whereas a longer hold will start/stop and lap. This allows you to get more functions out of the smaller button set.
In my case, I’ll go ahead and long-hold (about 2-seconds) the top right button to start.

Once running, I can then tap the up/down buttons on the right side to change data fields. I’ll talk about data fields and data pages later, but the key item is you can customize all of them to as much or few data as you want. In my case I’ve set a slew of different fields. Here’s a small smattering of them during my runs:


There’s also a Virtual Partner field, which will tell you how far ahead/behind you are compared to a preset pace. This means that you can set your virtual partner for 7:30/mile, and the unit will alert you when you fall behind that pace or too far ahead of it.

You can configure functions such as Auto Lap or Auto Pause. Auto Lap will automatically create a lap marker at a prescribed interval, such as every 1 mile. You can also manually create laps as well.

Auto Pause lets you automatically pause the track when the unit falls below a certain speed threshold (such as waiting at a stoplight).
The Tactix connects to any ANT+ heart rate strap, and will display your HR (in either BPM or %Max), and then record that data. You can see a bit of this on the page below, where it shows my current HR and then shows a graph of my HR during the run.

Once you’re done with your activity (which, the unit commonly calls a ‘track’), then you’ll go ahead and choose to save or discard it.

Later on when you’re back to your computer you can open up the track file and analyze it on Garmin Connect. The unit will export out files in .FIT format, .GPX format, or both formats concurrently.
Use in Cycling:
While I didn’t have much time to test the cycling piece, I did want to call out that the Tactix does support a cycling mode, as well as supports the cycling ANT+ speed & cadence sensors. Unlike when the Fenix first released, the ANT+ speed and cadence sensors are now fully supported on Tactix in that you can set wheel circumference and the unit will properly record that data while indoors.
To pair to the ANT+ Speed/Cadence sensor you’ll go ahead and dive down into the ANT+ Sensors menu. Then, you’ll tell it to search for a new speed/cadence sensor.

Once the unit finds the sensor, you’ll then get a new menu option for calibration.

Within this option you can specify the wheel-size of your wheel, enabling you to get accurate speed distance indoors (or, if on trails with switchbacks where GPS may be challenging).

At this point, you’ll also want to tweak your Cycling ‘profile’ on the watch to ensure it has the data fields you’d want to see for cycling (versus something like running).
Compass, Navigation & Routing:
The Garmin Tactix includes a magnetic compass which enables navigation and routing – even while standing absolutely still. This is unlike a GPS compass, which requires forward direction of travel to display the current course.
In order to start your navigation and routing activities, you’ll need to calibrate the compass. It only takes a minute and involves three separate rotations of the unit following a bit of a wizard:

It’s pretty self explanatory, and it’ll beep at you if you get it wrong. It won’t tell you what you did wrong, so use this simply guide:
Did it beep an error? If yes, rotate a different direction.
Is it still beeping? Rotate much slower.
Is it really still beeping? Go back to step 1, rotate differently.
That’s basically all you need to know about compass calibration with the Tactix.

Once that’s done, you’ll get a compass screen displayed whenever you’d like by just tapping the up/down keys.

Now, to demonstrate the importance of a magnetic compass, note how the little dots pointing to the waypoint stay in the same spot relative to the location, despite the fact that I just flipped the watch around without moving in any direction:


Next, it’s time to navigate somewhere. You have a number of ways to navigate on the watch (probably a dozen or more). But, the most common are navigating following a route/track, or navigating to a waypoint. There’s also navigational tools like sighting and whatnot, but most folks are buying a connected device so that they can download these routes/waypoints to the unit in an integrated way.
In my case, I’ve already created a waypoint and route, so I’m going to use those. I talk about how I created them later on. So I’m going to go ahead and navigate to a waypoint. To do so, I’ll dive into the menu and choose Waypoints:

Next, I’ll choose to navigate to the CDG waypoint:

It tells me how far away I am, and a bunch of other details including when the waypoint was created and a map there. From there I’ll select ‘Go’ to navigate there.

At this point the unit’s magnetic compass will become engaged and the GPS will be leveraged to provide distance information. My direction of travel is actually noted on the edge of the unit, with the two little dots.

Further, I’ll get a line on the map as to where I’ve been and where I’m going (or use the compass).

Following tracks and routes are exactly the same, except that you’ve also got the ability to route in reverse on a track (basically, tracking back to the start).
The VIRB Action Camera Control:

With the recent introduction of the Garmin VIRB action cam, the Tactix is able to act as a remote control for the camera, triggering it to start and stop from your wrist.

Unfortunately at present I lack a VIRB action cam, thus this isn’t something I was able to test for this review. Fear not, I’ll include that testing as part of the VIRB action cam review I’ll be doing (which is a combined VIRB Elite + VIRB normal review).
Internal Temperature Sensor & Garmin Tempe Sensor:
The Tactix supports measuring temperature in two ways. The first is via the internal temperature sensor built into the watch itself. This is good if you don’t want to deal with any sort of external pod. In this mode it’ll simply report the temperature for you and even plot it on a little graph:

If you’re recording an activity, it’ll also plot that information out for later use in Garmin Connect or with the Garmin Mobile app:

Next, you can also leverage the Tempe external temperature sensor. Tempe is about the same size as a footpod, and will wirelessly communicate via ANT+ with the Tactix. You’ll simply go into the pairing menu and go ahead and pair it with the Tempe sensor. Once that’s done all temperature data will come from Tempe, rather than the internal sensor.

The key benefit to using Tempe over an internal sensor is being able to place it away from a heat source – namely, your body.
Hunting/Fishing/Sunset/Sunrise/Moon Modes & Information:
Like the Fenix, the Tactix contains a few tools which provide information commonly accessed by users of this segment of watches. First up is the ability to pull up the current sunrise and sunset times for your current location. This is within the GPS tools section:

In addition to displaying the moonrise and moonset within the above page, the rise of the moon/soon is displayed on the main time screen as a small icon (if configured):

For folks interested in hunting and fishing data, the unit leverages the Solunar Theory (read up on it here, it’s actually interesting) which essentially states that the ability for you to increase your catch is tied to factors such as the sun, moon and tidal patterns. To provide an outlook for both activities,access them in the GPS tools section:

Finally, if you happen to be fishing and throw your friend overboard, you can decide to retrieve him/her with the MOB (Man Overboard) functionality. This simply plops a point at your location and then switches into navigation mode to get you back to that point. It’s assumed that you know how to be the captain of your ship.

As an interesting side note, on the marine variant of this watch – the Garmin Quatix – the MOB function will actually navigate your boat back to the MOB point. Which, is pretty crazy. Well, at least until the point it runs you over. But, I suppose that’s better than leaving you behind.
Altitude & the Barometric Altimeter:

The Tactix includes a barometric altimeter, which allows you to get typically much more accurate data than a GPS-based altimeter. Especially so in this case because you can configure in a number of different ways how the altimeter reacts to certain situations.
By default the unit will utilize GPS to first calibrate the altimeter when the unit is started. This is controlled with the altimeter settings. The second option called ‘Continuous’ allows you to always keep checking against GPS for altitude corrections. Finally, the third option is to simply go manual, where you provide a known elevation or sea level pressure reference. Utilizing a known elevation point is always the most accurate way to go, especially if you know for certain that the reference point is accurate.
Next, the unit contains three basic ways to control how the altimeter works (found under Setup > Sensors > Altimeter > Baro Plot): Variable, Fixed and Ambient Pressure. By default the unit uses the variable mode.

Finally, one interesting feature that was introduced to the Fenix lineup this past spring and then carried into Tactix is the ability to plot 3D distances. In this mode it understands that a distance between two GPS points may be longer if you’re ascending or descending, so it takes into account the elevation changes as well. I talk more about this quite a bit when I tested this out last winter in its beta form while skiing in the Alps.
Waterproofing:
Waterproofing for the Fenix product family line has been a bit of sore spot over the past year. While the Fenix was officially fully waterproofed, and many users had no problems – Garmin did recall a large number of Fenix units due to leakage and fogging issues. In fact, they ceased production entirely last December for more than a month to address the problem and re-work inventory.
With that in mind, the Tactix is fully waterproofed to 50-meters. This is written in the literature, as well as stated clearly on the back of the unit:

Most of my testing however has been in the rain, and a bit in the pool. In neither scenario did I run into any problems, but I also fully understand that’s hardly going to surface any issues (the Tactix exterior backing is slightly different in design than the Fenix).
In order to test at a slightly different level, I’ll be taking the Tactix and some other fitness units down to 33-meters deep in a controlled indoor test facility. This will be happening at some point before the end of the year, as my schedule permits to visit the facility.
Given all the very visible troubles that Garmin had with the Fenix and the recall, I’d suspect that they’ve likely got the waterproofing right the first time on the Tactix. Well, that’s my hope anyways.
Data Fields, Data Pages, and Device Profiles:
The Tactix supports near limitless customization of views and data fields. To start with, you’ve got a bunch of default ‘Profiles’, such as running, cycling, hiking, fishing, military, etc… Each of these profiles can be customized to have the watch display different data fields when using that profile. Further, you can create your own profiles if you wanted. For example, you could create a profile called “Mud Running”, and change the data pages and fields for just that profile.

Within each profile you can setup a myriad of options unique to that profile. But the one most folks are likely customizing is the data pages and data fields. Within data pages you have two types of data pages that you’ll setup. One for ‘Tracking’ and one for ‘Navigating’. This means that if you’ve enabled some sort of navigation (i.e. going somewhere) you’re likely to want slightly different fields in the display than if you’re just tracking (i.e. recording an activity).

Within each of those sections you’ll setup what are called ‘Data Pages’, whereby each page contains data fields. The Tactix enables you to create a ton of data pages (I’ve done at least 12), with each page containing up to 3 pieces of information. Some pages can also be graphs/charts as well.

The data fields you can then add to each of those pages vary depending on the category.

Below, is a list I compiled of every data field offered on the Tactix. Note that you can click it to expand to get a much larger and more visible view of it.

In addition to the customization of data fields, you also have a slew of options around what metrics are used to present different types of information. For example, whether you’re displaying altitude in meters or feet. What’s cool is that you can select different measurement types to be displayed differently. For example, distance in kilometers, but elevation in feet, and speed in MPH.
Distance/Speed: Nautical (ft), Nautical (m), Statute, Metric, Yards
Elevation: Feet, Meters
Depth: Feet, Fathoms, Meters
Temperature: Celsius, Fahrenheit
Pressure: Inches (Hg), mmHg, Millibars, Hectopascals
Vertical Speed: Feet/Min, Feet/Hour, Meters/Min, Meters/Sec, Meters/Hr
Lastly, you’ve got a ton of options for ways to display GPS coordinates. An aircraft carrier sized boatload of them. Below is the full listing of all different ways you can display the data (typed exactly as shown on the unit):
Format: hddd*mm.mmm’, hddd.ddddd*, hddd*mm’ss.s’’, Austrian Grid, Borneo RSO, British Grid, Dutch Grid, E0V Hungarian, Estonian Grid, Finnish Grid, German Grid, Icelandic Grid, Indonesian Equat., Indonesian Irian, Indonesian South., India Zone 0/IA/IB/IIA/IIB/IIIA/IIIB/IVA/IVB, Irish (ITM), Irish (IG), Latvian TM, Loran TD, Maidenhead, MGRS, New Zealand, New Zealand TM, QNG Grid, RT 90, Swedish Grid, SWEREF 99 TM, South Africa, Swiss Grid, Taiwan Grid, US National, UTM UPS, W Malayan RSO, User Grid
Datum: Adindan, Afgooye, AIN EL ABD ’70, Anna 1 Ast ’65, ARC 1950, ARC 1960, Ascnsn Isld ’58, Astr Dos 71/4, Astro B4 Soral, Astro Bcn “E”, Astro Stn ’52, Aus Geod ’66, Aus Geod ’84, Austria, Bellevue (IGN), Bermuda 1957, Bogota Observ, Campo Ichspe, Canton Ast ’66, Cape, Cape Canavrl, Carthage, CH-1903, Chatham 1971, Chua Astro, Corrego Alegr, Croatia, D jakarta, Dos 1968, Dutch, Easter Isld 67, European 1950, European 1979, Finland Hayfrd, Gandajika Base, GDA 94, Geod Datm ’49, Guam 1963, Gux 1 Astro, H jorsey 1955, Hong Kong ’63, Hu-Tzu-Shan, Indian Bngldsh, Indian Thailand, Indonesia 74, Ireland 1965, ISTS 073 Astro, Johnston Island, Kandawala, Kergueln Islnd, Kertau 1948, L.C. 5 Astro, Liberia 1964, LK592, Luzon Mindanao, Luzon Philippine, Mahe 1971, Marco Astro, Massawa, Merchich, Midway Ast ’61, Minna, NAD27 Alaska, NAD27 Bahamas, NAD27 Canada, NAD27 Canal Zn, NAD27 Caribbn, NAD27 Central, NAD27 CONUS, NAD27 Cuba, NAD27 Grnland, NAD27 Mexico, NAD27 San Sal, NAD83, Naparima BWI, Nhrwin Masirah, Nhrwin Saudi A, Nhrwn United A, Obsrvtoria ’66, Old Egyptian, Old Hawaiian, Oman, Ord Srvy GB, Pico De Las Nv, Potsdam, Prov S Am ’56, Prov S Chln ’63, Ptcairn Ast ’67, Puerto Rico, Qatar National, Qornoq, Reunion, Rome 1940, RT 90, Santo (Dos), Sao Braz, Sapper Hill ’43, Schwarzeck, SE Base, South Asia, Sth Amrcn ’69, SW Base, Taiwan, Timbalai 1948, Tokyo, Tristan Ast ’68, Viti Levu 1916, Wake-Eniwetok, WGS 72, WGS 84, Zanderij, None, User
Spheroid: Tied to Datum (matches it)
Phew! Next!
Use as a Day to Day Watch, and Backlight:
The Tactix can be used as a day to day watch for upwards of 6 weeks (GPS off). In this mode you can customize the display parameters shown on the main/default screen, including even the icons displayed:


The unit can setup multiple alarms, which can be configured as Tone alarms, Vibration alarms, or both. These alarms can also be configured as either Daily alarms, or Weekday alarms (or just one-time alarms).

Next up is the backlight. The backlight/screen is probably the most unique component of the Tactix unit. As you’ve likely already noticed throughout the review, the screen has inverted colors, such that it’s white text on black backing. This is done to ensure the unit isn’t a bright glowing ball when viewed through night vision goggles.
The backlight brightness can be adjusted (increased/decreased), as well as the contrast can also be adjusted.

Finally, you can specify how long the backlight remains illuminated, ranging from 5 seconds to 2 minutes, then a forever option. Additionally, you can also have the unit automatically illuminate the backlight at night, via the ‘Auto Light’ setting.

Battery Life:

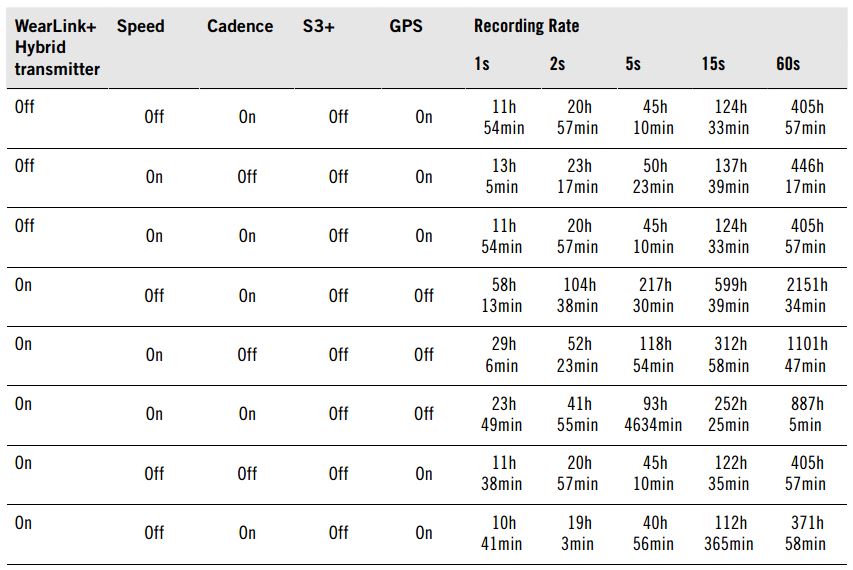
Perhaps one of the biggest draws to the Tactix/Fenix series is the long-battery life. The unit boasts upwards of 50+ hours in what’s known as ‘UltraTrac’ mode, which essentially reduces the GPS-on time to every 60-seconds. This is primarily useful in situations where you want a tracklog of the route, but aren’t terribly concerned with a high level of detail. For example, if you’re walking for 6-7 days. Whereas if you’re running for a shorter time period (i.e. 4-6 hours), you’ll really just want to leave it on the default modes to get a higher recording rate.
Beyond that, the unit has a lot of little options to tweak the battery, but there’s very little documentation (actually almost none) on how to get the most out of your battery life for each of the different options that could impact battery (such as recording rates, etc…). This is actually the same complaint I had about Fenix last year when it came out, and unfortunately I haven’t seen anything yet that really gives clear-cut guidance on it. I’d love to see something like this chart (from Polar RCX5 manual) developed for the Tactix/Fenix.
Wireless Connectivity (Smartphone, Unit to Unit):
The unit supports sharing of data between other Tactix units, as well as Garmin Fenix units. Specifically you can share Waypoints, Routes, Tracks, and Geocaches. To share between units you’ll press the main button and then scroll down to ‘Share Data’. Then, on the secondary unit you’ll do the same (or, likely, your friend will). Then you’ll choose ‘Unit to Unit’:

Next, you’ll choose whether you’re planning to send something, or receive something. In this case, I’ll send something. So I’m going to select that. Then I’m going to select what I’m going to send, which will be a ‘Track’. In my case, I’m simply selecting a previous Track that I ran.

Once I do that, I’ll go ahead and begin attempting to send the file. On the secondary unit, you’ll need to go ahead and choose to receive something. At this point magic happens and the files are transferred between the two units:

The secondary method of transferring data is via Bluetooth Smart enabled smartphone. This method also allows you to create waypoints as well on the phone, and then transfer them back to your unit. This does require a Bluetooth 4.0 compatible smartphone. For example, on the iOS platform that means anything above an iPhone 4s.
You’ll go and download the free ‘Basecamp’ application, which is Garmin’s mobile variant of their larger Basecamp desktop software. The app isn’t terribly complex, but it does contain a few basic features. Once you’ve got the app loaded you’ll go ahead and tap the bottom ‘Device’ tab and then click to search for your device. Meanwhile, on the Tactix you’ll go back into the ‘Share Data’ area and simply choose ‘Basecamp’.

This all occurs via Bluetooth Smart and doesn’t require you to go into your phone’s Bluetooth Control panel. A few seconds later it’ll connect to your device and open up a list of items on your Tactix.

Within this list you’ll see Tracks, Routes, and Waypoints. You can then go ahead and select a track to get more detail. When you do so it’ll start by showing you the track overlaid on the map.

From there you can look at summary information for the track:

As well as produce graphs for temperature, speed, elevation, heart rate, and cadence.

Next, comes one of the more useful options: The ability to create a waypoint on the device using maps and transfer it to the Tactix. To do this you’ll select Edit, and then create a new Waypoint. This will open up the Map display where you can zoom in/out and find the location you’re looking for.

Then, using the little target you’ll go and and drop your dot for the waypoint. Following which, you can name the waypoint and assign one of a crapton of icons for it.

In my case, I just named it CDG:

After that’s completed, it’ll be transferred to the device, ready for you to use in navigation.

Now, there are some challenges here. Like the Fenix, you can’t actually upload any of this data to Garmin Connect – which is where most running-focused data goes. This is the same disconnect that was present last fall when the Fenix came out. Second is that Garmin Connect has a powerful route builder, but you can’t transfer that via phone either to your Tactix (or Fenix). You can do this on other Garmin Fitness units, such as the Garmin Edge 510 and Edge 810. You can transfer it via PC, but then it shows up as a Track, rather than a route.
Garmin Adventures, Garmin Basecamp, and Garmin Connect:
Garmin offers three different platforms for connecting to the Tactix/Fenix. Each of these platforms does slightly different things. Let’s try and quickly run through them.
Garmin Basecamp:
This desktop software suite is Garmin’s main solution for route and waypoint planning, as well as transferring of maps to some of the other Garmin handheld and mapping units. Additionally, it also allows you to prepare GPS location-stamped photo maps based on your Tactix/Fenix software.

Basecamp uses what’s called a base mapset, which is a sparsely populated map that helps you plan your routes/waypoints. This is why it’s really much better to use your phone if you can, because then it pulls from Google satellite maps rather than the below map, which has virtually nothing on it.

You can also pay to add maps, but that costs a fair bit. I’m hoping at some point they’ll just simply allow you to leverage the OpenStreet maps – like some of the other newer products such as the Garmin Touring do now. OpenStreet maps are free.
Nonetheless, pretending that this map is semi-useful I’ll pick a random place of non-discernable locale. Actually, I’ll right click it. Which then pops up the following menu allowing me to set a waypoint or begin a route.

Next, I can open up that waypoint and add a bunch of information into it. By default the GPS position is specified for me, and everything else is up to me to add. You can choose from a ton of icons, including apparently, a Panda bear. I wonder if the Panda bear icon has ever been used before for a waypoint. As in, ever in the history of the universe. If so…for what purpose precisely?

Nonetheless, me and the Panda were ready to move onwards, so, we closed out the window. Obviously, the Panda was ready too:

With that set, we’ll go ahead and click on the point in the collection, and then select to send it to a destination, in this case, the Tactix.

A split second later the transfer will complete, and if you look at the left side while highlighting the point, you’ll get the waypoint location shown as being on the internal Tactix storage:

The same concept can be applied to creating routes as well. For example, in this case I made a couple of dots along the main roads from the Panda Point to the Zoo (in purple). The teal track you see is because I’ve got the Tactix highlighted, so it’s showing me some of my running routes that I’d done with the unit.
After I completed the route, you can see I’ve opened it up, and it shows me my key waypoints along the way.

I can slightly tweak some of these points from an alerting standpoint, as well as change the order.
Again, like the waypoints, once completed here you’ll just send the route directly to the unit. It only takes a second to transfer.
Garmin Adventures:
While you start off with creating an adventure from Basecamp, once you get into the wizard it’s really a separate platform. An adventure allows you to automatically geotag photos based on the location in your track aligned to the cameras timestamp. In order to make this process a heck of a lot easier, try and ensure those devices have the same timestamp.
I started off by choosing to create an adventure based on a run I did around Paris. You can see this selected in the first screen of the wizard.

Next, I went into my photo card and grabbed all the photos I took from the run. Most of these photos aren’t terribly exciting – as many are shots of the watch itself I’d use in this review. But some are just random things I saw along the run.

Then, you’ll go ahead and give it a name, description and some other properties along the bottom. After which, tap Finish.

In addition, you can also do the same thing and adjust the date/timestamp of the photos to better match the track.
To start with, I’ll right click a track and then select to Geotag photos. Then, I’ll choose the photo folder from my hard drive.

After you’ve selected the photos you can go ahead and timeshift them if need be, this is usually because your timestamp is off.

Once that’s done, it’ll go ahead and import the photos into the collection, ready for viewing on the map.

There’s a fair bit more minor functionality within Basecamp, but much of it won’t apply to the Tactix/Fenix since it deals with mapping. The key activities in Basecamp for those two devices are around waypoints and routes.
Garmin Connect Route Mapping:
Last but not least, you’ve got Garmin Connect. Now Garmin Connect route creation is actually the coolest of them all. Mostly because you’ve got a usable map to work with:

And, on top of that you can see I even get elevation information, mile markers and the works. It’s great.
At the end, you just click ‘Send to Device’, and select the Tactix:

Now, there’s one minor catch here. Once the routes from Garmin Connect are sent to your device, they’re not actually ‘Routes’ per what Tactix understands them to be. Rather, they come across as tracks, which essentially appear as completed activities. All’s not lost though, you can still route/follow a track, it just won’t have as much information around things like waypoints in them.
Uploading completed workouts to Garmin Connect via computer (USB):
In addition to the mobile options, you’ll use USB to upload your completed workouts (or tracks) to Garmin Connect. To do so, go ahead and plug the unit into the computer, then navigate to Garmin Connect and click the big ‘Upload’ button in the upper right corner. Once that’s done, it’ll bring you here:

Note, in the event your Tactix doesn’t show up, double-check the USB setting within the Setup menu. By default it’s set to enumerate on the computer as a USB device, but if it somehow got switched to the secondary mode, it won’t show up.
At any rate, once you click ‘Upload All New Activities’, which will go ahead and list all activities, with ones you haven’t uploaded yet.

Next, go ahead and click on “View Details”, which will open up that activity. From there you’ll see an overview of the activity, which you can dive down into the details of by scrolling down the screen. The upper half includes summary information as well as a map overview.

Meanwhile, scrolling down further, you’ll get pace graphs along with elevation and heart rate data. Along the left you can see the various interval times and distances as well as average paces.

Finally, getting to the bottom we’ve got cadence (if you have a footpod), and temperature. In this case temperature was provided via the internal temperature sensor within the Tactix. Whereas if you had Tempe sensor (temperature), it would come from that instead. The weather information on the side is pulled from local sources based on databases online.

You can click to expand any of these graphs, as well as click to zoom in on certain chunks of the graphs.
Additionally, you can also click up top on the ‘Splits’ tab and get more information about splits that were recorded – either manually or automatically.

Lastly, there’s also the ‘Player’ function, which will display a much faster replay of your run. This will merge your geographic location with your sensor data:

In addition to viewing any of your data, you can also go ahead and export out data to TCX and GPX files, as well as straight into a Google Earth KML. Of course, the unit is also recording both a .GPX and .FIT file (if you selected those formats), so you can just pick those up right off the unit itself just via Windows Explorer (on a PC).

Ultimately, it’s important to remember that Garmin Connect is just one outlet for using your Tactic data. Because it uses the industry standard .TCX/.GPX/.FIT/.KML file formats, you can pretty much load it into any application out there. Or at least, any application worthwhile using (I’m not aware of any that don’t support one of those four file formats).
Bugs and Miscellaneous:

In recent reviews I’ve been adding a bugs section to cover things that I stumbled upon. Because I’ve had the watch for a bit now, I’m really only focusing on bugs that I’ve seen on the final firmware. Remember a ‘bug’ is different than ‘by design’. For example, the lack of a feature is something I highlight within a given section is considered ‘by design’, whereas something not really working right is below.
In the case of the Garmin Tactix, the issues I’ve seen are largely in the annoyances category, rather than the show-stopper category. This is based on what I’ve been told is essentially the final firmware. In the event items unexpectedly change, then that should be noted.
– The unit takes a really long time to save a track file after completion. For example, a 90-minute run (GPS + Heart Rate + Cadence) took almost 4 minutes to save the file. That’s not transferring it off the computer (that takes a split-second), but rather the act of saving on the Tactix itself.
– I’m seeing some alerting oddities with Virtual Partner and it falling asleep on me. Perhaps my Virtual Partner is lazy. In either case, the Garmin Tactix development team is looking into it.
– I’ve seen a couple of instances where transferring tracks between units has had hiccups and had to be retried, where it then succeeded. Again, the Tactix team has taken the offending files and is looking into it.
Now, this doesn’t mean this is all the bugs/annoyances out there. This is just the ones I saw during my running and/or use. As a single person I can’t possibly test every possible feature in every possible combination to reproduce every possible scenario. Sure, I’d love to – but companies have entire teams of testers and they still miss things. So I do the best I can to note what I’ve seen above.
Pros and Cons:
I always hate writing the Pros and Cons section because it’s really trying to narrow down a massive review with a lot of important nuances into something best seen in a one-page magazine advertisement. Nonetheless, here goes as usual:
Pros:
– Long battery life – upwards of 50+ hours
– New military focused features such as NVG-friendly display and Jumpmaster mode
– Durable construction, waterproofed to 50-meters
– Tons of functionality in the navigation/orienteering space
– A good option for trail runners doing ultras
Cons:
– The separate camps of the different Garmin platforms still present (i.e. Basecamp, Garmin Connect, etc…)
– The long-life battery options are somewhat confusing (much clearer to understand on Suunto Ambit units)
– Doesn’t quite have as much functionality as a typical Garmin running watch
Product Comparison Chart:
Below is a comparison chart comparing the units in this category. I’ve selected the units that are most comparable, and most likely to be compared. However, if you want to compare other units, simply go to the full product comparison page here, and you can mix and match units till your hearts content!
| Function/Feature | Garmin Tactix | Garmin Fenix | Suunto Ambit2 | Suunto Ambit |
|---|---|---|---|---|
| Copyright DC Rainmaker - Updated April 29th, 2021 @ 5:06 am New Window | ||||
| Price | $450.00 | $299 (on sale) | $319 | $400.00/Discontinued |
| Product Announcement Date | Oct 22, 2013 | JUL 10, 2012 | APR 29, 2013 | Jan 18, 2012 |
| Actual Availability/Shipping Date | Nov 2013 | AUG 2012 | May 2013 | Apr 2012 |
| GPS Recording Functionality | Yes | Yes | Yes | Yes |
| Data Transfer | USB & Bluetooth Smart | USB & Bluetooth Smart | USB | USB |
| Waterproofing | Yes - 50m | Yes - 50m | Yes - 100m | Yes - 100m |
| Battery Life (GPS) | 50 hours | 50 hours | 50 hours | 50 hours |
| Recording Interval | Variable | 1s to variable | Variable | Variable |
| Alerts | Vibrate/Sound/Visual | Vibrate/Sound/Visual | Sound/Visual | Sound/Visual |
| Ability to download custom apps to unit/device | No | No | Yes | Yes | Connectivity | Garmin Tactix | Garmin Fenix | Suunto Ambit2 | Suunto Ambit |
| Bluetooth Smart to Phone Uploading | Yes | Yes | No | No |
| Phone Notifications to unit (i.e. texts/calls/etc...) | Yes | Yes | No | No |
| Live Tracking (streaming location to website) | No | Yes (as of Feb 2014) | No | No |
| Emergency/SOS Message Notification (from watch to contacts) | No | No | No | No |
| Built-in cellular chip (no phone required) | No | No | No | No | Cycling | Garmin Tactix | Garmin Fenix | Suunto Ambit2 | Suunto Ambit |
| Designed for cycling | Yes | Yes | Yes | Yes |
| Power Meter Capable | No | No | Yes | No |
| Power Meter Configuration/Calibration Options | N/A | N/A | Yes | N/A |
| Power Meter TSS/NP/IF | N/A | N/A | No | N/A |
| Speed/Cadence Sensor Capable | Yes | Yes (full support added Sept 2013) | Yes | Yes | Running | Garmin Tactix | Garmin Fenix | Suunto Ambit2 | Suunto Ambit |
| Designed for running | Yes | Yes | Yes | Yes |
| Footpod Capable (For treadmills) | Yes | Yes | Yes (internal accelerometer) | Yes |
| Running Dynamics (vertical oscillation, ground contact time, etc...) | No | No | No | No |
| VO2Max Estimation | No | No | Yes | Yes |
| Race Predictor | No | No | No | No |
| Recovery Advisor | No | No | Yes | No |
| Run/Walk Mode | No | No | No | No | Swimming | Garmin Tactix | Garmin Fenix | Suunto Ambit2 | Suunto Ambit |
| Designed for swimming | No | No | Yes | No |
| Openwater swimming mode | N/A | N/A | Yes | N/A |
| Lap/Indoor Distance Tracking | N/A | N/A | Yes | N/A |
| Record HR underwater | N/A | No | No | No |
| Openwater Metrics (Stroke/etc.) | N/A | N/A | Yes | N/A |
| Indoor Metrics (Stroke/etc.) | N/A | N/A | Yes | N/A |
| Indoor Drill Mode | N/A | N/A | Yes | N/A |
| Indoor auto-pause feature | N/A | N/A | No | N/A |
| Change pool size | N/A | N/A | Yes | N/A |
| Indoor Min/Max Pool Lengths | N/A | N/A | 15m/y to 1,200m/y | N/A |
| Ability to customize data fields | N/A | N/A | Yes | N/A |
| Captures per length data - indoors | N/A | N/A | Yes | N/A |
| Indoor Alerts | N/A | N/A | No | N/A | Triathlon | Garmin Tactix | Garmin Fenix | Suunto Ambit2 | Suunto Ambit |
| Designed for triathlon | No | No | Yes | No |
| Multisport mode | N/A | N/A | Yes | N/A | Workouts | Garmin Tactix | Garmin Fenix | Suunto Ambit2 | Suunto Ambit |
| Create/Follow custom workouts | Yes (As of Dec 6, 2013) | Yes (As of Dec 6, 2013) | No | No |
| On-unit interval Feature | Yes (As of Dec 6, 2013) | Yes (As of Dec 6, 2013) | Barely | No |
| Training Calendar Functionality | No | No | No | No | Functions | Garmin Tactix | Garmin Fenix | Suunto Ambit2 | Suunto Ambit |
| Auto Start/Stop | Yes | Yes | Yes | No |
| Virtual Partner Feature | Yes | Yes | No | No |
| Virtual Racer Feature | No | No | No | No |
| Records PR's - Personal Records (diff than history) | No | No | No | No |
| Tidal Tables (Tide Information) | Yes | No | No | No |
| Weather Display (live data) | No | No | No | No | Navigate | Garmin Tactix | Garmin Fenix | Suunto Ambit2 | Suunto Ambit |
| Follow GPS Track (Courses/Waypoints) | Yes | Yes | Yes | Yes |
| Markers/Waypoint Direction | Yes | Yes | Yes | No |
| Offline Maps | No | No | No | No |
| Back to start | Yes | Yes | Yes (added Aug 30, 2013) | Yes (point to point only) |
| Impromptu Round Trip Route Creation | No | No | No | No |
| Download courses/routes from phone to unit | Yes | Yes | No | No | Sensors | Garmin Tactix | Garmin Fenix | Suunto Ambit2 | Suunto Ambit |
| Altimeter Type | Barometric | Barometric | Barometric, GPS (FusedAlti) | Barometric |
| Compass Type | Magnetic | Magnetic | Magnetic | Magnetic |
| Heart Rate Strap Compatible | Yes | Yes | Yes | Yes |
| ANT+ Heart Rate Strap Capable | Yes | Yes | Yes | Yes |
| ANT+ Speed/Cadence Capable | Yes | Yes | Yes | Yes |
| ANT+ Footpod Capable | Yes | Yes | Yes | Yes |
| ANT+ Power Meter Capable | No | No | Yes | No |
| ANT+ Remote Control | Yes | Yes | No | No |
| ANT+ eBike Compatibility | No | No | No | No |
| Shimano Di2 Shifting | No | No | ||
| Bluetooth Smart HR Strap Capable | No | No | No | No |
| Bluetooth Smart Speed/Cadence Capable | No | No | No | No |
| Bluetooth Smart Footpod Capable | No | No | No | No |
| Bluetooth Smart Power Meter Capable | No | No | No | No |
| Temp Recording (internal sensor) | Yes | Yes | Yes | Yes |
| Temp Recording (external sensor) | Yes | Yes | No | No | Software | Garmin Tactix | Garmin Fenix | Suunto Ambit2 | Suunto Ambit |
| Desktop Application | Basecamp | Basecamp | Moveslink Agent | Moveslink Agent |
| Web Application | Garmin Connect | Garmin Connect | Movescount | Movescount |
| Phone App | Garmin Basecamp | Garmin Basecamp (iOS) | Suunto Movescount | Suunto Movescount |
| Ability to Export Settings | Yes (profiles XML) | Yes (profiles XML) | Yes (online) | Yes (online) | Purchase | Garmin Tactix | Garmin Fenix | Suunto Ambit2 | Suunto Ambit |
| Amazon | Link | Link | Link | Link | DCRainmaker | Garmin Tactix | Garmin Fenix | Suunto Ambit2 | Suunto Ambit |
| Review Link | Link | Link | Link | Link |
Remember that not all units fit into the table, so it’s best to swing over to the full production comparison tool and mix and match the units you’d like to compare.
Ok, I’m confused, should I get the Tactix or something else?

The Tactix (along with the Fenix) can be a bit of a peculiarity for straight runners – often leaving them with a bit of confusion as to whether or not either device is appropriate for them. This stems from the fact that you really need to think of both devices as a marriage between the Outdoor handheld segment, and the Running segment. And just like in marriage in real life – you sometimes give up things from both partners to make it work.
For military/law enforcement: I won’t pretend to know the operational side of this equation (I didn’t stay at a Holiday Inn Express last night either, just a Sheraton), but I’ll go out on a limb and assume there is indeed some overlap between people who buy these units, and people who need non-reflective displays and watches, as well as watches that won’t flare up with night vision goggles. There are simply no other downloadable/connected GPS+ABC units available on the market that I’m aware of that contain the physical hardware features as well as the software features. Thus, if you were looking to spend money on the Fenix or Ambit, the Tactix would probably be worth the $50 additional cost ($449 instead of $399).
For trail runners: If you’re running on trails, then you should look at what type of environment you’re running in. If it’s largely flat, then you won’t really get much out of the Tactix/Fenix over traditional GPS watches. If you’re running in hills, then you’ll get the barometric altimeter. But, ensure that you’re actually going to utilize that elevation reading for something related to training – rather than just an occasional glance. In that case, there’s options for runners with more running-focused functionality than the Tactix/Fenix (such as the FR610, FR620, and FR910XT from the Garmin lineup).
For road runners: If you’re primarily on roads, then I see little reason to go with the Tactix/Fenix. These watches are meant for navigation, primarily off-road in conditions that don’t include strip malls. There isn’t running-specific functions like an interval timer, nor any sort of downloadable workouts to the watch (i.e. structured workouts). All those are found in other units.
For ultra trail runners in the mountains: If you fall into this category, then it makes sense to look at the Tactix/Fenix. You’d be able to plot out routes and save waypoints, increases the chances that you’ll successfully navigate your route and not end up as bear feed. The battery life is extended beyond what most units on the market have, except the FR910XT. While there is the UltraTrac mode within the Tactix/Fenix (and Suunto has a similar mode), the 60-second recording rate is a tough compromise to make for running. For walking, sure, no problem. But a lot of ground can be covered in 60-seconds while running.
For hikers: This is another category that the Tactix/Fenix really excels at. The 50+ hour battery life with GPS on using UltraTrac is really all about this. You can disable the GPS at night, and even with 8+ hours of movement per day ,that’s basically a week’s worth of GPS tracking. In this usage scenario the UltraTrac mode would indeed be useful because the amount you’ll move walking within a 60-second period is virtually insignificant, especially if you’re talking 50+ hours of recorded track time.
For triathletes: While this probably goes without saying, I’ll say it anyway. For triathletes, the Tactix/Fenix simply makes no sense. It doesn’t contain a multisport mode, nor many of the other features that most triathletes would find useful (like swim tracking, power meter support, etc…). I’d suggest you check out the Garmin FR910XT, or the Suunto Ambit 2/2s.
Summary:

For those that have made it this far, you’ll probably realize that in many ways this review is as much a second review of the Fenix as it as a first review of the Tactix. Over the past year since the Fenix released, they’ve made a boatload of changes – virtually all of them for the better. So while I could have simply put forth a Tactix review in a single section and told you to read the Fenix review, there’s been so many changes since the Fenix review that I kinda wanted a bit of a clean slate on this review (because of my high level of frustration with Fenix at release).
Since then, the vast majority of my frustrations have been addressed. Whether it be running-specific features, or just general usability things – all of which have been improved. Plus, we saw new features as well like the beta skiing mode (applicable to both Tactix and Fenix) as well as adds like Virtual Partner.
There are still areas that I believe Garmin can focus on – specifically in the smart phone app side of things and improving that situation a bit more – making it more cohesive. Right now the app is really a bit of an island to itself, rather than integrating with the rest of the online Garmin platform.
For the military and law enforcement crowd, I’ll be interested to see how valuable the Tactix-specific features and functions are and whether this watch overlaps in a true workplace scenario, or if it’s more of a neat to have situation. It’ll be somewhat fascinating to see whether or not the unit caught on, as if it does, I suspect we’ll see others like Suunto make minor tweaks to the Ambit and offer a similar unit.
Found this review useful? Or just want a sweet deal?
Hopefully you found this review useful. At the end of the day, I’m an athlete just like you looking for the most detail possible on a new purchase – so my review is written from the standpoint of how I used the device. The reviews generally take a lot of hours to put together (especially this one, probably the longest and most detailed I’ve ever done), so it’s a fair bit of work (and labor of love). As you probably noticed by looking below, I also take time to answer all the questions posted in the comments – and there’s quite a bit of detail in there as well.
I’ve partnered with Clever Training to offer all DC Rainmaker readers exclusive benefits on all products purchased. You can read more about the benefits of this partnership here. You can pickup the Tactix through Clever Training using the link below. By doing so, you not only support the site (and all the work I do here) – but you also get to enjoy the significant partnership benefits that are just for DC Rainmaker readers. And, since this item is more than $75, you get free US shipping as well.
Garmin Tactix GPS + ABC watch
Garmin Tempe ANT+ Temperature Sensor
Additionally, you can also use Amazon to purchase the unit (all colors shown after clicking through to the left) or accessories (though, no discount on Amazon). Or, anything else you pickup on Amazon helps support the site as well (socks, laundry detergent, cowbells). If you’re outside the US, I’ve got links to all of the major individual country Amazon stores on the sidebar towards the top.
As you’ve seen throughout the review there are numerous compatible accessories for the unit. I’ve consolidated them all into the below chart, with additional information (full posts) available on some of the accessories to the far right. Also, everything here is verified by me – so if it’s on the list, you’ll know it’ll work. And as you can see, I mix and match accessories based on compatibility – so if a compatible accessory is available at a lower price below, you can grab that instead.
Thanks for reading! And as always, feel free to post comments or questions in the comments section below, I’ll be happy to try and answer them as quickly as possible. And lastly, if you felt this review was useful – I always appreciate feedback in the comments below. Thanks!
Finally, I’ve written up a ton of helpful guides around using most of the major fitness devices, which you may find useful in getting started with the devices. These guides are all listed on this page here.


