Yesterday I got to take out for a spin a new combination tail-light and HD camera that just launched on Kickstarter yesterday as well. The Fly6 camera is designed to act as a bit of a safety cam – recording whatever goes on behind you, while at the same time acting as a rear light.
While I’ve only spent a short amount of time with the unit, it seems to be enough to get the gist of things and provide some initial opinions. Given Kickstarter campaigns have a finite life (30 days), and and even smaller window for the cheaper options, I figured sooner was better.
What’s in the box:
Cracking open the box, you’ll find things very well padded/secured. The box itself is about the size of a cigar box.
As you can see above, everything is very neatly arranged inside with each component in their own little foam homes. I do suspect that long-term they’ll probably minimize all that separation for the non-light pieces (mounts), as it realistically just adds a lot to international shipping costs and they could probably slice the box in half without it.
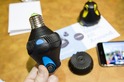
Here’s what you’ll find inside. On the upper left and bottom you have the rubber straps that secure it to your seatpost. In the center you’ve got a variety of mounts, also used for securing to the seatpost. On the right there’s the unit itself, along with the standard mini-USB cable. And finally, on the middle-left you’ve got the Micro-SD card adapter, used to put the Micro-SD card from the unit into your computer.
Here’s a closer look at the mounts. In order to mount a unit you’ll need two straps and one of the plastic things on the right side. The rubber pieces up top allow you to change the angle based on your seatpost angle. If you look at your bike you’ll find that very rarely are seatpost’s directly straight up and down. So these are little wedges to even it out. And finally, the big wedge up there is to attach to an aero seatpost. So, all in, you’ve got enough to mount to two bikes concurrently (limited by the two plastic pieces).
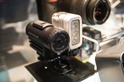
Finally, here’s the unit itself, as seen from the front:
And, as seen from the side. You can see the power button on the left side there. And then the ‘rail’ that it slides down into the mount on; it’s sitting on the rail in this shot.
Oh, and here’s one last look, removing the cap to show the USB port itself as well as the Micro-SD card itself. The unit is interestingly proofed with a waterproofing technology that keeps everything completely waterproof. You often see companies demonstrating it at CES & trade shows where they’ll drop full phones/iPad’s/etc straight into an aquarium and leave it there. Effectively internally waterproofing it. The process is called Nano-Tech waterproofing, and you can read more about it on the interwebs.
Installation and Setup:
Ok, in order to install the thing on your bike you’ll basically need three components + two straps. Starting with the components above you’ve got the light itself, then the plastic mount, and then the rubber wedge.
You can see how these come together below:
Ultimately, the rubber wedge and the plastic piece stay on your bike using the rubber mounting bands. And then the unit just slides in and out on a rail so you can stick it in your pocket (or cycling shoes) for safe-keeping.
Next is the mounting on the poke. In this case you simply take the two bands and wrap them around. You can play around with how tight you make the bands. I went for a bit tighter after taking the below photo.
In the event you’ve got an aero seatpost, like below, you’ll use the bigger wedge first, and then the bands. Here’s the wedge on such a bike.
And then here’s the whole thing installed on the aero seatpost. Pretty straight forward and kinda hard to screw up.
Finally, note that the unit is rated for a 5 hour run time. I haven’t tested that piece yet. And of course, it just detaches with a little tug upwards to then plug into any USB outlet you can find.
On the bike and test videos:
Now that we’ve got everything all set, it’s time to head out for a ride. To turn it on, you’ll simply hold the left button down for 2 seconds. That’s it. It’ll make some sharp beeps to let you know of the battery state. It’s very loud and easy to hear.
At that point it’s both blinking and recording. You’ll know the camera is operating when the swirling flashing light is…well…swirling.
You can then cycle through three different blink modes by using the right button. By default it’ll always start-up to the ‘high’ mode. But you can press it again to go into the least-bright mode (low), then again for no LED mode, and three times for super-bright mode. The camera is always on, it cannot be turned off (that’s sorta the point). The reason you might dim the lights is if you were in some setting such as a group ride and it was a bit bright for people on your wheel.
Here’s a quick demonstration video of me turning on the unit sitting in the dark, and then iterating through the three modes, and then finally walking back a bit so you can see the brightness. At it stands today the prototype units are rated at 9 lumens, however the next pilot group in March will be 15 lumens.
Before we get to some actual video, a few notes on the straps. In my case, even the small straps were kinda oversized – so they were a bit sloppy on one side.
I wanted to show the above, because I suspect that virtually every other shot you’ll see will look all pretty and show the other side, seen below:
And here’s how it looks looking back:
Ok, with that, let’s take a look at some footage. I’ve got three pieces of footage that I’ve uploaded without any editing or tweaking. Just chunks of me riding on the bike around the city. The first was done in broad daylight, about 3:55PM – almost two hours before sunset. It’s interesting to note that in all three videos the video does appear slightly darker than it actually was outside. Here’s the first daylight video:
The second was done at dusk, about 20-30 minutes before darkness:
And finally, the third was done just after dusk. It might get a smidge darker, but here in the city there’s tons of ambient light – so that’s about as dark as it’ll get. The camera does not have any night-vision type functionality in it, so it needs some sort of light to illuminate items (street/sun/etc…).
As you can see with the last one, you can see the effect of the light ring looping around. Because the purpose of said video is really more about recording an incident than it is about producing an award winning film, that doesn’t bother me too much.
I did see one issue where the camera is randomly shutting off about 10-20 minutes into a clip. I’m not clear why. However, I noticed after my first segment that there was a rattle coming from inside, so I think something inside broke that may be impacting things somehow. It’s a prototype unit, so I’m not terribly concerned about that bug/issue at the moment. They provided a laundry list of other bugs that they were working on for the March beta shipments.
Viewing the files/recording details:
In the event you want to view the files post-ride, you’ve got two options. First, you can simply plug the whole thing into your computer via the provided USB cable, and the device will surface up just like any USB thumb drive.
The second option is that you can use the included Micro-SD card adapter, which turns the Micro-SD card into a standard SD card – just like your camera probably has. This can then be slipped into the computer (assuming your computer has such a slot), or, an adapter. Either way, pretty easy.
The unit records an .AVI file in 720p resolution, which can be easily played with just about any video player on earth. In the event your computer doesn’t play the .AVI file, I suggest returning that 386/DX Packard Bell to Circuit City or CompUSA and upgrading.
As for the quality, you’ve gotta keep in mind that this isn’t designed to be a GoPro replacement. Rather, it’s designed to record what’s going on behind you in the event of an incident. There’s obviously a clear difference in quality between a GoPro (or similar action cam) at 720p and this unit at 720p. But, that’s sorta why the GoPro costs twice as much, and lacks the blinking tail-light piece.
As you can see above, a 4 minute file takes up about 220MB, so an hour’s worth of footage takes up about 3.3GB (3,300MB). The unit includes an 8GB card – so enough for a little more than 2 hours worth of footage. It’ll also automatically loop/overwrite itself, so you don’t have to worry about clearing old files off.
Because the unit uses standard Micro-SD cards, you can buy your own (larger) card for about $10-$20. I stuck with a 32GB card for about half my tests, simply to validate there were no problems. The unit at this time doesn’t support 64GB cards, but it’s not clear if that’s just a beta limitation or not.
Final Thoughts:
Overall, I’m fairly impressed with the simplicity of the unit and the ‘just works’ factor of the Fly6 unit. There’s been a few other rear and forward facing units on the market lately (well, Kickstarter anyway), but this is a much more seamless integration into a component I already need (the light) than the others.
And, more importantly – they actually have a working sample to send to me. I can’t stress the importance of that enough when it comes to Kickstarter projects. In fact, it’s my ‘golden rule’ for whether I write a full post about a project (like this), or if a project is just relegated to the ‘Week in Review’ posts. If a company can’t send me a unit to poke at, or, can’t at least physically show me a unit I can lay my hands on – then I don’t really trust that they’re at the point of being ready to launch a Kickstarter project. Or at least, a Kickstarter project that I’ll write about. History has shown time and time again how poor companies are on Kickstarter at managing timelines, expectations, communications, and product delivery.
So with that – keep in mind that Kickstarter is a ‘buyer beware’ type venture. Looking at what they delivered me, I’d classify the project as ‘low risk’. The unit works today, has some minor bugs, but otherwise is fairly solid from what I can tell. They noted they have 150 other units out in the field with riders today, so that’s also positive.
As for whether or not you should get an action camera or a safety camera – that’s really a personal choice. Action cameras are great for capturing action you want to share, usually with some sort of storyline around it (even if it’s as simple as: Watch me beat my friends cycling). Whereas safety cameras should be as simple and seamless as possible so that they’re dependable with minimal features. Power on, record. That’s it. Just my two cents.
I swim, bike and run. Then, I come here and write about my adventures. It’s as simple as that. Most of the time. If you’re new around these parts, here’s the long version of my story.
You'll support the site, and get ad-free DCR! Plus, you'll be more awesome. Click above for all the details. Oh, and you can sign-up for the newsletter here!
Here’s how to save!
Wanna save some cash and support the site? These companies help support the site! With Backcountry.com or Competitive Cyclist with either the coupon code DCRAINMAKER for first time users saving 15% on applicable products.
You can also pick-up tons of gear at REI via these links, which is a long-time supporter as well:
Alternatively, for everything else on the planet, simply buy your goods from Amazon via the link below and I get a tiny bit back as an Amazon Associate. No cost to you, easy as pie!
You can use the above link for any Amazon country and it (should) automatically redirect to your local Amazon site.
While I don't partner with many companies, there's a few that I love, and support the site. Full details!
Want to compare the features of each product, down to the nitty-gritty? No problem, the product comparison data is constantly updated with new products and new features added to old products!
Wanna create comparison chart graphs just like I do for GPS, heart rate, power meters and more? No problem, here's the platform I use - you can too!
Think my written reviews are deep? You should check out my videos. I take things to a whole new level of interactive depth!
Smart Trainers Buyers Guide: Looking at a smart trainer this winter? I cover all the units to buy (and avoid) for indoor training. The good, the bad, and the ugly.
Check out
my weekly podcast - with DesFit, which is packed with both gadget and non-gadget goodness!
Get all your awesome DC Rainmaker gear here!
FAQ’s
I have built an extensive list of my most frequently asked questions. Below are the most popular.
You probably stumbled upon here looking for a review of a sports gadget. If you’re trying to decide which unit to buy – check out my in-depth reviews section. Some reviews are over 60 pages long when printed out, with hundreds of photos! I aim to leave no stone unturned.
I travel a fair bit, both for work and for fun. Here’s a bunch of random trip reports and daily trip-logs that I’ve put together and posted. I’ve sorted it all by world geography, in an attempt to make it easy to figure out where I’ve been.
The most common question I receive outside of the “what’s the best GPS watch for me” variant, are photography-esq based. So in efforts to combat the amount of emails I need to sort through on a daily basis, I’ve complied this “My Photography Gear” post for your curious minds (including drones & action cams!)! It’s a nice break from the day-to-day sports-tech talk, and I hope you get something out of it!
Many readers stumble into my website in search of information on the latest and greatest sports tech products. But at the end of the day, you might just be wondering “What does Ray use when not testing new products?”. So here is the most up to date list of products I like and fit the bill for me and my training needs best! DC Rainmaker 2024 swim, bike, run, and general gear list. But wait, are you a female and feel like these things might not apply to you? If that’s the case (but certainly not saying my choices aren’t good for women), and you just want to see a different gear junkies “picks”, check out The Girl’s Gear Guide too.