
This post started almost 100% for my own reference as a simple notepad file. But enough people asked about my random Instagram stories using it for Zwift and TrainerRoad, that I figured I’d write it up into something semi-cohesive. While the concept of loading apps like Netflix on a Peloton bike is hardly new (with much of it documented on Reddit), loading TrainerRoad or Zwift specifically is relatively unheard of. Both are technically easy to load, but Zwift was much trickier to sort out all the nuanced steps.
Now, the only ‘bad news’: You’ll need power meter pedals to make this work. I can’t get around that (and nobody to my knowledge has). The good news is that you can use even crazy-old Vector 1 or Favero BePro pedals if you can find them on eBay or something. That’s because the Peloton bike actually supports connecting to ANT+ sensors. More on this later.
If you’re tech savvy, the overall install process is pretty easy – about 10-15 mins for TrainerRoad and 15-20 mins for Zwift. If you’re familiar with sideloading Android apps, then it’s trivial. Whereas if you come from the iOS world, you’ll probably scratch your head a few times but keep on chuggin’. To my knowledge, there is nothing here that ‘voids’ your Peloton warranty per se (at worst you simply reset your screen to defaults). But then again, they technically void your warranty for changing out your pedals…so…shrug? Either way, you’re on your own.
In any case, the end resultant of loading Zwift or TrainerRoad on a Peloton bike is that you can ride Zwift or TrainerRoad on your Peloton screen.
Some may be asking: Why?
To which I respond: Some idiot many years ago looked at a piece of horribly moldy cheese that might kill them and thought: I should eat that, maybe it’ll taste good!
And thus, we now have blue cheese and stinky fridges everywhere.
Actually, the answer is simple. As I’ve heard from many of you, you might already have the Peloton bike in your home for its primary purpose (riding the Peloton app). So to be able to re-use it for riding TrainerRoad or Zwift is handy for some folks. In fact, I’ve used it a number of times that way over the last 5 months. At home I keep the Peloton bike in our living room, whereas I have a spare bike on a trainer in a shed thing. All the rest of my trainer/bike gear is at the office. So if I’m also keeping an eye on the kids at the same time as I’m doing a workout, then I’ll likely ride the Peloton bike.
Practically speaking riding the Peloton bike for a TrainerRoad workout is not really any different than a non-smart trainer. The same goes for Zwift. The only difference is that instead of shifting you use the resistance knob. It makes for a perfectly functional TrainerRoad session, but realistically a less than optimal Zwift experience. But you already knew that going into this.
Anyway, let’s get moving.
(Ok, and yes, I’m still planning on writing up my full Peloton review touching on accuracy/usage/etc. All the normal bits. The long pole in the tent was honestly moving it from home to the DCR Studio to get final photos/videos, which, I did via cargo bike this morning as some of you saw on my Instagram stories. So now that’s done, expect a review shortly. Also, for those not following along, the TDLR is that I bought a barely used Peloton back in January in Las Vegas while there for CES. I disassembled it into a million pieces in my hotel room, then brought it on the airplane with me back to Amsterdam and re-assembled it. The 200-post long story of that is on my Instagram Stories archive in two pieces. Enjoy!)
Why You Need Power Meter Pedals:

Now as I stated before, you’ll need power meter pedals here. Any pedals will do. Technically a company like Stages, 4iiii, or even Avio could develop a stick-on style power meter for the Peloton crank arms. Though, that’d probably require some incentive to do so. So till then, power meter pedals are where its at.
The reason you need this is that Peloton does not broadcast your power (or cadence) over any standard protocol (ANT+ or Bluetooth Smart). Instead, that’s done via wires directly into the bike itself for its own app. Surprisingly, despite nearly a million of these bikes out in the wild, nobody has actually decided this successfully as a small app that can run on the bike and broadcast that data. And unfortunately, Peloton has no real incentive to follow industry standards either.
The kicker here is that the Peloton bike has both ANT+ & Bluetooth Smart hardware. So if someone did find a way to do that, then any app could be loaded and connect to it.
I really wish there was a way around this. But I’ve searched the crap out of the internet for more hours than I’d like to admit, and nobody has come up with a solution, specifically to being able to detect the resistance knob level. Speed would be trivial using a magnet sensor. The exact calculation Peloton uses is known, also cadence would be trivial using a magnet sensor also. But without knowing what precise setting the Peloton resistance knob is at, you can’t determine output wattage on a spin bike. The closest someone has come is using OCR on the screen to read the digits in the Peloton app live, and then re-transmitting it. But that won’t work here, since we’re using the screen to run Zwift.
So, until then, any of the following power meter pedals will work:
– Garmin Vector 1, Vector 2, Vector 3 (or the single-sided variants)
– Favero BePro or Favero Assioma pedals (or the single-sided variants)
– PowerTap P1 or PowerTap P2 pedals (or the single-sided variants)
– IQ2 pedals
– SRM X SPD pedals
– SRM EXACT Look Pedals
– LOOK Power Pedals
– Polar Power Meter Pedals (these should work as they follow the BLE standards)
I believe that’s it. Or heck, I suppose you could skip that and find an old PowerCal heart rate strap somewhere, that’d work too (and frankly, for longer duration bits the accuracy probably wouldn’t be all that different than the Peloton bike anyway).
Ok, with that out of the way, let’s talk tech.
The Foundational Bits:

Estimated Time: 5-10 mins
These first steps are required no matter what app you’re installing. And realistically this would be the same whether it was Zwift, TrainerRoad, or Netflix. Maybe even apps like The Sufferfest or others. Note that there are numerous ways to slice the Android onion. In my case, I’m mostly just using the various bases that I found elsewhere. So if you’ve got tweaks, feel free to suggest them in the comments.
Note: I’m writing these instructions using a PC because I’m mostly a PC guy. But if someone writes these foundational instructions for Mac, I’m happy to include them.
1) You need a micro-USB cable, specifically one that supports data (note: I’d recommend the longest one you’ve got around). Most support data, but if you’re unsure and have a Garmin/Wahoo/etc lying around, plug it into your computer and ensure that you can see the Garmin/Wahoo/whatever in your computer. That’ll get plugged into the only port on the back of the Peloton console that you can plug it into.
2) Next, turn on developer mode on the Peloton bike:
A) Login to your bike
B) Tap settings in upper right, then ‘Device Settings’, then select ‘About Tablet’, then tap the ‘Build Number’ box repeatedly until it says you’re a Developer.
C) If you press back once, you should see ‘Developer Options’ showing now below ‘About Tablet’, open the ‘Developer Options’
D) Scroll down to ‘USB debugging’ and enable that, this is basically how you get apps on your Peloton bike

3) Next, we need to install the Android Developer tools on your Windows computer. Again, I come from the Windows world mostly, so I don’t know the steps for Mac. But I assume they’re similar. Select the option that says ‘Download SDK Platform-tools for Windows’. To ‘install’ them, you’re basically just copying the contents to a folder. In my case, to keep things simple, I’ve created a folder called Peloton on my hard drive:

(Note: It may unzip into a folder called ‘Platform-Tools’, that’s fine. I just put everything into the Peloton folder for simplicity here.)
4) Now, plug your Peloton bike to your computer using that USB cable. You should see your Peloton bike show up on your computer. It’ll be a funky name, this is actually just the model of your Peloton bike. The folders under there will vary slightly from mine, since the AzRecorderFree is what I use to capture screen recordings.

5) Now, open up a Command Prompt, and get to the same directory as where you installed all these files. In my case, that’s the Peloton folder on my C: drive.
Then once there type: adb.exe devices

6) You’ll get a prompt on your Peloton bike to authorize that request from your computer, press to accept (and probably check that box to make your life easier in the future).
7) Now, type the command again: adb.exe devices
You’ll see this time it shows a device returned (IAPLBS182104347), which simply means it successfully connected to my Peloton bike.

Ok, with these steps done we’re ready to install *ANY* app you want. In other words, you accomplished the hard part. Now it’s easy from here on out!
TrainerRoad Install Steps:

Estimated time: 5-10 minutes
We’ll start with the TrainerRoad steps because frankly it’s the fastest. Everything is in one tidy package and you’ll be up and running in no time!
The way ‘side-loading’ works is that Android apps come in an APK file, which is basically a self-contained file that includes the entire apps. Mostly (as we’ll see in Zwift). But you need to get those files. Because the Peloton bike doesn’t simply have the Google Play store installed, we’ll need to use 3rd party sites to download these same APK files. Sometimes companies will also make them available easily too.
In the case of TrainerRoad, the APK file is available from PureAPK. It shows the most recent/current Android version from January 22nd, 2020.
(Note: Anytime you download an app from a 3rd party service, you risk a scenario where the 3rd party app is compromised. That’s a pretty darn low chance here, but just want to be aware of that.)

Now, download that APK file into that Peloton folder. It’ll make your life easier. You can see the file below in that folder:

Ok, back to your command prompt and type the below and press enter:
adb.exe install TrainerRoad_v2020.3.0.92026_apkpure.com.apk
(Pro Tip: After typing the Tra of TrainerRoad, simply press tab and it’ll finish it for you.)

It’ll come back with ‘Success’ a few seconds later.
Now, back on your Peloton bike press the three dots in the lower right corner, then press ‘About’, and then tap the lower right corner of that box 10 times quickly:


Here’s the spot:

Now, you’ll be here, which shows all your apps. You’ll see some general Peloton apps (including the ANT+ Demo app no less!), as well as our new TrainerRoad app:

Simply tap it to open, then login to TrainerRoad as normal:

The screen will go sideways for a second while TrainerRoad downloads all the files. This part of the app isn’t optimized for landscape. No worries. It might even turn upside for a second.

Next, press ‘Pair Devices’. Then press ‘Deny’. You won’t be able to ‘Allow’. Don’t worry, we’ll come back to that in a second. Let it finish pulling all the workouts, you’ll see status at the bottom left corner. It’ll probably take 3-5 minutes. This is no different than on any other TrainerRoad device.

Once it’s done, we need to go fix that permissions issue. Don’t worry, it’s easy!
Tap the time/Bluetooth/WiFi icons in the corner of the screen, that’ll bring you here:

Then, you’ll see the ‘Settings’ menu (above), where you’ll tap ‘Apps’ (above), which brings you to a list of apps. Choose the TrainerRoad app:

You’ll see the above. Then select ‘Permissions’ and enable the ‘Location’ option (not enabled above, but you’ll need to enable it).
Now press back a few times till you’re in the TrainerRoad app. It might still be upside-down, sideways, or such. No worries right now.

At this juncture you can now scan for devices successfully! I don’t know why the sensor pairing here in TrainerRoad depends on the location service, but it does. So without it, you can’t get either ANT+ or Bluetooth Smart connectivity (which, you kinda need). Let it scan for devices, and you’ll now be able to select ‘Next’. Keep pressing next through various menus. Each time it’ll probably rotate your Peloton screen once.
But ultimately press Next enough times and you’ll be here, ready to roll!

You can go into the Devices menu as normal to ensure all your pairings – mostly notably your power meter pedals:

With that, you’re done!
Now, anytime you want to open TrainerRoad it’s easy, simply press the three dots in the lower right corner, then press ‘About’, and then tap the lower right corner of that box 10 times quickly, then tap TrainerRoad. All in it’ll take less than 5 seconds. And then you’re doing your TR workouts as normal:

The above was my workout yesterday, on the Peloton bike using PowerTap P1 pedals, but controlling the resistance knob manually. One tip, is that you can use the Peloton logo on the resistance knob to figure out roughly how much of a turn you need for different intervals. It’s not perfect, and is kinda like using a non-smart trainer.
Go forth and enjoy!
Oh, and if you need to get out of TrainerRoad, you can swipe down from the top of the Peloton screen and then tap the Peloton logo at the bottom. Because TrainerRoad will run in the background after you’re done, I’d recommend either Force Closing the app via Settings, or simply restarting your Peloton bike so it doesn’t slow down the main Peloton app when you use that.
Zwift Install Steps:

Estimated time: 10 minutes
Ok, next up is Zwift. Practically speaking it’s not more difficult than TrainerRoad’s, it’s just totally different. Most people (including myself) got snagged up on this because it’s got one minor catch that if you don’t know to create a special folder, it won’t work.
In the case of Zwift, we’re going to get the APK file from APKFab. That’s because they include the added OBB data you’ll need. Other sites don’t have this, and without it, you’re hosed. You’ll see the big blue button ‘Download XAPK (APK + OBB Data)’.
(Note: Anytime you download an app from a 3rd party service, you risk a scenario where the 3rd party app is compromised. That’s a pretty darn low chance here, but just want to be aware of that.)

Now, download that file into that Peloton folder, it’s big, it’ll take a minute or two. But downloading it to that Peloton folder on your hard drive will make your life easier. You can see the file below in that folder:

Now in your C:Peloton folder, rename the Zwift APK file to be a .ZIP file instead (right-click > Rename > simply replace the .xapk with .zip):

Now, right-click that Zwift file and extract the contents into a new folder, just call it “Zwift”:

We need exactly one file from this entire boondoggle, the OBB file, just keep clicking down a few levels till you see it (it’s the only file there, paths shown below):

Now, using Windows Explorer, navigate to create a new folder within the Peloton bike’s directory, under Android > obb, called:
com.zwift.zwiftgame
It needs to be called exactly that. This is SUPER CRITICAL. It won’t work if you screw this up. Just like below:

Now, copy and paste that obb file to your Peloton bike, in the Android > obb > com.zwift.zwiftgame folder:


Now, back in that command prompt we need to install the Zwift app. Here’s what you’re typing:
adb.exe install .Zwiftcom.zwift.zwiftgame.apk

Got it? Good, almost there.
(At this point I don’t know where exactly your Peloton screen may be, but ultimately you want to be in the app launcher. If you’re not sure, simply press the Peloton icon to get yourself back to the main Peloton screen and then continue on).
Now, back on your Peloton bike press the three dots in the lower right corner, then press ‘About’, and then tap the lower right corner of that box 10 times quickly:


Specifically, where this red box is, is where you tap 10 times quickly:

Now, you’ll be here, which shows all your apps. You’ll see some general Peloton apps (including the ANT+ Demo app no less!), as well as our new Zwift app. But don’t be clickin’ anything yet! We need to give it some permissions first.

So instead, open that Settings icon (the big wheel, not the ‘Settings’ text in the upper right corner):

Then press Apps, and then scroll down to Zwift and open it up:

Open the ‘Permissions’ section, and give it all three: Camera, Location and Storage options (I don’t know why it asks for camera, but it does, it’ll fail later if you don’t – I tried.)

(Pro Tip: Look at the size of the app, if it’s not in the 600MB+ range, and is perhaps around 30-40MB, that means something went amiss with the folder you placed the OBB file in. Double-check that. Mine shows 2GB because I’ve finished the install for this screenshot)
Then press back a few times till you’re here:

Now you can go ahead and open Zwift:

It’ll take a little while, don’t worry. It’s doing its thing downloading more data. A minute or two later, it’ll bring you to the welcome screens you can swipe through, then the login screen:

And from there you pair up your sensors like normal. Both ANT+ & Bluetooth Smart sensors are compatible:

Now, go forth and enjoy Zwift like normal…at all its low-resolution Peloton screen processor glory:


Note that I mounted a Quadlock mount to my bike to hold my phone for other stuff, but it works well for holding the Zwift companion app too. Though frankly any phone mount will work well here:


You do you on that front, at this point in the setup guide, you’re probably just using duct tape to hold it together.
In any case, you’re done, off you go to use Zwift. Oh, and if you need to get out of Zwift, you can swipe down from the top of the Peloton screen and then tap the Peloton logo. Because Zwift will run in the background after you’re done, I’d recommend either Force Closing the app via Settings, or simply restarting your Peloton bike so it doesn’t slow down the main Peloton app when you use that.
Wrap-Up:

Ok, there ya have it: Zwift or TrainerRoad working just fine on your Peloton bike, albeit with power meter pedals.
Now, is it an optimal Zwift experience? No, of course. But it’s totally doable. I’ve used it numerous times this way. It is however a perfectly functional TrainerRoad experience, especially with longer intervals.
Undoubtedly you’ll have ways these steps can be optimized (to which I’m all ears). And perhaps those folks with the latest generation Peloton screens will get better resolution on Zwift than mine. I’m not sure. Also, you’ll need to remember every once in a while to update your Zwift or TrainerRoad app. There are Android tools that can do it for you when new versions come out, but I haven’t tackled any of those. If someone wants to write some steps in the comments below, I’m totally game for adding them in here.
And maybe at some point I’ll write-up steps for other apps like The Sufferfest, though, it’ll likely just follow one of the variants of either the TrainerRoad or the Zwift install. That pretty much covers the two extremes you’re likely to find on Android app sideloading.
With that – hopefully you found this useful, or something. Given there’s a million Peloton bikes out there, it stands to reason that at least some of you have too much time on your hands like me and want to do this. Thus…good luck!
Note: I fully expect to edit/update these installation numerous times. I also fully expect you’ll have some great tweaks in the comments. So if you’re seeing these on Day 0, they might be a bit smoother a few days later.
FOUND THIS POST USEFUL? SUPPORT THE SITE!
Hopefully, you found this post useful. The website is really a labor of love, so please consider becoming a DC RAINMAKER Supporter. This gets you an ad-free experience, and access to our (mostly) bi-monthly behind-the-scenes video series of “Shed Talkin’”.
Support DCRainMaker - Shop on Amazon
Otherwise, perhaps consider using the below link if shopping on Amazon. As an Amazon Associate, I earn from qualifying purchases. It doesn’t cost you anything extra, but your purchases help support this website a lot. It could simply be buying toilet paper, or this pizza oven we use and love.


This is weird that nobody did a simple app to expose the BT/ANT, it should be pretty straightforward to re-broadcast if you can root your android device
Yeah, surprised me too. I can’t imagine it’s all that difficult for the right developer. I suppose there’s been limited cross-over between someone who might be that developer, and someone who might have a Peloton bike (or perhaps, has a Peloton bike but hasn’t been granted spousal authority to dork with it!).
DC- Use your superpowers to lobby Peloton to broadcast power and cadence. Or do a contest with a great giveaway to get somebody to write the app for us!
This is exactly the sort of geekery that piques my interest. I’d humbly submit I might be ‘that developer’, but alas I lack a Peleton bike.
If you’re looking to advance what is known about the internals on the bike and don’t mind side-loading a debug APK every now and then perhaps I could help out here?
First thing I wonder about is if a background service was transmitting the internal power/cadence data over BT/ANT+, would TrainerRoad/Zwift be able to use the same BT/ANT+ hardware to receive as well. It _should_ work, but a definite question there.
Hi Andrew-
I’ll hit you up via e-mail.
Cheers!
-Ray
Please be that developer! :) I’d happily pay if the data was broadcast in a way my garmin 945 could pick it up.
Next up….. Grand Theft Auto: Peloton!
Running at a blistering 0.5FPS!
How bout connecting via steamlink or some other screen sharing app from a computer with some umph?
Yeah, you could do that. I think to me though, the goal of using the Peloton bike for this sorta thing is the ‘Just works, all in one device’ type objective. Essentially, the same thing that’s made Peloton so successful as a hardware platform is the hardware ecosystem and the fact that it *ALWAYS WORKS*.
I guess here is the question. If someone had a Peloton that was gathering dust because they didn’t want to pay the monthly $$$, could they still do this? Zwift is less than half the price.
Yes.
I stumbled upon this realization when I first bought the used bike, because I had to get it reactivated and they were closed that night. So in that scenario you can still get to all the same spots as outlined here – no issues. Again though, you’ll need power meter pedals on it.
Ray, do you remember how you did this? With a lapsed subscription, the bike boots into log in screen which doesn’t have the three dots to open the about menu. I have zwift installed and working, but can no longer access the list of apps to open.
THanks!
Instead of side loading zwift and TR, could you not side load the play store?
You need to add the gapps and such to it..
I’ve really been looking for a way to do this, thanks! Do you think I could do the same with the Tread? Currently use the Garmin footpod for speed wonder if that would register with the Tread.
I was wondering the same thing… I no longer have the bike but do have the Tread. I’ve run to YouTube videos but would quite enjoy having Zwift up on the screen.
My bet is that it would work on Tread – and frankly, better because the barrier to entry for a BLE/ANT+ footpod is like $29 or something for a ZwiftPod. But, I lack a tread (and I’m pretty darn sure I wouldn’t be able to fit that on an airplane…).
Would love to hear if someone gives it a whirl!
Got me thinking. I have a True 900 treadmill with 16” Touchscreen Console. It connects to Zwift App via Bluetooth and also Bluetooth connectivity to headphones etc. also has a web browser, tv tuner and USB input. Would love to be able to figure out how to sideload Zwift on the treadmill screen instead of covering treadmill with my iPad. Think it would work?
I will give it a try if someone can share instructions on how to side load via Mac… I dont have a windows machine.
Haha but what I would pay to see you get the Tread on an airplane! The bike was so much fun to watch. I am going to give the Tread a try and I’ll report back.
I was wondering the same thing. I am happy to give it a go but (un)fortunately no Windows machine in the house
In terms of why you need to give it permission to your location, is Android counts BLE sensors as part of the location permission. IIRC because you can use them to triangulate your position without using GPS so they chuck them under there.
Yeah, location makes sense. I was referring to why the ‘Camera’ permission was needed. :-/
I’m interested in the opposite. I’d like to see if it is possible to side/download the Peloton app and see how it runs on something besides the Peloton bike. They obviously have an Android but that isn’t this the same app. It might be fun to see if something else can feed the information into the app besides the Peloton bike.
In your article, you mention the Powercal which I used a few years ago…
Now, the application HR2VP does the same exept that you can customize parameters such as FTP, resting HR and max HR. It computes power from any HR monitor and broadcasts over ANT+ or BLE.
This may a good option as well for people who don’t have a power meter!
Interesting, I hadn’t heard of that before. Will have to give it a poke!
Re: The Sufferfest, not an option yet as there is no Android version (unless there is a beta version I do not have access to). Any ETA on that?
Good point, I keep forgetting that’s still…somehow…now out yet. :-/
Speaking of which, seeing as how you brought them up… any word on Avio?!
Zwift and TrainerRoad need location permissions because one of the main uses of BTLE is location tracking.
Also, when typing the adb commands, you don’t need to type “adb.exe”, just “adb” will do.
What’s the performance like on Zwift?
Yeah, certain habits die hard…
As for performance, huh…I guess I never added the video. It’s dismal. FPS isn’t unusable, but graphics quality is non-ideal. Functional, optimal no.
That said, would be interesting if a Gen3 Peloton display is better. Haven’t dug into those specs.
So my question:
Can I load the Zwift apk on my (not supported) android phone?
Probably. I haven’t tried.
So, for this to work you need:
Peloton
Zwift or TR subscription
Power pedals
In the absence of power pedals, can you use a speed sensor on the wheel and a cadence sensor on the crank arm?
Correct.
No, the problem with the speed/cadence sensor is that the resistance knob isn’t known. Without that, there’s no way to know power. So if you loosen the number it’s literally 10w resistance. Whereas tighten it and it can be like 1,000w.
I was wondering what about going in slightly different direction. Running Zwift on other standalone device and meanhwile use Peloton screen for zwift companion app – it’s big touchscreen right before you, so easy to use while suffering.
That’d be totally doable and easy. Interesting idea. Basically you can just follow all the steps here, except grab the Zwift Companion app APK instead.
Please update if you get the companion app up and running and zwift running on another device. I have zwift going to my big screen right now via PC. It would be cool to use the peloton screen as the companion app.
Need help! Really easy step by step instructions, but when I go to create the new folder (com.zwift.zwiftgame), the android folder doesn’t exist under Internal shared folders. I tried unhiding folders in case it was hidden, but that didn’t help. I tried to create a new folder called Android, but that wouldn’t take because I assume the folder already exists but I can’t access.
Am I missing something?
Hmm, that’s odd. Can you create the folder from the Peloton bike instead?
If it’s not allowing it via Windows, you could use an Android app called ES Explorer, which allows creation of folder and such.
That did the trick…. thanks! Tried to install kinomap as well but it crashes when the app tries to turn on gps.
Dan, in fact, the Android system requires a gps sensor to activate the Bluetooth Smart connectivity. There is no reason but this is an operating system requirement, not related to the App.
@kinomap – Thanks for the response. Was hoping to get your app working on the peloton bike. It seems like a great fit, and heck I’m paying for the subscription, might as well use it! For whatever reason, going through trainer setup, a popup appears that the app is requesting GPS, when you touch OK, the app immediately crashes. Too bad!
In fact, we should able to skip it as you don’t need any Bluetooth connectivity so no need for the GPS requirement from Android. We have found a way to proceed but the App is not yet the one you got on the play store. If you are interested to have a try using an apk from you, would you mind to ping our support desk and continue the discussion on it. Support@kinomap.com. Great opportunity for you to get a beta tester but feel free.
Got it working by just skipping the gps request.
Hi Dan
Did you create the folder from the bike (and if so how) or use the ES Explorer? I am stuck at the same place you were and your next comment seems to suggest you got it working.
Any help much appreciated.
Thanks
Will
Hi,
THANK YOU for this!
I tried this and it works like a charm .. for Trainer Road.
For Zwift, i was able get as far as uploading the .obb file to the Peloton bike, but there was no Android folder within the Internal Shared Storage..
Not knowing what else to do, I created an Android folder with the same path for the needed file and uploaded the .obb file into the folder you specified.
adb loaded the necessary files with “success”
I could get the zwift icon to appear in Apps, but it would not load properly – stating file missing..
Any ideas?
Hmm, that’s odd. Your photo or such didn’t come through. Any chance you can shoot it to me via e-mail (just my first name at domain name).
It was just a screenshot (similar to the poster above me) of the Peloton directory which does not have an Android folder in Internal Shared Storage.
I was able to create such a folder (is it empty by default?) but had the error message I noted.. “File missing” even though the program weighs in at >600 MB in Peloton apps..
same here – I had to copy the obb using adb push not the explorer to get the install to go to 700mb but then when I launch I get “Incomplete Installation – missing file” from Zwift
I am having the same issue. Did you find a resolution?
Wow, this is going to be interesting. Have the feeling that many Peloton users are going through the same transition: enjoy peloton classes the first year, get bored the second, start cycling outdoors more, look at better training methods like Trainerroad, Zwift, Rouvy, etc. Have been running TR on iPhone with powerpedals on the Peloton for quite a while, and now even my wife prefers TR over Peloton classes.
So with this hack (and no doubt more to follow) it seems likely more Peloton users will start questioning the $40/mo subscription fee in light of alternatives. And that will make Peloton nervous, possibly adding security layers to their system.
Thanks Tom,
I’m actually the opposite. I’m a five time Ironman finisher and now part time triathlete. Just not very good at programming! I’m just trying to find something to do without spending as much time on the road since I’ve watched a bunch of my friends deal with injuries in bike vs car collisions in San Diego.
So transitioning from using trainer road, zwift, & sufferfest to figuring out how to do workouts on Peloton since it’s quieter for my 5 AM bike sessions than my Kickr.
You are correct that I’ve run through all the one hour and longer workouts in short order there.
Peloton *could* put in the extra security layers to prevent folk doing this or they could conceivably ship with all 3 options downloaded/enabled and supported. That, I think, would be the smartest route for them to take.
I’ll wager they’d sell more hardware (at a premium for enabling the 3 apps) and more subscriptions as a result, as Peloton bikes could be re-configured by multiple users in the home more easily than real bikes on turbos.
Interesting!
Yeah, preventing sideloading on Android would be incredibly challenging. They could do steps though to raise the bar of complexity/resilience. Right now the bar is pretty low.
I’m just hoping someone comes up with a creative way to get that power data out via ANT+/BLE. If so, the world is our oyster!
Hi, I’m having an issue with the side loading. I’ve done all the steps and have the app installed but cant access the app. Is there a work around this? is this method still possible?
You *MUST* load a non-Peloton launcher (Lawnchair, Nova, etc.) and set it as the default home app to see/run non-Peloton apps. When you’re done with Zwift (or whatever other side-loaded app you are using, set the home app back to “Peloton” to return to Peloton.
Once you have side-loaded a launcher, go to Settings (three dots in the lower right in the Peloton launcher, or the gear icon in most launchers) –> Apps –> (The launcher you installed) –> Home App and set the home app to “Peloton” or the launcher that you loaded, depending on what you want to do next.
Not sure if this is a stupid question/thought but was wondering – if you had a TV with an Apple TV + Zwift app in front of your Peloton bike, would installing power pedals get you most (or all?) of the way there to use the Peloton bike on Zwift? (e.g., something like the Favero Assiomas would transmit power + cadence via BLE to the Apple TV).
Would that let you use the Peloton bike for Zwift without having to worry about graphical issues and sideloading, etc.?
Yes, that would work and is what many people have been doing. The simplest form of that is to use a phone or tablet; pc or Apple TV with additional monitor works as well. But requires extra gear and makes the setup ‘messy’. In my case the Peloton was a more digestible option for my spouse than to have a smart trainer, bike, additional tv, etc in the house. And the process Ray described took me a lot less time and hassle than adding a Bluetooth/Ant dongle to an old PC, mounting an additional screen in a location that is actually visible and getting the setup up and running.
Correct. I’ve done that too, and that also works just fine.
The main goal of this entire thing is a self-contained package though of just the bike.
But this option would allow us to drop the peloton subscription fee per month, correct? Essentially, the peloton would just become the bike in the setup that all other zwift or trainer road users are using. So a small investment of power meter pedals and a cheap TV or just a laptop, and we could drop the peloton subscription of $40 per month. That’s a $480 savings a year. You could even remove the peloton screen and install the new TV screen in place of it. He would take a little bit of “Jerry rigging” to put the TV in place of the peloton screen.
DCR, in what you saw or seen I don’t suppose you saw a way to make the Peloton read power from power pedals? As you note their power readings can have a really broad range. I’d love to be able to this zwift hack but for standard Peloton classes get more accurate power readings via my pedals. I’d they support Ant you’d think it would be a simple matter to offer power support from Ant versus their Dyno.
No, sadly that’s all 100% via wired in stuff.
I have a peloton and have enjoyed it, getting a trainer would not be an option for me. Having to swap out bikes for 2 people everyday and the space they would take up. Was planning on getting a Stages Power meter for my bike, now I need pedals we both use SPD. Thanks for helping me spend more money. In fall this looks like it could be a fun option.
Do we know if the Power/Cadence information from the Peloton bike is transmitted to the Android Screen via BT/ANT or hardwire connection? If hardwired can you make a pass-though raspberry device to read/rebroadcast the signal?
Hardwired connection.
I’m sure someone with the right skillset could make such a device, but I’m definitely not that person.
Thanks for these instructions! Do you happen to have a solution with ABD not showing connected devices? My micro-usb cable works fine when using it to install Google Play APKs on my Fire Tablet. But connecting it to my Peloton Bike gets the “USB device not recognized and that the Last USB device has malfunctioned” error on my Windows 10 PC and shows no devices listed. USB Debugging is enabled on the bike. I also tried on my Mac. Is this Fire Tablet cable the issue or something else?
same issue here
David — I finally got it working. I uninstalled all of my USB drivers one by one on my PC, until Windows 10 automatically installed the drivers for the Peloton tablet. It seemed the existing composite usb drivers needed to be uninstalled. You might try that and see if it works for you. Still no luck though on my MB pro.
Ray, if you have a lot of time on your hands you can also use your covid lockdown time to make a device that lets Zwift control any spin bike, including the Peloton Bike as well as adding shifters. All for <$50 worth of parts.
It's a Esp32, LM2596, A4988, and a nema 17 stepper motor.
It really works well even though my code is functional spaghetti.
It velcro straps to the head tube and then I’ve made a bunch of adapters for the various size resistance knobs that different bikes have.
Woah – that’s crazy cool. How would it know the power though? Or do you basically establish a baseline?
Just the change from baseline (power on)
Zwift sends out incline in a percent gradient and the device adjusts the knob a configurable amount for each .01% gradient change. The “shifting” essentially does the same thing – rotates the knob a preset amount in either direction depending on if you press the button strapped to the left handlebar (downshift) or right one (upshift).
I haven’t done anything yet with ERG mode but it should be possible. The trick here is that it would have to listen to both Zwift and the power meter at the same time.
That’s super cool.
Yeah, I’d love sorta the middle ground – just to tell me what the power is. What’s frustrating is that I know that info would be so trivial easy for Peloton to broadcast. Sigh.
I might be able to do it but I don’t have direct access to a Peloton. Not one that anyone would risk letting me take apart at least.
A simple memory scanning tool like “Cheat Engine” for Android might get you pointed in the right direction. If you’re lucky they are decoding the power in a background process that’s running all the time weather the main Peloton app is or not.
Then it should be possible to write another app that hooks to the memory address and exposes it via whatever method you want.
That is sooo cool! Had been thinking in that direction but never the courage to really explore it. There are a large number of Pelotons in the the field (1M?) and there might be an after-market for this… I would order one!
Where could I learn how to do this?
If this can be done for <$50, you should sell a kit to add it to a Peloton. I would definitely buy it. Especially if you got ERG mode for workouts on zwift to work.
Yes, I would buy it too!
On the other hand, if this is something you plan to open source, I’ll be happy to contribute
I would also love to buy this!
Hi Anthony!
I did this at the beginning of the lockdown. I bought an Esp32 and used to measure the speed of the treadmill and run on Zwift than a make the same thing in my dumb trainner. I switch over to the hall sensor and upgrade to a Fitness Machine with a servo motor, but I have a lot of trouble getting on my dumb trainer.
I hope you read this. It is very difficult to get information about this on the internet.
My code is working when I use Zwift companion but when I use Zwift directly on the smart phone it doesn’t send the grade data. Do you have any tip? I was not able to use it in the rouvy, says that it cannot connect to my device even if it identifies in the available devices. Have you tried using the Rouvy?
I’m curious about your setup too, did you use Nema 17 directly on the resistance axis?
Maybe you can send a contact or facebook page to exchange information.
I appreciate it
Hi João,
I’ve been tossing around what to do with this little project and will probably just open source it soon. Right now I’m working on a little bit of code cleanup so it’s only slightly embarrassing when I put it up on github (I’m not a great coder). My biggest issue at the moment is that I can’t get the ESP-32 to work (smoothly) as a BLE Client, BLE Server and WIFI all at the same time, so I’m going to have to add a hardware switch to the design so I can turn off the BLE when you want to use WIFI to change configuration settings.
Last I checked I didn’t have any issue communicating with Zwift directly (ipad). My only other test method is communicator on iphone with Zwift on Windows.
Yes, I’m using a NEMA 17, but I’ve 3d printed a simple gear reduction into the case. Torque is low enough that the printed gears seem to hold up well.
I’m open to an email exchange. Let me know how.
Thank for fast reply
My email is joao_gabrielfk@hotmail.com
I have a lot of difficulties because BLE documents are so confusing. I try learn with examples or other people codes and implement in my device. Just using the BLE documents it is impossible
I never tryed use Wifi and BLE at the same time. I buyed a nrf52832 development board but is so confusing SDK.
Send a email to help each other
I use a group called Zwift Coders in facebook too
Anthony has made some mega strides since his last post and has open sourced the project on GitHub. Anyone interested check out the project at link to github.com
There’s a few units out in the wild and more coming. They work very well and really do make a “dumb” spin bike into a versatile smart trainer.
On debian based systems you can apt-get install android-tools-adb, a little bit easier compared to windows.
If you don’t trust other sources to download your apk files from, use another device to download the apps from the play store, using adb you can retrieve them from that device. An howto is easy to find online.
Many thanks for the writing up the steps to install Zwift on a Peloton bike.
I use SPD pedals on my outdoor bikes and Peloton. There’s doesn’t appear to be SPD power pedals on the market. Does the setup also work with power meter crank arms?
It would, but there’s no power crank arms that are compatible with a Peloton bike, because you can’t remove the Peloton crank set. There may be some odd left-sided crank arm you could stick on there, but I’m not aware of any of the major power meter crank arm companies having anything compatible.
More on swapping out that crank arm: link to reddit.com
I am actually going to attempt this as soon as my Peloton arrives next week. From what I have found, Peloton uses an ISIS drive bottom bracket. This is the same drive system that is used in many spin bikes. It is the same drive that is used in many models of Stages spin bikes that have left sided crank arm power meters. I have a Stages Left sided crank arm power meter. The model is a Stages Cycling 971-0101 SPM2, it is bluetooth and ANT+. I plan to pull the left crank and put the power meter in its place. The main thing that I am worried about is clearance as the inside of the crank arm houses all the electronics and it isn’t small. I have seen pictures and measurements of the clearance and it should work. If it works, this ends up being a much cheaper option than power pedals. The crank arm can be found on ebay for around $100-200. I purchased one a year ago for $50. I will update in a week when my bike arrives.
I know this is old, but I wanted to update and let everyone know that the left sided crank arm works fantastic. I have been using it for 4 years on my peloton and have been riding on zwift the whole time.
Super helpful. Any other left side cranks that might work. I can’t find that stages crank at present?.
You’ve got a typo in your example here ?
Missing a z
Good catch, thanks!
Has peloton already blocked this. I’ve tried to install zwift based on these directions several times with no success. I’ve tried several cables, since most i had returned an error. I found only 1 works from only 1 usb port on my computer, seriously only 1 port will connect to the peloton, the others return an error. My problem is it wont transfer the obb file, it launches the progress window, but closes after a second or two. I also use the command prompt to check connections and it usually returns offline. I’ve tried with a laptop but it wont connect at all, I though it might be the cable but I can open the files on the peloton just cant transfer, plus the connection goes offline after a few seconds in the command line.
I was experiencing the same issue. I ended up copying the obb file directly to Internal Shared Storage, once there I moved the file folder by folder (Android > obb > com.zwift.zwiftgame). Hope this helps
A lot of hiccups along the way but I finally got it! Thank you so much! I even had to do a factory reset at one point. Guys, read the comments for issues with the Android folder. Best of luck!
OK to follow up with the install, I finally got it done. It turned out that all the cables I had tried (7 of them) had some sort of issue. Only 2 cables actually made a connection to the peloton, but no matte what I did it still would not completely transfer the file. I bought an additional cable which performed the same way. I was about to give up when I decided to try one more 1ft long cable that I had from my garmin. It wasn’t easy I had to move my computer, to almost the same height as the pelton, but once connected the files went right over. I spent plenty of time to get this to work ,and glad I did, but wow the graphics are really poor lol.
Hi Jose, for some reason I don’t see the Andriod folder on the Peloton Internal Shared Storage. I also tried to unhide any files/folders and still have no luck with it. Not sure why I am experiencing this!
Yeah that was also happening to me, I just created the folders manually
Hi Jose,
I was able to create the folder and copy the obb file in the folder. When I got to the install dos command step: adb.exe install .\Zwift\com.zwift.zwiftgame.apk, for some reason I don’t get any response showing success or fail. The install seems to be stuck.
Have anyone experienced this before?
Maybe it is your cable, have you tried with other cables? Try getting a good quality cable that supports data transfer
I ran into the “not being able to copy the obb file” issue this morning when updating Zwift. Restarting the Peloton fixed my issue
hey guys, I am having some difficulty installing the Zwift step. I did the initial step correctly and was able to get my laptop successfully connected to my Peloton bike.
For some reason I dont see the Android folder on the Peloton internal storge drive. Did I mess something up?
Thanks for helping out!
Awesome- Can’t wait to see how it works. Please give us an update when you get it set up.
Ray,
Any idea how to get to the to the “About” screen when you don’t have an active subscription? The three dots don’t appear on the “enter your log in information screen.”
I have zwift installed and have been using it successfully, but now that the peloton subscription lapsed, can’t get back into the apps.
Thanks!
Hmm, weird. When I first bought the bike (in January, used) it was in a clean/reset state. I had a generic Peloton account that I created at a Peloton store or online or something, but it wasn’t linked to a subscription. So I was able to sign-in with that instead.
When I did that, the only thing accessible to me was free-ride, until I subscribed. This Reddit thread seems to indicate the same: link to reddit.com
I wonder if something changed in the last 6 months? Out of curiosity, if you create an empty/shell account – what happens when trying to login as that?
Thanks for the response… it asks to log in with the account that purchased the bike and the activation code. I can do the three classes or free ride without the subscription, but no screen has the three dots to tap on to get to the about menu…
I reactivated the account to get access, and installed a different android launcher so now, when I tap the Peloton “P” at the bottom of the screen, it goes to an app list instead of the peloton app, We’ll see if that provides access when the subscription expires next month.
I can confirm that if your subscription expires, you can no longer log-in to Peloton and access the three dots that lead to the location of the apps.
Maybe they did this so that people who canceled their subscription can’t use apps that they’ve downloaded.
Do you know if there’s another way to access, and open, apps? Maybe by going through the settings menus?
A tip…. If you also install a launcher (I used NOVA Launcher) and set it as default, the bike boots into a screen that allows you to select which app you want to use. If you select peloton it opens the regular peloton app. Tapping the peloton P brings you back to the app selection screen.
Dan, does this allow you to bypass the initial login screen? I believe that’s the main issue with having to maintain the peloton subscription to access trainer road or zwift is you have to log into peloton first. It’s sounds like this might allow you to bypass that?
You should be able to use ADB to install (if it’s not already there) and launch another launcher (like Lawnchair or Nova.)
Once you have done that, you should be able to go to Settings –> Apps –> (The launcher you installed) –> Home App and set the non-Peloton launcher as the primary launcher.
Once you have done that, the Peloton tablet should boot into the launcher you installed and from there you can launch whatever Android software you’ve installed.
Thanks for sharing this wonderful and knowledgeable content with us
Ray,
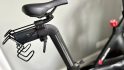
So I got my (wife’s) Peloton this weekend. I went ahead and installed the Stages 971-0101 SPM2 left sided crank arm power meter. I used a Park tool CWP-7 crank puller to take off the Peloton factory installed crank. The Stages crank fit perfectly. I then installed zwift (as well as Nova launcher and Netflix as well) per your instructions. I fired up Zwift and when I got to the sources for power and cadence, I tapped on the newly installed crank. I then rode around watopia for five minutes to make sure it worked correctly. No problems. So this is for those that prefer to use spd pedals or would rather not spend $500 on power pedals. The crank was $100 on eBay. I realize it is only one sided, but one sided is better than nothing.
Dang – that’s super awesome!!!
Would love to see a photo if you’ve got one!
Here’s an imgur link showing the crank in place, the Peloton screen with Nova launcher running and Zwift and Netflix installed, then with Zwift running and showing the crank arm giving power and cadence reading over Bluetooth. link to imgur.com
Awesome!
Though dang, that’s a beast of a crank pod covering. It’s like they left the cardbox box still attached! :)
It is pretty large, thats why I was worried about the clearance. But there is plenty of room. It uses two AA batteries and they last forever.
How’s the power metrics compare to what the native Peloton screen shows? I want to be able to capture the power on my Garmin 945
wow nice work! I was thinking about pedals but I’m an SPD-SL fan and would prefer to not move to Look everywhere. Do you know if there’s much difference between 971-0101 and 0100?
I am not sure exactly how close they are. I could grab my wahoo Elmnt and compare. They “seem” close when I am riding in that a similar effort on Peloton will create similar numbers within Zwift.
I don’t think there is a difference between the two model numbers. I couldn’t find one. I purchased the 971-0101.
So I went ahead and recorded a ride using peloton power and then I used my phone to record the power from my Stages crank arm. The power numbers were about 10% different.The average power over a 45 min workout was 10% different. Stages 215 and Peloton 186. The second by second numbers were about 10% different. With the peloton 10% less. I don’t know if Ray could validate his peloton power numbers to his pedals, but thats what I got with the Stages crank arm.
Can you use any stagespower crank arm? Some of the new ones look thinner.
Ian, no you can’t. There aren’t any of the newer ones that fit the ISIS bottom bracket.
This is awesome and might be exactly what I’m looking for… quick question, have you looked at measuring speed and distance using a sensor on the flywheel? I’m assuming this is possible as it’s a known circumference and a magnet that records how frequently it passes during a set time period. However I’ve seen other posts that suggest I won’t get this data.
If I can then your crank arms solution gets me the power and cadence, plus I could add a speed sensor to measure distance and speed – this would be all the metrics I want for my Garmin 945 to collect, and will probably cost me £125 including the park tool (which is bearable).
I have put a wahoo speed sensor on the flywheel before. The problem is that it is a fixed gear bike. The speed is directly related to your cadence. So yes, it gives you a speed that the flywheel is spinning, but the information isn’t super helpful. It is the power information that is helpful.
Ahh… I think I get it now. are you saying that 1 revolution of the flywheel = x revolutions of the pedal and that is constant irrespective of the level of resistance on the bike? So I could be on 10 resistance and it looks like I’m smashing out 60mph Vs being on 80 resistance and looking like I’m doing 10 mph as I can only crank the pedals around 1/6th as fast?
If so that’s mega helpful as it’s saved me a mistake! So if I’ve understood correctly above, there is no way for me to get speed or distance data to my Garmin watch from a peloton. Is that correct?
Thanks again for your insight!!
The resistance is a magnetic brake on the flywheel. The bike has no gears. If you spin your legs at about 90rpm, no matter the resistance, the flywheel will spin the equivalent of about 20mph. If you use Zwift, with the power reading coming from the crank, Zwift will calculate your speed for you base on your power and cadence and incline and air resistance and all that. As far as getting the data to the Garmin though, I don’t believe any data will come from the bike. Although there are a few guys that are doing some highly educated detective work to figure it out.
Jeremy, Thanks for this. Really appreciate it. I now know everything I need to achieve what I want to. Nice one!
Apologies if this has been discussed. Has anyone gotten the “UPDATE NECESSARY” message on zwift?
What is the fix? Keep uploading a new..obb file?
I just started getting this message with the latest Zwift roll out. I installed the new version on my Peloton using the same program where I originally downloaded it. (I think its called Aptoid?) Anyway, were you able to fix this problem? And how? I would appreciate it.
Anyone having issues where apps can no longer be installed on the Bike? I can copy over Apps via ADB but using “adb install ” it just hangs….no success or failure. Using “adb logcat” it shows ”PackageManager: signature verification….keys mismatch. install denied…Install not allowed”. Even tried installing a copied apk file directly from the Peloton tablet, it just hangs “Installing…”. My Bike is running Android 7.0 build NRT56A-980. Tried factory reset but no difference. Unless someone has any suggestions I may have to “root” the Bike but don’t really want to take that step. I also have the Tread and have no issues at all with it…installs Apks just fine. My tread is running Android 7.0 build NSQ16A-857.
Same for me. It just says Performing Streamed Install, and then nothing happens. Do you think Peloton is preventing APK installations?
I think so. I was able to install Netflix and Amazon Prime on my Bike before. Then a firmware update was pushed OTA and ever since then I can no longer install anything.
I feel the need to say that just on principle I think it’s wrong that Peloton should be able to prevent us from downloading and installing apps on our tablets. We paid a lot of money for these bikes, we own them, they’re our property, and we should be able to do with them what we please. For Peloton to keep altering our bikes so that we can’t do certain things with them, in an attempt to force us into a subscription, is really ridiculous. Just had to get that off my chest.
Shawn – I’ve identified a potential fix. Check out my post below: link to dcrainmaker.com
Hi Ray,
After I instruct the program to install the APK, it just says “Performing Streamed Install,” and never says success.
Any idea why the installation wouldn’t be completing?
Brian,
Try this fix: link to dcrainmaker.com
did you find a solution >?
Hi Ray,
Thanks for your efforts, but it appears this method no longer works. Peloton updated the tablets, and now the APKs no longer install. After you enter the install command, it just stays stuck on “performing streamed install,” and then never completes the installation. Any idea of how to get around this?
I was having the same issue, but I got mine to work. Make sure the tablet is fully booted up and you PC has all of the necessary files and Android tools extracted before you connect the PC to the Peloton. My bike and tablet are brand new as of this past weekend and had downloaded the most recent software so I don’t think it is a Peloton issue. I got the “Performing streamed install” hangup if the USB was connected to the Peloton while the Peloton booted up. So if I was you, disconnect the PC from the Peloton. Then in the developer options right below the “enable USB debug” it says “revoke debug license” or something like that. I would also move the slider back to disable USB debugging. This will clear the tablets memory that you have used your PC before to debug it. Now restart the Peloton and restart your PC. Once both are fully booted up go back into the developer settings. Now connect the PC to the Peloton via USB. Now tap the slider to enable debugging. Hit the always allow. Peloton might not let you, if so you need to go back to Apps, and then force stop the Peloton app. Then enable debugging. Now try to install.
Just out of curiosity what is your build number? Mine is NRT56A-980 Running Android 7.0. I have tried this and still cannot install apps. Even copying the apk to internal storage and installing from the tablet just hangs at “Installing”.
No joy for me via mac. Used adb tools and copied obb to correct place but the app only installs as 36mb :(
Well I had success using APKPure noted in link to reddit.com (despite what the title says here, you’re not rooting the tablet, just sideloading). The issues I was having might be due to the permissions of the ADB tools on the Mac I was using. But nevertheless, I upload the OBB and used APKPure to finish the installation. Now I just need to get a power meter!
Does it VOID warranty to side load apps? What if you need to have it serviced? Do they frown upon you if you side loaded apps?
I can’t get to the list of apps. After the 3-dots, and the ‘About’. You are supposed to tap the lower-right corner 10 times. No matter how fast I try to tap, the first tap closes the About window.
I have NOT yet side loaded any apps. I just wanted to see if I was able to get to the app screen before I spent the time side loading.
Or does the ’10 tap access’ only happen after you side load an app?
Sorted! I wasn’t tapping close enough to the corner… /facepalm I was using the red box that Ray drew as an example, but in reality, the tap location is more like ‘the bottom right corner of that red box’.
Also stuck on the performing stealing install hangup. Followed above recommendations to no avail. Anybody else figure out a way to resolve?
Hi All – any idea if this is still working? I’d love to give it a try, just want to make sure Peloton hasn’t blocked this in their most recent updates. Thanks.
Just got mine reinstalled tonight. Switched USB cables and it worked great.
Awesome, thanks Dan!
The only thing you did differently was changed the cord, and the “Performing Streamed Install” issue was resolved? If so, what usb cord are you using?
Hi Brian. Struggled for hours. Swapped to a different cable and it worked first time. Was a thicker higher quality “feel” cable.
Thanks, Dan. Congratulations. Hopefully, I’ll be so fortunate. Enjoy your new and improved Peloton!
For those of you who can sideload apps via adb what is your build number and kernel version? Mine is NRT56A-980 (kernel version 3.18.35+, Android 7.0, model Ruby) and no longer allows apk installs.
On Aug 6 and Aug 7, I sideloaded Zwift onto the Peloton (I was testing on the 6th, and then re-loaded (on the 7th) the latest Zwift that came out on Aug 6th.)
Peloton specs:
Software -> 2.3.104.2030104 (July 27)
Android -> 7.0
Kernel -> 3.18.35+
Build -> NQT75A-980
Different build than yours – not sure if that is a factor?
I used a Mac to sideload, with adb.
Since my build number is after yours (i.e. R comes after Q) I am guessing that Peloton has pushed an OS update that prevents any app from being installed….so its not an “adb ” issue its an OS issue. Copying an app over via my data cable does not even install on the tablet.
Shawn,
I don’t think that build number has anything to do with it. I think the build number corresponds to your monitor display Model #. Your build is NRT56A-980 because your display is Model RB1V1 (Ruby). Brett has NQT75A-980 because his model is the RB1VQ (Quartz). I have build number NOT56A-980 because my display is the RB1VO (Opal). All three displays are considered “2nd gen” even though the RB1VQ and RB1VO came out after the RB1V1. The Ruby, Opal, Quartz are just the developmental names before they release the screens. The Tread Screen is Saphire. Supposedly the one coming out in the near future is the “Topaz”.
Anyway, all that being said, your build number isn’t necessarily newer, but it is different. I just recieved my bike 3 weeks ago and have downloaded the latest updates when I first turned it on. If might be an OS issue, but it might also be a cable issue. Try multiple cables. Also check my post #117 above. I installed Zwift just fine at first but then my screen rebooted. I couldn’t install anything after that. I reformatted the display and couldn’t install anything. I then disconnected everything, re-booted everything up, then connected the cables. It worked flawlessly after that. I installed zwift, Netflix and nova launcher. I believe that the installation is very finicky. Other people have noted that it worked after changing cables, even though the other cables were supposed to support data.
Jeremy,
Thanks for the info, that makes sense. However, I still don’t understand why it would be an issue with my cable because…
– I have been able to sideload apps before using adb with my cable
– Adb stopped working after a Peloton system update
– I can copy APKs over to the tablet using my data cable
– APKs copied over to my tablet are stuck “Installing……” after selecting the Install option
– I have tried what you suggested in your #117 post several times
Hey, were you able to get this figured out, I have tried almost everything on the tread but it is still stuck on ‘Performing Streamed Install’
Nope. Not yet. Hope someone will figure it out. I am reluctant to try rooting with something like KingoRoot.
If I remember correctly, the never-ending ‘Performing Streamed Install’ meant that one of the permissions wasn’t set correctly.
Hey, Do you have any reference to what permission that needs setting. I have set almost all the permissions I can’t think of, the only thing different is I don’t have a Peloton subscription anymore, I don’t know if that is what changes some permissions on the backend.
Two thoughts:
Triple check these perms for the Zwift app: Camera, Location and Storage options
And then second, up above someone in the comments mentioned that in their case if the USB cable was still connected, it’d hang on the same streamed message: link to dcrainmaker.com
And then a different person noted that by swapping the USB cable, it went through without issue after that.
Thanks, Dan. Congratulations. Hopefully, I’ll be so fortunate. Enjoy your new and improved Peloton!
Anyone else have issues getting the right cable to work? I purchased the one in Ray’s Amazon link from his post (AmazonBasics USB 2.0 A-Male to Micro B Charger Cable) but I can’t get it to fit into the micro USB port on the back of my Peloton display. I’ve tried every way. Am I missing something??
That’s weird. Can you shoot a photo of what you’ve got?
Ray, image attached of the cord. Does this look like the correct one?
Yup, that’s the correct one, and the side you’re holding is the correct side to go into the back of the monitor. Can you take a pic of the underside/back of the monitor, next to the network port?
And… now the cord fits into the port, thanks Ray! :-)
I’m so close to getting Zwift downloaded/installed on the Peloton but I’m getting an “Access is denied” message at this part of the process:
“Now, back in that command prompt we need to install the Zwift app. Here’s what you’re typing:”
“adb.exe install .\Zwift\com.zwift.zwiftgame.apk”
I’m pretty sure I’ve done everything correctly up until this point. Any advice here? Or has this been blocked by Peloton now?
Hey thanks! My biggest hesitation in buying a Peloton has been what happens if The Peloton ecosystem is no longer available to me. I would really like to be part of the whole Peloton thing, but I don’t want to pay that much money for a single platform item. This is an interesting option, although I’m Mac based there’s still that. This gives me hope though!
Hi Kar, I’m Jeff from a few of the postings above. Unfortunately I was never able to get this hack to work on my Peloton bike. I’ve enjoyed my Peloton for a couple years now, but like you, I don’t like being locked in to just the Peloton classes. They are great, but I’m excited to also try things like Zwift, Rouvy, FulGaz, etc. Based on my recent research, I’m seriously considering the purchase of the Stages SB20 smart bike that Ray has also reviewed here on his website. That bike allows you to experience a lot of the cycling apps out there, and you can also get the Peloton app and still be able to do the Peloton classes. Just something to think about!
computer does not recognize USB device
Thanks for the tutorial. I’m able to follow all of the steps but after enabling Zwift permissions (camera/etc.) and opening the app, I get an error within Zwift:
Incomplete Installation – missing file
Please tap OK to un-install app and install again from Play Store
A few questions:
1) Should I have had this “Android\obb” folder already on the Peloton tablet, or was I meant to create that? I had to create both levels of that directory (and the Zwift one underneath).
2) Am I missing something with the note about the importance of creating a “special folder” (“it’s got one minor catch that if you don’t know to create a special folder, it won’t work.”)? It seems important but I can’t find anything in the instructions that references this point or what I need to do.
3) I’ve tried pushing the app from my computer to the tablet using “adb push” but get an error of “remote secure_mkdirs failed: Read-only file system”. Could this be related to my issues? I don’t get a permissions error when I copy via Windows Explorer (I tried it that way 3x first before trying adb push).
I’ve been using Zwift on my Peloton by just draping my iPad over the Peloton screen for months – very excited to try something slightly less (or at least differently) bootleg.
Same here – tried it today & followed the steps correctly (i think):
1. the Android\obb folders were missing and i had to create them
2. i get to the same error message:
Incomplete Installation – missing file
Please tap OK to un-install app and install again from Play Store
any help GREATLY appreciated !!
Update !!
it seems to be the most current ZWIFT APK (1.055225) causing issues…
i redownloaded exactly the version DC used (1.051959) and it works !!
You can get it from here
link to apkpure.com
Fantastic – I’ll give this a try, thanks for posting your solution!
No matter how many times I try both versions I keep getting the same error. I checked and the size is only 38 not in the 600+. Any ideas? I have removed and downloaded again. Had to walk away I was frustrated.
On another note, tried this with my TREAD but it supports usb 3.0. Has anyone been able to get their tread to show on their pc like the bike?
Any thoughts on how this hack will work with the new Zwift + bike? It sounds like it has its own version of ERG mode. But perhaps still doesn’t broadcast power. Wonder how running Zwift on the new bike will all tie together.
I made a device that reads the power and cadence directly from the Peloton’s data cable and broadcasts it as a Bluetooth LE power meter or fitness machine. With it you don’t need power meter pedals to use a Peloton with other platforms. More details are here: link to intelligenate.com
I’m gauging interest to develop it further. Let me know if you have questions!
Hi Jason, I checked out your device and video. Very cool! How does this device work if I Zwift using the Apple TV app? Or does it only work via a tablet?
Wow! Nice!
Hey Jason. Since you have a 3d printer and access to a Peloton, care to look at my automatic resistance knob project on GitHub? Your device and mine on a Peloton would create a full featured Smart Trainer. The biggest hurdle to come is documentation.
link to youtu.be
link to github.com
Thanks! I hadn’t tried Zwift with an Apple TV before I saw your question. I just set it up and can confirm that it works just fine. My device shows up the same as it does on an iPad with power and cadence via Bluetooth.
The SmartSpin2k is great! I envy your 3D design work. I’d love to give it a build when I get a chance. I’ve been wanting to do something with an ESP32.
Feel free to open an issue on github if you need help with any part of it. I’d love to see this working on a Peloton!
Jason, this is exactly what I’m after. Do you have to cut any wires, or do you plug the wire that would go into the peloton into your box to intercept the data and then a cable from your box goes into the peloton screen? Is there any lag? If there is zero destruction to the peloton wires (as they would invalidate the warrantee) then I’d be very interested if the price is right. How much and when would it be available? I’d be delighted to test one for you.
Thanks for this useful article. Can you do similar one for Zwift Run using Peloton Tread? Thanks
I don’t have a Tread unit, though, my understanding is that this should work all the same. I think someone tried it up above in the comments.
Will Zwift work on the new Peloton+ bike?
Hi Craig, I just heard about the new Peloton+ bike this morning and was wondering the same thing! Not sure of the answer yet though…
Was wondering the same. Have been using this zwift setup on my peloton with power meter pedals for a while and it’s pretty good. Still no shifting though on Peloton+… so I guess the system could adjust the resistance and then the user can adjust from there to simulate shifting. Systems seem to be slowly converging…
My guess is that it’ll work the same way as before – meaning, sideloaded but no integration of power.
Great point. Forgot about shifting. I wish there was a bike where you go to Zwift and Peloton. I hate having two.
I spoke with hardware support at Peloton this morning, we just ordered the new Peloton Bike+ and with the transmission/broadcast capabilities for Apple Watch I presumed either Bluetooth and or ANT+. The person I spoke with confirmed this was the case, but will be able to confirm officially in 10 days when the bike arrives.
Ian – inquiring minds want to know? Does the Bike+ really transfer watts with bluetooth and/or ANT+
Bob,
Sadly I have not been able to get it to broadcast the BLE or ANT+ I was told would be possible by the tech support person I spoke with. I suspect this is on my end, maybe someone else can chime in once they get their hands on it. The new Bike+ Android OS interface has also been paired down compared to the Bike as shown in this article. I am sure there will be a workaround, but I think Peloton didn’t want it as easy as it was for people to run other apps.
No broadcasting of any power/cadence metrics. And honestly, I definitely don’t expect this to change.
There are some 3rd party apps/developers working on power broadcasting type things over the last month, so we’ll see how that goes.
Note – all the steps in this article work just fine on the Bike+, I’ve already tried it for other apps (I haven’t loaded Zwift yet, but other apps I have, which is all that matters from a ‘can it work’ standpoint). There’s no difference there.
Maybe this is a dumb question, but if I link Zwift to my Peloton, does anything happen to my resistance when I climb a hill in Watopia? Or do I need to adjust the knob? Seems like it might be unfair when I ride with my buddies.
Hi Mike, you’ll still need to adjust the resistance manually. I have speed and cadence sensors on my Peloton (with Zwift running via Apple TV) and I adjust my resistance whenever the elevation level increases or decreases on the route map. It’s not ideal since it’s not “fair” to other riders, but I’m not doing any racing and just doing for fun and exercise. Hope this helps.
I’ve got a “thing” up thread for exactly this purpose. If you’re interested, I may be able to provide a kit soon. I still need a peloton to measure so I can be sure it’s a very simple install.
Hey Anthony, keep us updated on your project!
Will do! I’m test riding it on Zwift right now and it’s awesome! First day with it forwarding power cadence and heart rate from the other sensors. That solves the AppleTV 2 devices limit.
Hey,
Question: If I dont have any power meters or speed sensors I can still use Zwift downloaded to my peloton? If its not downloaded though it wont work on the app though correct?
Without a power meter and/or speed sensor Zwift will NOT work on the Peloton.
There is no way for Zwift to get speed, cadence and power data from the Peloton, even if Zwift is running on the Peloton.
In a round about way, you can. Provided you have a bluetooth HR strap, SmartSpin2K has a built in heart rate to power conversion.
To use it you just need power data from two rides to import. Preferably these rides are 1 hour steady state, one very easy ride and one ride at threshold. If you don’t have any access to a power meter to get this data, Strava provides estimations on most rides that you can use.
The heart rate to power calculations are then based on Brian Mac’s work: link to brianmac.co.uk
In our testing, it’s surprisingly close to actual averaged power numbers but it’s obviously very slow to pick up on sprints other temporary power fluctuations.
It’s far from as good as having a power meter, but it’s usable and might help someone bridge the gap until they want or can afford a power meter.
Our little community is really starting to grow and if you’d like to look into building your own, come check us out:
link to github.com
Can’t load the Play Store instead of side-loading Zwift and TR?
Download Play Store Apk file link to waptabs.com
link to thebeupdated.com
it is good
Love this Ray, thanks for posting. The main thing I would like from my peloton is to have the data connect with my Garmin 945. My understanding of the fitness metrics (training load, etc) is that they only work from data collected in real time during a workout. At the minute I use an app to transfer my peloton data into Garmin connect, this includes all the power, speed, cadence, etc. However it still won’t let me calibrate my FTP for the watch nor affect my fitness metrics as far as I’m aware. I record my rides and collect my HR data, but of course there is no distance, speed, cadence, power collected by the watch as Peloton won’t broadcast the data. Are you aware of any work arounds here, or is the answer to get a set of power pedals that will broadcast to the watch (an expensive workaround!!) Moreover – am I deluded in the idea that I’ll get much extra feedback from my watch with the fitness metrics and training load?
I was in the same boat wanting to get metrics from my Garmin Fenix that only work with real-time data so I created a device that broadcasts the power data from Peloton to other fitness services like Garmin and Zwift. With my device I get updates on FTP, VO2, and recovery from my Garmin when using my Peloton. Since my prior comment on this thread (see #161) I’ve developed it further and look to have a new version of it running in the next week.
Not sure how I missed that post! It looks awesome. As per message above. Very interested.
Jason’s solution looks much cleaner however I noticed this project on GitHub. It uses screencasts to a Windows computer which then performs OCR on the data fields and outputs any metrics displayed on the Peloton apps screen:
link to github.com
Hi, Need a little help. When I click on the peloton storage there is no android folder/
Hi John
I am having the same issue – did you find a way to solve it?
Thanks
Will
I read through all the comments and was hoping someone had put out instructions for OSX. My issue is the Android Studio for OSX, terminal commands, and folder directory seem different enough on OSX that these directions don’t work. Any have an OSX tutorial?
I installed it through OSX. It’s pretty similar, but I used drag and drop to perform the commands that DCR used. Download the platform tools for MacOS and the app file for Trainerroad. Open Terminal and drag and drop where the adb file is from the finder into the Terminal. That will automatically include the entire file name and location into terminal. Then include a space and type ‘devices’ without the ‘ around it. This serves the purpose of the “adb.exe devices” from the tutorial. When you are ready to install, drag and drop adb again, space, install, space, then drag and drop the trainer road APK file into the terminal window.
The confusion starts at the platform tools for me. The OSX android platform tools that I downloaded here: /private/var/folders/lt/2pv_ybzd1kd5fh_7tqlc14t40000gn/T/TrainerRoad_v2020.3.0.92026_apkpure.com.apk looks nothing like what he is using up there. By adb do you mean Android Studio and dropping the file from applications into the terminal window? When I do that I get: “MacBook-Pro-2:~ jeff$ /Applications/Android\ Studio.app
-bash: /Applications/Android Studio.app: is a directory
MacBook-Pro-2:~ jeff$ “
I’ll do a series of posts because I don’t know how to attach more than one picture to each one. The first screenshot is what my folder looks like that I downloaded the platform-tools ADB to.
Here, I drug the adb with the little black icon into the terminal window and then typed ‘devices’.
After hitting return, it shows the IAPLBS1902203051 which is the crazy name the Peloton shows up for. This shows that the computer is connected to the Peloton. I think I had to do it more than just the twice that DCR mentioned.
Lastly, here I have dragged (drug?) the ADB back to the terminal window, then I typed ‘install’ then dragged the Today.apk into the window. Then hit ENTER.
I was playing around with adding Today’s Plan to the Peloton, but you would do the same for the Trainerroad APK that you download.
Also, I think you have downloaded the APK for trainer road, but the Platform tools was a different download. I think I got mine from here.
link to developer.android.com
Click on download SPK platform tools for mac.
Thank you. This makes a lot more sense with the right platform tools downloaded!
I like your comment brother<a href="link to apktiger.com;.
Thanks for this article. I’m also finding the comments really interesting re: the different methods people are working on for resistance control and broadcasting power!
BTW, Zwift works on the Tread as well.
Hi
A huge thank you for laying out all these steps. I got stuck when I plugged in the peloton and there was no Android folder (or data / obb subfolders). I tried to create them myself and paste the other obb file in but at the end of your process for Zwift on the bike it said it had not installed.
Any thoughts?
Thanks
Will
Are you trying to do it on Windows or MacOS?
When I did it on MacOS there wasn’t a folder with those names, so I had to create it and then put the subfolders in the one I created. I was concerned that there were hidden Android files and folders I couldn’t see, but eventually got it to work with the created folder.
Thanks Anthony
On a windows. I tried creating when it was plugged in to my computer in windows explorer with sub folders but no success.
Did you create the subfolders on the peloton screen (and if so how) or on your Mac when the bike was plugged in?
Thanks
Will
I used a program I got from Android.com called Android File Transfer. I was able to create folders in the peloton from the Mac computer. I never really did anything on the Peloton except the steps DCR outlined above. All the technical stuff really occurs on the computer attached to the Peloton.
On the Bike, I didn’t have a folder called OBB. I was afraid that it was hidden, but when I created it and placed the game folder inside, it worked.
When I did it on the Tread, I didn’t even have a folder called Android. I created it then the OBB and other sub folders. It took a few restarts as it would look like it installed, but the actual OBB file for the game would be missing. Eventually got it to take.
Is there anything to prevent you from side loading the Android Peloton Digital app? I’m thinking that would allow you to downgrade to the $13/month subscription instead of the full $39… obviously with all the limitations it would entail.
Or do you need the full Peloton Bike subscription to run side loaded apps?
Without an active subscription, I could never figure out how to get to the “About” box to launch the Android app screen.
Will this one Work?,…it says Bluetooth and Ant+
Wahoo RPM Speed and Cadence sensor for iPhone, Android and Bike Computers
About this item
Track and capture real-time cycling speed and cadence on your bike computer or smartphone with compatible training apps.
Lightweight and easy to install – NO MAGNETS. Cadence attaches to your bike’s crank arm or shoe; Speed attaches to your bike’s wheel hub (mounts included).
Integrated with Bluetooth and ANT+, RPM sensors connect to smartphones, tablets, and bike computers by Wahoo, Polar, Garmin, and more.
Record workout data with the Wahoo Fitness app and automatically upload data to your favorite training platform like Strava.
Works with 50+ Smartphone Apps including Wahoo Fitness, Zwift, Trainerroad, Sufferfest, MapMyRide, Komoot, RideWithGPS, Cyclemeter, Peloton, Rouvy, Fulgaz, Kinomap. waterproof up to 5 feet
No, And no help from anyone.
Version 1.057791 (the very latest) didn’t work for me, some error regarding play store. I recommend getting v1.0.57540 from apkpure.com this worked fine for me and is only one update behind. I also didn’t have an android folder so I created one and below that an obb folder. Then just follow the steps in the guide. Happy pelo zwifting
Just create one and below that an OBB folder.
It works just fine
Anyone have an idea why Favero Assioma pedals don’t pair with the Peloton Gen 3? I get an error message “pairing rejected by Assiamo”. Thanks
Raspberry Pi Peloton Wireless hack to advertise power data. Looks pretty easy. Also, see comments for pointer to 3.5mm breakout to working around the need to solder anything.
link to reddit.com
Looks like someone solved the power problem: link to kickstarter.com
Very interesting Dave, thanks for sharing that Kickstarter link!
Yup – wrote about it here: link to dcrainmaker.com
Plus another that I started testing this weekend.
Can it be that this installation routine needs to be repeated after an update on the Peloton software? Seems I got an update on peloton today and now I cannot start Zwift anymore. It’s just not available anymore…
It can also be if Zwift needs to be updated too. It’s plausible that a Peloton update broke something for sure though. Zwift especially tends to be picky on being on the latest version.
Right now if you hit 10 times on the About screen – the bottom right corner – there are more or less no apps available. I only can see Netfilx which I installed and the WebView Browser Tester are still there, all other Apps are gone on the screen.
Even a restart didn’t help. I tried it with 3 latest versions of Zwift. The secon last one worked the last couple of days, but since yesterday evening the “challenge” with the Apps screen appears. So it seems it is something what happened on Peloton.
Hi Marcus, same here with Trainerroad. After yesterday’s Peloton update the app icons are no longer visible after playing the bottom right corner trick. ?
The new Peloton update has removed the majority of icons from the app tray. I now see only Netflix, Hulu and the Webview browser. I have multiple additional apps installed including apkpure, es file explorer, TrainerRoad, Zwift, plus the (official) streaming app for my soccer team’s live games and none of those are appearing in the app tray but I can see they are still installed via settings.
I rebooted the tablet as Zwift was no longer picking up the ant+ power meter which may also be due to the update but was something that was happening for me intermittently so I can’t say with any certainty what was causing it.
Does reinstalling the apps via routine above fix this? or do the apps remain hidden and unable to get launched?
Re-Installing didn’t work at all. As mentioned also from other users after the Peloton Update some of the apps are gone….
Blargh! I think the update wiped the access to the apps, somehow.
I can also confirm that a reboot did not help. My applications remain installed but a reinstall (-r option in adb) did not update the application registry.
Not a long-term solution but as I wanted to continue my Expanse binge on Amazon Prime during my ride today I did find a quick workaround. Sharing in case helpful to anyone else until we have a proper debug:
Settings
->Device Settings
->->Apps
->->->Prime Video
->->->->Notifications
The settings icon (gear) should be available here which will launch the app to the settings page, at which point it can be freely used.
Thanks Brian. You gave me a ray of hope, but my peloton software(v. 2.5.160.2050160) seems impenetrable to your workaround The setting icon is not available in the ‘notification’ area of the settings.
Thank you. This is great. I’m running into a problem both the bike and the tread – in both cases, when I hit the about screen to show the list of Android apps, the only app that appears is the WebView Browser tester. Anything I’m missing? Thanks again.
It looks like the update as of today rendered 3P apps unavailable, which is a shame given I literally just bought powerpedals and went to do the initial install tonight of Zwift.
There are a bunch of permissions and additional developer toggles so perhaps there’s somethign someone smarter than me can figure out….
I got around it by uninstalling the updates. Maybe not the best option, but it works. I did the following: settings, device settings, apps, Peloton app, force stop and then click the 3 dots in the upper right-hand corner. Choose uninstall updates. You will NOT lose your profile, wifi settings, etc. I was then able to see all 3rd party apps. ✌️??
How did you manage to prevent the updates from downloading automatically the next time you opened the Peloton app?
Hi Grant- I disabled auto updates. I can’t remember exactly where it is right now but I could look later…If you can’t find it.
Hi Grant,
if I have it right in mind then you can disable it in the developers settings. At least there I believe I’ve seen something related to Auto-Updates.
Thanks, Jason. I uninstalled and went through these steps and still no luck. I also found that whenever I ended up back on the profiles screen, it would initiate the auto updates and bring me back to where I started.
I tried briefly force stopping the auto updater app, but that guy auto restarted too.
Hi Ryan- Did you already have 3rd party apps installed? I was using Rouvy and Rouvy AR (both previously installed) and they are now visible and usable after doing what I posted.
last night was the first time I was installing any 3P app so i had nothing added prior to the updates. i can still see the Zwift app in the app list, just not available to run anywhere.
Perhaps I need to do the install again while i’m the older version, or there needs to be a new way to launch the app then from that app drawer.
Yeah, if you are only seeing the help web browser in the app drawer then I would guess it must have something to do with you installing them under the latest Peloton release. I think your plan is the best route.
So it took a bit of playing around but I’ve figured it out. The solution I’ve used is to install a new launcher (I went with Nova launcher) and then set that to be the default home app.
The new update also draws over install buttons preventing you from installing new apps so you’ll have to deactivate that first. Go to Settings > Apps > Gear Icon top right > Special Access. There go to “Draw over other apps” and turn it off for the two Peloton apps there.
I have APKPure installed as an alternative app store on my tablet which made keeping Zwift updated even easier. If you don’t have it installed on your device, you should still be able to download a launcher app from their webstore and install it. Open the WebView browser that appears when hitting the bottom right corner of the About window ten times. Then google > apkpure and search for Nova Launcher there. It should hopefully download the apk file and prompt you to install it.
Once you have an alternative launcher, go back to Settings > Apps > Gear Icon. From here, set Nova Launcher (or whatever you went with) as your default home app. Now every time you open the settings screen and then tap on the P icon at the bottom, it’ll open your new launcher and you’ll be able to access all apps from there.
Grant – thank you. This seems like the best approach. A couple of questions/issues.
First – when I turn off Draw Over Other Apps, the About box no longer pops up. Instead, the entire screen turns white. Does this sound right?
Second- how long does it take to download the Nova Launcher? My bike has been on the “Downloading” page for a while now.
Thanks again.
In my case, I already had APKPure installed and I had Firefox installed (sideloaded via USB and a Windows PC) and had Firefox set as my default browser so when I clicked the link, I was prompted to open in either Firefox or APKPure. Sideloading Firefox using the method the main article uses to install Zwift and Trainerroad might be a necessary first step.
Tapping About in the Peloton app causes the app to exit so now to access third party apps, I go to settings and then hit the peloton P logo in the bottom middle to open Nova launcher and from there I can access everything I have installed.
I noticed that there are two Peloton App icons – one seems to be the factory original version and I have to sign in from scratch each time. The other continues from where I left off without any need to log in each time.
I am unable to install any apps after the latest Peloton updates, even after uninstalling them. It just seems to get stuck “installing….” and never completes.
Grant – great information, thanks! I have nova launcher and it’s working brilliantly, but now my issue seems to be that no matter what version I install using all the above procedures to a T, i can’t avoid the app not being able to find the obb file. it’s always throwing an error on launch of a missing file, but i know i’m loading the right obb file where it should be.
anyone else having this issue? seems someone had it happen over the summer by there wasn’t any resolution
Shawn,
It sounds like I am having the same issues as you. If I try to adb install it just says “Performing Streamed Install” forever. (Adb push doesn’t work either). If I drag apk file into internal storage, and then install from tablet, it just shows ‘installing’ forever, but nothing happens. If I access the tablet’s web browser and try to download apk files, nothing happens once I hit ‘download’. I’ve factory reset the tablet probably 30+ times, re-downloaded SDK tool numerous times, used different USB cords, etc. I am able to toggle on “enable unknown sources” too (and used adb shell settings put secure install_install_non_market_apps 1). I’ve tried ‘force stopping’ every single application (there’s a ton when you hit ‘system’) and prevented ‘draw over apps’ form everything. I also tried enabling storage permission for every app (and tried disabling storage permissions) as well as giving unrestricted data access to all apps (or to none at all). I’ve also tried to adb install immediately after factory reset before any of the Peloton apps get installed.
I don’t understand what is happening. The first day I got my Tread + I was able to install a few apps no problem. Then a few hours later, I was having trouble uploading another app (it just kept hanging on performing install) so I factory reset it and I was never able to upload an app again.
Has anyone found a solution to this or any other workarounds?
Tread +
Model Number: PLTN-TC1VS
Android Version 7.0
Android security Patch level: August 5th, 2019
Kernel Version
3.18.35+
jenkins@devi-system-builder #1
Tue Sep 15 03:54:06 UTC 2020
Build Number: NSU76A-120
Touch Firmware Version: Current FW version: 03
SmartCard version 74
MCB version 61
CJ,
I assume you have an active subscription on your Tread? I canceled my subscription on both my tread/bike and while I had no issues installing apps for a while, it no longer works. I did exactly everything you tried as well. Unfortunately after I factory reset my bike I lost all the apps I previously installed. I read on another site someone had the same issue and was able to install apps after reactivating their subscription, but I am skeptical that would work for me.
No, I didn’t have an active subscription. So… I paid $39 and activated my Tread… and… it WORKED! So I’m downloading every app I can and trying to make sure when my month ends I have the apps necessary to keep everything running correctly. I’m not sure how updates will work once I no longer have a subscription, but I guess we’ll see. I’m annoyed Peloton got me to pay another $39, but, I’ll admit they beat me, because there was no other way to get the apps loaded. Now I have 30 days to get on top every Running leaderboard so I can feel I got my money’s worth lol.
Glad you got it to work! I guess that is my solution to get apps back on my bike. I will try to update an existing app on my Tread and see if that works before I pay Peloton $39. Wish we could figure out what permission or setting is flipped when you activate.
You probably ran into the same issue I did. I describe the fix in my comment below: link to dcrainmaker.com
Sadly, it did not work for me. Since I still have my active subscription, I rebooted my tablet so my account was not logged in. I tried to do an install and got the “Performing streamed install” hanging issue. I toggled the package verification setting “off” like you stated. It made no difference. Once I logged into my account, I was able to install APKs again. And I noticed that having the package verification setting “on” made no difference, I could still install successfully as long as I was logged into my account.
@Shawn, so looks like paying $39 and re-instate membership for another month to get install going is the solution.
Yeah, too bad that is the only solution. If in the future the installed apps require the latest version/update before they will run…then you have to reactivate your membership AGAIN to get them updated.
@shwan, Today my pelton screen gave white flashing screen. The only cure is factory reset. After doing that, you can’t install any apps unless you activate. I think, Pelton has successfully destroyed all possibilities of using Netflix without membership.
Well, why should Peloton Broadcast Power/cadence and integrate into other venors’ trainer apps, while wanting to push and sell their live videos/monthly membership revenue stream? I guess they set up their big model like Apple: Closed ecosystem, hype-driven, user interface/experience centered, maxing their own profits within their ecosystem, but NOT integrative…
That isn’t what anyone is asking for…imo. we are using 3PAs which are simply using the Peloton hardware. In actuality, there isn’t anything about the table that truly makes it “theirs”. It’s an Android based tablet. In most cases, those here are looking to expand the use of the Peloton by adding in a pedal based power meter and an cycling app such as Trainerroad, zwift, Rouvy,etc. Plain and simple. ✌️
Any idea of this would work on a Nordictrack s22i?
In theory, yes…since it runs Android. However, I don’t now off-hand (since I don’t have one) on how to access the developer options there. Shouldn’t be too hard to Google that little bit though, then you can use the rest of the post..
Hey Mike. Did you ever get this to work on a Nordictrack?
For those looking for an app that can read the bluetooth metrics from most bikes, take a look at the qdomyos-swift app.
Hi JH,
Can you explain what the app (qdomyos-swift app) mentioned above does exactly? I have a Peloton with speed/cadence sensors attached to my bike, so I can see those in Zwift on my Apple TV. The main thing I can’t do is have Zwift control my resistance, which I need to do manually when I’m on uphill/downhill. Does this app mentioned do anything with resistance, or just show other metrics?
Seems as though Peloton has updated their software and now the app launcher screen no longer shows all the apps like it previously did. Mine just shows ‘Webview Browser Tester, Zoom and Netflix’ and all others seem to be hidden. I also have a few other third party apps installed but they are also hidden. All the apps show up in the settings-app menu but not in the hidden launcher menu. Any idea how to launch the Zwift app now that it’s hidden?
Never mind found the fix! Jason’s post #239. Rolling back the updates as he suggested enabled me to see all the apps installed in the app drawer. Cheers!
I was able to perform the Zwift upload to my Peloton, but for whatever reason the Zwift app is visible via Settings but there is only one app in the App Launcher accessed as described above via “About” screen tapping. I am unable to see any of my apps in the App Launcher. Any suggestions?
You can get around this by install another app launcher like Nova. After you install, just click on the Peloton P logo after you go into device settings. It should ask if you want to switch launchers. You need to launch the peloton app through their own launcher if you want to see your user accounts splash screen.
I was able to perform the Zwift upload to my Peloton, but for whatever reason the Zwift app is visible via Settings but there is only one app in the App Launcher accessed as described above via “About” screen tapping. I am unable to see any of my apps in the App Launcher. Any suggestions?
Hi Grant,
Their latest software update seems to hide all the icons in the app drawer. In Jason’s post from earlier, post #239, it explains how to downgrade to the earlier software version in detail. I tried it and it worked perfectly. I was able to see and run zwift along with all my other 3rd party apps. The peloton software did however upgrade itself automatically again and once again hid all the apps. There is a way to stop it from auto updating but I just haven’t played with it yet to find it. It’s easy and really fast to downgrade if you wanna give it a try to play around. Zwift worked fine for me but just needs the additional equipment (ie. power pedals and cadence sensor) installed to get the metrics to appear on screen. There is also a new device in the works called ‘Shift Smart Trainer’ (link to kickstarter.com) which will simplify the set up and integration of zwift with your peloton bike. It was a Kickstarter project but never received enough funding but says it’s still in the works through a new partnership. Just have to wait and see! It’ll be great to have both options to use on the bike. Good luck!
Cheers,
Matt
I am afraid I will mess up my Peloton. Does anyone live in Denver that has done this and would like to make some money?
thanks in advance,
Luke
Has anyone done this using a MacBook? I have attached micro usb but peloton can’t be seen in the Mac finder. I have used the same cable for my garmin which shows up so I am confident I am using a data cable. Debugging in developer mode is enabled.
My wife just got a Bike Plus, and gave me her blessing to load Zwift. I couldn’t get these instructions to work, but I found that the aptoide app store was loaded (not sure if it came that way, or if it was installed when I installed ES Explorer), so I was able to load Zwift directly without sideloading it.
Enable install from unknown sources with:
adb shell settings put secure install_install_non_market_apps 1
Aptoide isn’t on the launcher screen, so launch it with:
adb shell monkey -p cm.aptoide.pt -c android.intent.category.LAUNCHER 1
Search for Zwift, click install.
On the Paired Devices screen it will keep giving you “Location Alert – Location is off! Please enable LOCATION in the System Settings”. If you click “OK” the message will go away, but will come back in a few seconds. Just click OK every time it pops up. Once your in-game it will stop coming up and everything works fine.
The annoying part that I’m still working on is that it didn’t add Zwift to the app launcher (It added Netflix when I installed that, though!) so currently the only way I can launch Zwift is:
adb shell monkey -p com.zwift.zwiftgame -c android.intent.category.LAUNCHER 1
Before I did anything the app launcher screen just had “WebView Browser Tester” and now it also has Netflix. If anyone knows how to add Zwift to the app launcher screen on the Bike Plus, let me know!
Update: I’ve sorta got a workaround for this. Using aptoid, I loaded Lawnchair App Launcher.
Now if I hit the three dots and then settings, the Peloton logo (home button) will show at the bottom of the screen. If I tap that, it gives me the choice to go to the Lawnchair or Peloton homescreen.
If I go to Lawnchair, all the apps are there. The home button (Peloton Logo) on the Lawnchair screen will again give me the choice of going to the Lawnchair or Peloton home screen, giving me an easy way to get back to Peloton.
Sorry about the double post…. not sure how that happened. Maybe I refreshed the page when I came back to add my update.
Also I wish you could edit a post because that “your” in my post where it should have been “you’re” is driving me nuts!
This is the perfect solution! Just installed it and it works perfect to swap back and fourth. Thanks mate ??
Awesome! I’m glad it was able to help someone! Thanks for letting me know it worked for you.
I should also mention that there are a lot of different launchers available and any of them should work. Lawnchair was just the first “lightweight” app launcher that I found that looked decent.
Awesome solution, thanks for exploring this. Unfortunately once I get to the pop-up screen where I have to click “install” it won’t let me click that button. I can click cancel but not install. Same happens when Aptoid tries to update. Any idea what the issue might be?
I found that you need to side load apps to install them since the peloton android software is masking over the install buttons. I use ADB to side load apps.
Aptoid worked fine for me, no problem clicking the Install button.
Did you enable installation from unknown sources?
I also used Aptoid to load CBS All Access so I can catch up on “Picard” on my “Active Recovery” days!
Hi Michael,
Did you download and install the Lawnchair App Launcher through Aptoide or did you download externally and installed it through the adb command?
I installed Lawnchair via aptioid.
Try killing the “peloton” app via the Apps settings. They have somehow added a feature that overlays the Install button preventing it from being clicked.
Can you do this trick on the treadmill
I don’t have the treadmill to try it, but I would guess that it works the same there.
Where do I find the setting which allows me to “install from unknown sources?”
I’ve enabled the developers mode and the USB debugging.
I sucessfully added Aptoid and I could download the “Lawnchair” app, however I couldn’t install this launcher.
I tried the following statement on the command bar: “adb shell settings put secure install_non_market_apps 1” however even this didn’t allow me to install Lawnchair it still gives the error message: Enable “install from unknown sources” in settings.
Thanks Markus
Markus,
It’s in my instructions for what I did.
link to dcrainmaker.com
so i used the cmd command: adb shell settings put secure install_install_non_market_apps 1 nevertheless it doesn’t work. it always says: For security your tablet is set to block installation of app obtained from unknown.
maybe it’s because I’m using a Windows Laptop…
I also used a Windows laptop.
If you execute:
adb shell settings get secure install_install_non_market_apps
(notice “get” instead of put, and no “1” at the end)
Does it tell you “0” or “1”?
Hey DCR, I am trying to install TrainerRoad on my Peloton Bike+, and it shows up in the “apps” section, but when I tap in the corner of the About box, the only thing that shows up is the WebView Browser Tester. What do I need to do in order to be able to use the app?
David Hales:
See my instructions above. On the Bike Plus you need to install another launcher to see other apps.
— Mike
I am not a big Android user so I am confused on what to do at this point:
“ Enable install from unknown sources with:
adb shell settings put secure install_install_non_market_apps 1
Aptoide isn’t on the launcher screen, so launch it with:
adb shell monkey -p cm.aptoide.pt -c android.intent.category.LAUNCHER 1”
What do I need downloaded to send these commands?
Sorry, I am mostly a Mac guy. Android is super foreign to me. I was able to get aptoid to launch and download trainerroad and zwift. Now I am just trying to figure out how to get them to launch from the Peloton tablet without being hooked up to a PC. I know you mentioned Lawnchair. Any advice to help get this part set up would be much appreciated.
You can find the instructions here to put the Peloton in developer mode (just substitute “Peloton” wherever it says “Phone”) and install the Developer utilities on a PC or Mac. The Developer Utilities include the Android Debug Bridge (ADB):
link to xda-developers.com
Oh, and just re-read your post…. skip the last thing I said and go back to aptoid. You can download lawnchair (or another laucher) using aptoid.
Once you have lawnchair (or another launcher) installed, then:
Hit the three dots and then settings, the Peloton logo (home button) will show at the bottom of the screen. If you tap that, it will give you the choice to go to the Lawnchair or Peloton homescreen.
If you go to Lawnchair, all the apps should be there. The home button (Peloton Logo) on the Lawnchair screen will again give you the choice of going to the Lawnchair or Peloton home screen, giving you an easy way to get back to Peloton.
Also, how did you get to aptoid without staring it via ADB? That might simplify my instructions a lot!
I am sorry if I confused you but I used the adb to launch aptoid. Mostly where my confusion came was knowing to use the adb when the peloton is on screen launcher. Once again. First time dealing with a tablet/android and now see how simple the process is especially with aptoid on there. Also I put lawnchair on there and it is running smoothly! Thanks so much!
Oh, gotcha. It doesn’t matter where the Peloton screen is when you issue ADB commands from your PC or Mac (as long as it’s not off.)
Glad it worked for you!
Hi Mike,
do you (or someone else) know if this procedure would also work on the “Bike”?
I’m still facing the issue that I cannot install an app with using aptoide.
I did install the developers tools on my laptop
I sideloaded Aptoide (I also tried it with side loading lawnchair)
I entered the shell command to enable install from unknown sources with a successful returncode
I enabled all the different permissions for Aptoide
I launched Aptoide on the bike
I could download Zwift (and other apps) through Aptoide
I started to install, but all the attemps failed, as I cannot select the final install button….
I did this on the “Bike Plus”, but Ray’s article that we are responding to was for the original “Bike”
If you are doing this on the original “Bike” and not the “Bike Plus” then you may need to side-load Zwift (using Ray’s instructions from the article) instead of trying to load it with Aptiod.
Thanks Mike,
independent from Zwift I also couldn’t install Lawnchair Launcher.
So on the Bike if I’m in the Settings and hit the Peloton Logo on the Bottom I end up directly on the Peloton Home Screen instead of having the chance to select between Lawnchair Launcher and the Home Screen. So it’s not only the challenge that Zwift cannot be installed, I’m also not able to install Lawnchair in a way to get access to it.
Jumping back a step, do you have the Bike or the Bike Plus?
If it’s the original bike then my instructions probably won’t work and you’ll have to follow Ray’s.
Sorry, yeah, I need to add a new section for a launcher of some sorts, since Peloton changed the platform back in January to make the apps section disappear.
I’m pretty sure there’s ways to override it, I just haven’t finished doing all my research. I suspect they’re using Android policies, akin to an enterprise policy. Which you can disable. But I haven’t dug enough.
In the meantime, I’ve been doing it the lazy why by just launching the apps via ADB command from a tethered computer for a second, and then unplugging.
Yes I’m a Bike user.
So it seems I still need to wait some more time and hopefully then a new idea/fix comes up which allows to run Zwift again on the Bike.
Anyways you helped already a lot of people with your description and the answers to my questions, unfortunately I’m not (yet) benefitting from it, however a lot of other Peloton Users get the benefit – Thank you very much – this is great for the community.
Best
Markus.
When “the lazy way” involves twice as much work as the “not lazy way” :)
The current setup with Lawnchair is pretty close to optimum for me, and switching back and forth from “Peloton” to “Everything Else” is just a couple taps.
I didn’t run into the issues that some other people are having trying to either install or use Lawnchair, so I’m not sure how I would go about trying to troubleshoot a problem that I can’t recreate. :\
Markus,
For now, are you able to launch Zwift via ADB, like Ray says he is doing?
— Mike
Hi Mike,
let me try to answer your question:
Right now Zwift only can be installed on the Peloton Bike with using the ADB method, but you cannot run/launch it anymore.
The launch was possible, however since a few weeks, after Peloton released an OS update there is no way anymore to start Zwift (or other Apps) on the Peloton. I raised that topic in the forum here immediately after recognizing it, however I haven’t seen a fix so far.
Before this update happened you needed to push 10 times on a certain area on the “About Window”, then you ended on a screen which contained all Apps. Now after this OS update if you hit 10 times on the “About” window you end on a screen which has only two Apps, unfortunately neither Zwift, nor Trainerroad…..
After seeing you post and your idea I had the hope that this also works on the Bike, however in the meantime I learned that the Bike+ and Bike works different from that perspective…..
Can you launch it with ADB?
adb shell monkey -p com.zwift.zwiftgame -c android.intent.category.LAUNCHER 1
Hi Mike,
yes this work and is ok as a workaround.
This means that I need to connect my laptop to the Bike in case I want to start Zwift.
Probably at some point of time the launch of Zwift can happen again directly on the Bike, as you do it similar on Bike+.
Thanks for all your support
Markus
Yeah, from Ray’s comment above, it sounds like that’s the only way to make it work on the original Peloton Bike at the moment.
Ray,
Have you tried setting up ADB over Wifi? If it works, it may save connecting a cable every time you want to launch Zwift.
link to medium.com
Very interesting – I never knew that existed. Will try and give it a poke.
That said – I’d be surprised if there’s any differences at all between Bike & Bike+ here. While I haven’t loaded up Zwift on both recently, I do use the AZScreenRecorder virtually daily on both. And both work equally in that respect.
I wouldn’t have thought so, either, but what Markus is describing as happening on the Bike doesn’t seem to match what I’m seeing on the Bike Plus.
It’s possible that our Bike Plus hasn’t received the January update with the associated lockdown, maybe?
Also, I only recently learned about ADB over WiFi recently because the latest version of Tasker can do some things that normally require root if you allow Tasker to do ADB over WiFi (which doesn’t actually go out over wifi in this case since it’s loopback) from your phone to your same phone.
I currently have Nova launcher installed and after the latest update (over the weekend?) I’m no longer able to open the Peloton app. It reports permission denied.
Anyone else have this issue?
Robb,
You can’t open it from the background page, but if you get to the page with the list of all the apps, it will open. Or at least it did for me. It doesn’t really make sense though.
Is it possible that when you installed a launcher you told Android to always use it as the launcher?
I purposely have not answered to tell Android to use the launcher that I installed because this way when I hit the home button it gives me the choice of Lawnchair (the launcher I installed) or the Peloton launcher.
Thanks for the suggestions. I’ll attempt these tomorrow.
Is there a way to make the ADB connection over wifi persistent? The tablet no longer listens for ADB connections via wifi after a reboot.
I was going to say “No”, but then I found this:
link to omelina.com
setprop persist.adb.tcp.port 5555
Or, if you’re doing this from the Windows command line and not within ADB SHELL then it should be:
adb shell setprop persist.adb.tcp.port 5555
Thanks! You prompted me to go find this, and it’s going to save me some hassle!
I found that as well and it doesn’t appear to work. Digging deeper, it seems we need to run the command from root, which isn’t available on the tablet.
Looks like you’re right, so you still saved me some time since I haven’t tried it on mine yet!
Like many of you, I was initially able to side load apps via ADB, but soon ran into a situation where this appeared to have been disabled (perhaps by a recent update? I’m not sure.) Installing directly from a package manager/appstore on the Peloton tablet results in the install ‘hanging’, and similar behavior is observed when attempting to sideload via ADB, which hangs at “Performing Streamed Install”.
If viewing the Peloton logs via logcat, one will see a similar message in the output after attempting to execute an installation (either on the tablet itself or via ADB):
02-25 22:47:00.064 538 569 D PackageManager: verifying signatures
02-25 22:47:00.064 538 569 D PackageManager: keys mismatch. install denied
02-25 22:47:00.065 538 569 E PackageManager: Install not allowed
I am happy to say that I believe I have identified the cause, and a viable solution!
If you see the symptoms above, it is likely that a system setting that forces package signing verification by the Android package manager was toggled on. Luckily for us, it appears to be quite easy to toggle off. Simply execute the following command with ADB:
adb shell settings put global package_verifier_enable 0
or if you already have an interactive adb shell session open:
settings put global package_verifier_enable 0
Hopefully the above fix will work for you.
Shame on Peloton for going out of their way to cripple what is otherwise a general purpose computing device in such a manner.
Thanks for this helpful and promising solution. Unfortunately it does not work for me–I am still getting the exact same errors you posted when I check in logcat (keys mismatch, install denied, etc.), and the same behavior (ADB hangs at “Performing Streamed Install”).
Like some other commenters for whom this did not work (Shawn, CJ), I do not have an active Peloton subscription. So it appears there is another configuration this that is forcing the package manager to check signatures notwithstanding the package_verifier_enable setting.
This is so maddening I’m loathe to pay Peloton and reward them for their obnoxious behavior.
I used to install apps on Pelton. Now I keep getting “PackageManager: keys mismatch. install denied pelton”. I just cancelled subscription.
I suspect this is due to “Verify app over USB” being disabled.
I tried
adb shell settings get secure install_non_market_apps 1
adb shell settings put global package_verifier_enable 0
adb shell settings put global verifier_verify_adb_installs 0
nothing is working… anybody knows how can we overcome “PackageManager: keys mismatch. install denied pelton”?
link to imgur.com
I am in exact same boat. I really need to get to bottom of this or else I won’t be left with any hair as I am pulling them for past 1 day.
@Per Curiam 271828, did you find any solution for “keys mismatch. install denied”?
@Kyon-kun Denwa
did you get any solution besides getting Peloton subscription?
Speaking of which, seeing as how you brought them up… any word on Avio?!
We’ve added FTMS support to SmartSpin2k. I regularly use it with FulGaz on my Schwinn IC4. I’ve tested it with Kinomap that it works well there too.
Has anybody been having forced update problems? Last month I got a forced update and haven’t been able to revert back smh.
I am getting the same thing. No ability to stop the update from installing, even with auto updates off. As soon as I uninstall the update it starts the install again.
Sometime during the last week my wife’s Bike Plus got an update. The weather has been nice, so I haven’t taken the time yet to see if I can load Zwift again, or if I’m going to be stuck running Zwift on my phone and Miracasted to the wall TV.
The Tread Plus arrived a week ago, and I haven’t had a chance to poke into the internals of that, either.
Good news for me (and hopefully others) — the update didn’t remove Zwift or Lawchair… it looks like it just re-registered the Peloton launcher as the default home app, so it no longer gives me the choice of Peloton or Lawnchair when I hit the home button (Peloton logo.)
I’ve got a workaround for now (see my reply #337 below), and I’ll work on it more later when my wife is done riding.
very nice game among us mod apk
Good news! Lawnchair and Zwift are still on my wife’s Bike+ after the software update, just a little more complicated to get to.
The Peloton logo no longer brings up a choice of Lawchair or Peloton for a launcher (the software update probably re-registered the Peloton Launcher as the default launcher — I’ll have to see if I can un-register the default launcher to force a selection again. Maybe by uninstalling and reinstalling Lawnchair?)
In the meantime I can get to Lawnchair (and launch Zwift from there) by:
– Three dots in the lower right
– Device Settings (gear icon)
– Apps (red icon with 9 white dots)
– Peloton Launcher (you will have to scroll down to find it. Make sure it says “Launcher”)
– Advanced (last option in the menu)
– Home App (last option before the horizontal line)
– Home App (will show the Peloton logo)
– Lawnchair
– Click on Zwift to launch Zwift
My wife had the audacity to want to get on HER Peloton Bike, so I’ll have to work on it some more later to see if I can make the process of going back and forth between Lawnchair (where I’ve got Zwift and the other non-Peloton apps) and Peloton easier again.
OK, I didn’t want to lose my settings in Lawnchair, so I took another route…..
I installed another launcher (I forget what one it was — I just searched for “launcher” in Aptoide and took the first one that said it was small and lightweight.)
That was enough to un-register Peloton Launcher as the “Home” app, and it stayed that way after I deleted the other launcher that i installed.
So now I’m back to what I had before.
I think the different tablet may have a different setup. I have Peloton Bike running the latest software. My Apps icon is the robot emoji looking icon. Once I get to the Peloton Launcher app the Home App appears above Store and then offers and advanced option under special access. It also has another Home App selection that shows Peloton Launcher as the default. I have aptoid and lawnchair installed, but can’t figure out how to launch them.
Michael, I successfully downloaded lawn chair but when I open it, all that’s on it is the green Android man icon and the camera. Trainer road is on the peloton, I can see it in the apps section, but when I open launcher only those two things are there. Any ideas?
All that will be on the homescreen is what you put there.
Open the apps drawer, touch and hold on Zwift to add it to the homescreen.
Sorry, not enough coffee yet this morning. I just realized that when you said “apps section” you might mean settings, and may not know how to open the apps drawer…
Touch and hold at the bottom of the screen and drag up.
Also replace “Zwift” with “Trainer Road” in my above reply.
Slightly different subject… the Tread Plus has a USB-A port, which I believe means that it will want to act as a bus master (like a PC.)
Does anyone have experience using ADB with something like that? Is it even possible, given that the USB-A port implies that the USB on the Tread Plus will expect to be a bus master?
I’m a software guy… I’m Googling as fast as I can, but this is hardware stuff so I’m not really up to speed on the hardware implications of what is or isn’t possible over USB-A to USB-A.
Hello-Thanks for the tutorial. I was able to follow all the steps to get Zwift installed on my Tread (it’s a shade over 700MB when I go to the permissions), but I don’t see the app listed when I go through the multiple taps on the about window. Actually, the only app I’m seeing is the WebView Browser Tester (I do have apps listed when I go through the settings, so I can assign permissions and force close). Is there a setting or app that could be masking or hiding every other app? BTW, I did have to create the Android and obb folders when copying the file over from Windows Explorer.
I just saw the discussion above regarding this very issue (duh). Apologies for the duplicate question.
HI Ren – did you wind up getting it to work?
Whether I use the default launcher (which I can only see WebView Browser Tester) or the Lawnchair Launcher (where I can only see the Browser & camera) – I don’t get to see any of the other apps installed on my Peloton.
I don’t have the ability to “roll back” versions as I did a factory reset about 7 days ago (before finding this article) as the tablet was acting glitchy.
Use Nova Launcher – all apps are showing up :-)
Hi- I followed the steps to get Zwift loaded on my Peleton. I have been successful loading Netflix but the Zwift icon does not appear after tapping 7 times on the About screen. I only see Netflix and WebView Browser Tester. I’ll try Nova Launcher. Thanks.
Buck, I have the same problem. Did anyone solve this?
Only the apps that you put on the homescreen will be there. The rest are in the apps drawer.
Touch and hold at the bottom of the screen and drag upwards to open the apps drawer.
Touch and hold on the app that you want to add to the homescreen.
a great guide on install zwift.
I received an on-screen message on Peloton screen indicating my Zwift app needs to be updated in order to function properly. I clicked on “Update” button and nothing happened, so does anyone know a process for updating the app on Peloton?
I was able to go back to Aptoid (where I loaded it to start with) and update it there.
I had to uninstall Netflix and Paramount+ to free up enough space for the update, and then reinstall them after Zwift was updated.
Worst case, you should be able to uninstall Zwift and reload it again.
Hi, I have followed your instructions and installed the latest Zwift apk and obb from May 25, 2021.
When I start Zwift, a pop up keeps saying an update is necessary and I can’t use Zwift properly.
Could you help? Thanks for everything
You should make a YouTube video of what the graphics look like running this setup. Does zwift lag or look bad doing this?
Hi- I followed the steps to get Zwift loaded on my Peleton. I have been successful loading Netflix but the Zwift icon does not appear after tapping 7 times on the About screen. I only see Netflix and WebView Browser Tester. I’ll try Nova Launcher to see if I see the Zwift icon as per #356. Thanks.
Hi- I was able to install Nova Launcher as suggested and all the icons appear! I downloaded the latest version of Zwift following the above instructions and Zwift works on my Peloton. Thanks all/DCR!
I assume you have Peloton subscription?
Just a quick heads-up to everyone
We had to uninstall Zwift to update Peloton, but then couldn’t re-install Zwift (it would fail saying that it needs 1.2GB of memory free, even though Settings -> Storage says we have over 2GB free.)
The Aptiod store will allow you to install older versions of an app. I was able to download and install the October 24th version of Zwift with no problems.
Litereally just posted about the exact same problem right after you did, and then saw your post. I am trying to download the Oct. 24th version now. I hope it works!
Let us know how it works out for you so we know if this is likely to be a solution that works for everyone.
Yes, this ended up working for me as well. Worked perfectly. Do you know why this issue is happening with the newest update by chance?
Yes. The latest version of Zwift is a *WHOPPING* 3.3 GB, and the Peloton Bike Plus only has 4GB of storage *TOTAL*, so after subtracting space for the Peloton app and all of the auxiliary apps that go with it, there simply isn’t enough room left over.
I started looking at trying to move Zwift to external storage, but Zwift doesn’t support installation on external storage, so without rooting the bike’s tablet that’s a no-go.
For this reason I’m going to go a different route. I’m uninstalling Zwift from the Bike Plus and installing a screen mirroring app instead (I’m still looking at options, but Apowermirror is at the top of the list currently.) Apowermirror is $40 (with one year of updates and support) or $60 (with lifetime updates and support), which is kind of expensive, but compared to the price of the Bike Plus and the powermeter pedals it’s peanuts.
I will then run Zwift on my phone, tablet, or PC and mirror the display to the Bike Plus screen.
This will allow the Peloton platform to be updated without uninstalling Zwift, and will allow me to always be running the latest version of Zwift.
My Data Fitness Connector (link to crowdsupply.com) is about to ship, but it seems that in between ordering the DFC and it being delivered, installing Zwift on a peloton has become a lot more difficult.
For someone that hasn’t started yet, is best practise the screen mirroring solution? And if so, is the installation of Apowermirror the same as sideloading an APK? Any instructions?? Or is it too early at the minute??
The issue now isn’t the difficulty in side loading an app onto the Peloton Bike or Bike Plus, the issue now is that the Peloton Bikes do not have enough storage to hold the latest release of Zwift, which got significantly larger with the addition of new maps.
I think that screen mirroring may be the ONLY way to use the latest release of Zwift on a Peloton.
Side loading Apowermirror should be pretty much the same process as side loading Zwift. In my case, since I have the Aptiode store installed, I was able to simply uninstall Zwift and install Apowermirror from the Aptiode store.
Apowermirror isn’t without its quirks, but since I’ve been unable to move Zwift to external storage, I think that Apowermirror (or another screen mirroring or remote control app) is the only game in town at the moment.
Can any Android app be sideloaded onto a USB stick instead?
I haven’t looked into that yet, but certainly putting a USB stick in the back is a cheap solution if so.
Based on this: link to forums.zwift.com it would suggest this isn’t an option (yet).
As such if we want to ride the new maps, the screen mirroring appears the only option.
An Android app can only be loaded on external storage if the app supports it, and Zwift doesn’t.
For a while I was using Duet Display to mirror my laptop’s screen to the Peloton tablet via wifi, but it was sometimes laggy and the animation wasn’t super smooth.
In a post on another forum I found a link to Splashtop Wired XDisplay, which allows mirroring over USB. USB is *WAY* faster than Wifi, allowing for full resolution, high framerate mirroring with no noticeable lag.
The trial version of Splashtop Wired XDisplay (teal icon) has a 10 minute timeout. The full version (blue icon) is also in the Aptoid store. You can download the full version from the Aptoid store, but since the Peloton tablet has no connection to the Google Play Store, there is no way to pay for it.
I just installed and used Splashtop over the weekend, and this morning I sent them a support request asking how I can pay them for it. I’m guessing they are going to be surprised by me asking to pay for something that I was able to download and install without paying but I *REALLY* like this program, so I want to support the developers.
I forgot to mention that in the Google Play Store, Splashtop Wired XDisplay is $6.99, which is a lot less than the $40 or $60 (depending on options) to license Apowermirror.
Has anyone else had problems downloading an update? I recently went to downloaded the latest version as I haven’t ridden indoors for a while now, and when I went to download it, it said there wasn’t enough space. So I deleted the app and redownloaded it. Once I have it installed and click on the app, it goes through it’s initial load screen and then a message pops up saying “Insufficient storage 1.2 GB needed – Please close Zwift, uninstall, free storge, and try again” (just for reference, within my peloton settings it says there is 2.16 GB free storage, and that is with the Zwift app currently downloaded.) Has anyone run into this problem, or know how to fix it?
For anyone with the same question as Russell, this is what worked for me:
link to dcrainmaker.com
Yes, anyone else with this issue, Michael’s solution worked for me as well.
The App has to support it. Zwift doesn’t. There are a lot of requests for this in the Zwift forums because of how much the app size has grown.
The App has to support it. Zwift doesn’t. There are a lot of requests for this in the Zwift forums because of how much the app size has grown.
Russell, if you’re still following this my current solution is to run Zwift on my laptop and mirror the laptop’s display to the Peloton’s tablet.
Originally I was using Duet Display for mirroring over wifi, but sometimes it was a bit laggy. In another forum someone mentioned Splashtop Wired XDisplay for mirroring over USB (which is MUCH faster than wifi) and this works beautifully!
The Splashtop Wired XDisplay app is in the Aptoid store. There is a free version (teal icon) and a paid version (blue icon.) The free version has a 10 minute timeout. You can download and install the paid version, but since the Peloton tablet doesn’t connect to the Google Play store, there is no way to pay for it.
I put in a support request mentioning that I was installing the Splashtop app on a device that didn’t connect to the Play store and asking how I can pay for it. I’m guessing that they will be surprised that I want to pay for something that I was able to download and install without paying for it, but I really like this app, so I want to support the developers.
I forgot to mention that in the Google Play Store, Splashtop Wired XDisplay is $6.99, which is a lot less than the $40 or $60 (depending on options) to license Apowermirror.
Curious if this is still working for you? I’m going to see if I can get it up on the Peloton tread somi can use zwift
Disclaimer – NOT A TECHY. Pelton base model w/ subscription.
SOLVED!!
After struggling my way through this process for second time and getting stuck at every turn, I can confirm I have loaded Zwift onto my Pelton – I would appreciate if someone can verify the steps as I’ve tried so many things that I’ve lost track of what worked and what didn’t.
STEPS:
1) Follow DCR steps above to enable developer options
2) Follow DCR steps to download ADB onto you Windows computer into a folder. I created a folder called “Peloton” in my documents
3) Open CMD
4) Navigate to folder where ADB is – at the prompt:
cd Documents
cd Peloton
It should now look something like this c:\Users\[Name]\Documents\Peloton>
5) Copy in following command and hit enter:
adb shell settings put secure install_non_market_apps 1
6) Download Nova Launcher from APKMirror.com or other APK site – look for variant that is for Android +5.0 (as Peloton runs on Android 7.0)
7) Download Firefox from APKMirror.com
8) Copy the name of the Nova Launcher file on your laptop (ie. click rename, copy the name, hit escape) and use sideload Nova Launcher using the following in CMD (showing what it looked like for me)
adb install .\com.teslacoilsw.launcher_6.2.19-62019_minAPI21(nodpi)_apkmirror.com.apk\
9) repeat above for Firefox
Note – you should get the message “Performing Install” and below that “Success”
10) on your Peloton – go to Settings>Apps>App Settings (Gear in the top corner)>App Permissions>Storage
Ensure that Firefox and Nova Launcher both are enabled.
**When you click the Peloton Icon you should be given the choice to launch with Nova Launcher or Peloton. You can also use the settings to default to NL and Firefox as a browser but I can’t recall how to navigate as I type this.
From Nova Launcher you can see all the apps and select Firefox.
11) Using Firefox download APKPure APP
Install APKPure APP
When I opened this it was stuck in the horizontal perspective and I couldn’t access the navigation bar but didn’t end up needing it. Maybe someone knows how to correct this.
12) Using Firefox download Zwift from APKFAB (DCR link above).
Choose APKPure to install Zwift – an option should pop up to choose between firefox and apkpure
APKPure will take over the installation – you have to swipe (down) to get to the downloads – and I’m a little foggy on how this worked (it was late, I was drinking).
My understanding is that APKPure will manage the app (and updates?) similar to what Google Play Store would do – but you can’t install it so don’t even try.
Load Zwift – there will likely be an update but it should all work.
If it works – buy me a beer and one for DCR really, he’s the real hero.
glad you made it work! Although we know that this only works if you have subscription. You can’t work make it work without subscription you will get following error
“PackageManager: keys mismatch. install denied pelton”.
Resurrecting this problem. I have peloton bike without subscription and I get following error.
02-25 22:47:00.064 538 569 D PackageManager: verifying signatures
02-25 22:47:00.064 538 569 D PackageManager: keys mismatch. install denied
02-25 22:47:00.065 538 569 E PackageManager: Install not allowed
Any fix other than getting Peloton subscription?
Does anyone know how to get Zwift to stop asking you to update to the latest version? Since the latest version is too big to install on the Peloton I recently had to install an older version, and this worked for a while. But now it just keeps telling me to update and won’t stop. Please, does anyone know how to fix/stop this?
Eventually you are going to be far enough behind that Zwift won’t let you use that version anymore.
My solution was to use Splashtop Wired XDesktop (I loaded the Android App on the Peloton and the desktop app on my laptop.) I run Zwift on my laptop with the screen mirrored to the Peloton screen (over USB, so full resolution and color, no lag!) Splashtop supports touch, so you can still interact with Zwift via the Peloton touchscreen.
That also solves the problem of needing to uninstall Zwift in order to update Peloton, and reinstall Zwift after (because Zwift is big enough that there isn’t enough space for Peloton to update.)
Thanks Michael,
My brother and I are going to try and get the mirror program up and working this week. It just seems like it will be much easier to deal with. Do you by chance know if Splashtop works on a Mac? Or does it have to be a PC laptop?
Also, I know you mentioned there being a paid version and free version. Were you ever able to work out getting the paid version installed to avoid the 10 minute timeout?
Note*
It looks like their website has an XDisplay agent for Mac as well as PC so we are good there. I am just curious about the paid/free version and if you were able to get that figured out? When does the 10 minute timeout happen? It’s not like in the middle of a ride or anything is it?
Hey Man,
So I was just reading on their website and learned that the 10 minute is just a trial so it seems like that won’t work at all. How were you able to get the full version so you don’t have to deal with time limits?
Thanks for your help
Russel, I sent you this message a few days ago :)
link to dcrainmaker.com
The full version is in the Aptoid store, and you can install it on the Peloton from there, but of course you have no way to pay for it. The license says that once you purchase it, you can install it on all of your devices, so I installed it on my tablet just so I could pay for it (the app works great, so I wanted to support them!)
Oh, and the desktop client has both PC and Mac versions:
link to splashtop.com
Oh sorry I missed it the first time. Thank you so much for all your help. I am going to try and get this all set up tonight.
Russell,
How goes the battle?
Hi Michael. Downloaded and installed wired XDisplay agent on PC Iphone and Peloton. Works on iphone but I can’t see the app on the peloton screen. I have installed nova and lawnchair launchers on the peloton but cant see them either. Please could you advise a solution. Many Thanks
To get to Lawnchair or Nova, you have to set it as the “Home” app:
– Tap the three dots at the lower right
– Tap Settings
– Tap Applicatons
– Tap Lawnchair (or Nova)
– Tap Advanced
– Tap home app
– Tap Lawnchair (or Nova)
I haven’t use the Nova launcher, so the rest of my instructions are for Lawnchair. It’s probably similar/same for Nova:
To get to the Wired XDisplay client, open the app tray by touching and dragging from the bottom of the screen to the top of the screen.
You can touch and hold the Wired XDisplay app to add it to the homescreen.
To get back to Peloton:
– Tap Settings (gear icon)
– Tap Applicatons
– Tap Lawnchair (or Nova)
– Tap Advanced
– Tap home app
– Tap Peloton
Hi thanks for reply. Got lawnchair working on peloton but cant see xdisplay wired app when I drag up from the bottom. I installed xdisplay via playstore and splashback website and both say says its installed on those if I try again, but cant see it on peloton? Any ideas what i am doing wrong?
Playstore? How did you get Playstore on the Peloton?
Since “Wired XDisplay” is toward the end of alphabetical order, you may need to scroll the app drawer screen to find it? Or it should come up if you type “xd” in the app-drawer search bar?
See attached screenshot.
Screenshot of the app drawer
Hi thanks again for your help.
Got the free XDisplay app on the peloton working great via my pc for 10 mins. Went into play store (via Google on the peloton) to upgrade to the full version, managed to pay 6.99 says it’s downloaded but only to my devices which comes up with nvidia shield and one plus A5000, tried both for installing it says installed but not on the peloton. In summary got the free app on the peloton showing but not the full version? Thanks Kerry
The full version can be found in the Aptoid store.
You’re off the map from my instructions, so I’m not sure how to help you if you can’t get it from the Aptoid store.
The Peloton doesn’t have a Google account by default, so I’m not sure how you got the play store to do anything.
After I downloaded the full version of Wired XDisplay from the Aptoid store, I purchased it on my phone just so I would legit have a license for it.
I seem to remember that after I installed the full version I had to uninstall the trial version to keep from getting the 10 minute timeout.
I’m having an issue with Splashtop Wired XDesktop showing a black screen on the Peloton when the Mac Prorgram and App are running on the Peloton.
I’ve tried both the free and paid apks and the black screen is the same. I’ve tried different cables, different USB C port on my Macbook – not sure what the issue is.
This is a great guide! There’s an open source tool available that can add auto-resistance and erg mode for the Peloton bikes and well as other spin bikes called SmartSpin2K. Anybody with a 3d printer and soldering iron can make one relatively easily. A couple of the project contributors including myself are also helping make units to get into users hands.
I use one with a Bowflex C6 with fantastic results. A mod for direct mounting to Echelon Connect Sport bikes is just about ready for release as well. Direct mount mods solutions for other bikes are also in the works as we get measurements and pictures from users
I have a soldering iron, but I’m a software engineer, so I don’t trust myself with anything more complicated than joining two 5v wires. I also don’t have a 3D printer.
I would be very interested in getting one of these units pre-built!
You can check it out on github here. I have contact information in the wiki and I can get you going for a prebuilt or if you if you’re feeling adventurous, I can ship out a parts kit.
I was in your shoes back in November when I made my first one – terrible at soldering and not very comfortable with it. The DIY is very approachable and we have some excellent how-to videos for PCB assembly on the wiki
link to github.com
Anyone know if Peloton has changed their system lately? I have successfully followed all these steps (thanks for such a comprehensive and easy-to-follow procedure) and I can see in settings that the app is installed and I’ve granted access as described.
But the only place where my experience diverges from this guide is in the app launcher. Instead of seeing all my apps there, I only see WebView Browser Tester. So while I can see that I’ve successfully sideloaded the app onto my (wife’s) Peloton. I can’t see any way to actually run it. Very frustrating!
My Peloton app screen shows it was updated only a few days ago (3/2) to version 2.5.933 so maybe they’ve implemented some heightened restrictions?
I’m not very well versed in Android but maybe there’s some other way to launch an app? Any chance I could downgrade the system to an earlier version? If anyone has any thoughts please LMK.
thanks!
I gather from some of the other comments above that one way around this would be to install another launcher like Nova and set it as the home app, but I’d like to avoid that if possible since it would also impact my wife’s use of the bike and she does have an active subscription.
So if anyone has any info about why the launcher you get to from the about screen doesn’t show all my apps that would be super helpful. It looks like some others have seen a similar result…
Installing another launcher does not uninstall the Peloton launcher, and is the only way (short of using ADB to launch the app) to launch non-Peloton apps.
From Peloton, go to:
Three dots at the lower right –> Settings –> Apps –> (Launcher you installed) –> Home App
and set the launcher that you installed as the home app to see and use non-Peloton apps.
When you’re done, go to:
Settings –> Apps –> (Launcher you installed) –> Home App
And set Peloton as the home app to go back to Peloton. When the Peloton app is the home app the bike will look and act exactly as it did before you touched anything.
Thank you for these peloton program tips, finally I can play it.
So happy to know how to sideload Zwift on a treadmill screen with my iPad, thanks
how? what are the steps from ipad?
This is very nice and this article is very helpful for everyone. I like it very much please keep doing this amazing work.
Hello,
I was able to sideload many apps on Peloton by following instructions at
(1) Instructions for Netflix, Prime Video, Chrome on Bike and Tread : pelotoncycle (reddit.com)
However, one pain point is Applet TV+. It doesn’t run in browser or in apk app.
I have tried several apps but looks like apks are very specific to version of android like Andriod TV, Sony TV, Fire TV etc.
On browser, I keep getting message “Error has occurred. please try again.” It runs trailer but when actual show starts it gives error. Has anybody able to run apple TV+?
did you have to get “membership” to be able to sideload the app ? please help if you found a way without subscription
This is weird that nobody did a simple app to expose the BT/ANT
did anybody try to root peloton with KingRoot ?
@Aghozzo, I don’t think Kingroot will work. The right way will be to create TWRP recovery image for Peloton and flash it. I am not sure if that’s now possible. I don’t know anyone who has done it either.
But would rooting allow sideloading without membership ? I think it’s not clear why the installation get stuck before/after membership . If we know what mechanism get unlocked when you login with membership it could be easier to spoof
if you can run peloton as root, you can do anything including installing apps without subscription. Unfortunately, there is no one who has dared to try this (except one thread on readdit which talks about very old model).
PLEASE HELP!!
I cant get the bike to authorize. It keeps telling there is an app running that is blocking permission.
Is this the same process for the Bike+?
im having trouble with the command promt o. i type :adb.exes devices” and i get told that is not recognized as an internal or external command, operable program, or batch file
@chris
that’s pretty simple. You can either give full path for adb.exe or add the path of adb.exe to your system path.
Question to this topic:
Did somebody try to install the Peloton App on the Peloton bike? Membership per month is only 12,99 and not 39$.
Knowing that -if this works- you are not on the leaderboard.
Thanks for any comment.
Yes and it works like it works on your phone . Just download the apk and sideload
The difference is that you don’t see the cadence , resistance when you cycle in the class but who cares
Aghozzo, any progress on rooting device? or did you end up in paying 45?
Not only that, you miss the awesome scenic rides and the new game mode that’s only availalbe on the higher price subscription. No more boring in studio rides.
I cancelled my Peloton subscription so cannot access “about” screen. Is there another way to jailbreak my Peloton to access apps or do I have to subscribe to Peloton?
Hello! Thank you for all this.
Just wanted to confirm and maybe it’s in the long list of comments, but once set up does it work well? does it accurately reflect your wattage with the power meter pedals? Does the peloton/zwift setup work with the resistance changes on inclines/declines?
I’m ready to pull the trigger on this to get out of my wheel on trainer for the winter, but wanted to see if you could confirm on those two items / or if in this time you had heard of any new way to get around the set up?
Thanks!!
Adam
My Question is:
Did somebody try to install the Peloton App on the Peloton bike? Membership per month is only 12,99 and not 39$.
Knowing that -if this works- you are not on the leaderboard.
Thanks for your reply in advance.
This is very creative and informative, thanks for such a great work.
This little tool works great to read the peloton data and transmit to zwift, Garmin, etc link to dcrainmaker.com
good work, its helpful for me ..
also i got help from inshot pro to get best video editing .. thanks to both
great work Bro
great work Bro
Hi
Can anyone help with Peloton model PLTN-TTR01, I followed the how-to and installed
TrainerRoad_v2022.36.0.92147_apkpure.com.apk which installed successfully.
After a few minutes the Tablet whilst in Trainer Road the app started to go on and off showing the Peloton logo then it switched off and now wont switch on.
when plug the windows computer in the Tablet is THE COMPUTER detects a device QUSB_BULK_CID:0400_SN:XXXXXX
from google search i suspect the device has gone in to EDL or Emergency Download Mode.
Help Please
Followed your instructions
Peloton worked started to flash black and white screen with trainer road
Now it’s bricked … nothing but a paper weight
You did warn me !!! But still it sucks
Hey, Mac, it ain’t brick. all you have to do is give peloton app rights back to overlay over confirmation message.
2022 December 7
I had to go back and get an “older version” – Zwift_1.0.100345_Apkpure
I was getting an error with the latest APK file saying “Requires newer sdk version #28 (current version is #24)]”
So its all installed now, but I think Peloton caught on to what people are doing.
If I go to the Apps screen (… About and then tap 10 times on lower right), it takes me to the Apps screen but the only app it shows is “WebView Browser Tester”.
No other apps show up. If I go into the settings as a developer, it shows the Zwift app is installed. I also went in and gave it permissions.
So its installed, but I have no way to launch it…. any thoughts?!!
Dave
hi ,
i am trying to install the APK onto the Bike , so i started following up until on the command where it stops @ c:\peloton> and i dont know what i am missing after this when i am typing the adb.exe devices ! its telling me its not recognized as an internal or external command ! am i typing it wrong ? am i missing any characters ? sorry i have no clue but just trying to follow the steps ! Appreciate the help on this . Thank you
Hi , got to the point where I’m trying to type in the command adb.exe devices and nothing is happening!
I’m currently at this stage C:\peloton>
Am I missing any characters ? How do I exactly type and proceed from here so i can get that permission screen on the peloton and Give it access? Sorry I’m pretty much clueless when dealing with such things 😂 thanks for the help
Hi when I installed it, it bricked my Peloton
I was told of the record by a peloton engineer that peloton do the bricking of hardware with unauthorised software
Plus you get no help here if it bricked
The installation was successful with my peloton Treadmill though.. I’m thinking something I’m doing wrong
what do you mean by Bricked?
@makkadiamond@mail.com sideloading is not likely to brick the tablet. One of the step is to disable Peloton app’s overlay control. This causes issue of flashing screen. Just give back peloton app ability to overlay over the other app windows.
How about just change the monitor. Simply uncrew the peloton one and install your own connected to your PC. I did that and it’s awesome. Ofcourse I need the power pedals, but you don’t need any apps etc.
Hi Bilal, can you share the detailed steps for replacing the monitor please? Yes i unscrewed the peloton monitor OK but how do i mount the bracket into a new monitor? The new monitor seems to have a VESA mount.
thanks for sharing for such an amazing syste with us
I spotted someone above had a similar issue. But it would seem that hopes of installing Zwift on an original Peloton Bike are now dashed forever. The original bikes use Android 6/7/8 all of which are now no-longer supported by Zwift: Source: link to zwiftinsider.com
The newest Swift version I was able to install onto the Peloton was the base install of: Zwift_1.0.101375 which after post launch updates shows itself (as per screenshot): 1.27.1(101375). It loads without error, music etc, but the UPDATE notice is not possible to bypass. Having checked all versions available for my Android build, there are no more.
That’s my conclusion on Zwift, but if anyone found a work around would be delighted to see it.
Some helpful notes for others loading software on and struggling with finding version types or which file would work with their peloton tablet version, you can install APKPURE app: link to apkpure.com It act’s as a GooglePlay Store on the device, so you see all the updates (specifically the version numbers you need to look for). Sadly, it does not appear possible to download them directly using this. But can certainly save a lot of time rather than version hunting.
@Jonny5isalive, installing things on outdated andriod 7 on peloton is becoming next to impossible. My suggestion is Splashtop Wired XDisplay from aptoid store. This has been discussed in this thread.
Yes, I do like the idea of running Spashtop, but have run into issues with that too:
1) I keep seeing “Aptoid Store” mentioned, but can’t find anything specifically called that. There is a @ But there is a “Aptoide Store” is it a typo or did the original site get taken down? I am assuming for now it may be just a typo.
2) Searching for the Splashtop Wired XDisplay on Aptoid it only has the free version available for download. So even if it was possible to get working am I correct to think that it doesn’t appear to be possible to download the APK of the full version for Android, then it would cut off after 10 mins. Maybe I’m wrong here and its restricted by the PC end of the software, but on the basis of the details above saying to download the full/dark blue version that looks like it could be a problem
3) Downloading the Free version of Splashtop Wired XDisplay on Aptoid appears to not actually install “Splashtop Wired XDisplay Free” at all, it installs the Aptoid App on the device and then a quick shortcut to download the app when on the device (i.e. On the Peloton). [This can be checked by downloading the APK, changing the extension to a .ZIP file and opening it to look at its contents]
4) As has been mentioned several times before, Peloton stop you installing programs from within any app and a notice “For security, your tablet is set to block installation of apps obtained from unknown sources” To date, I have not seen a way to get around this and had similar issues with other App Loaders (i.e. APKPure). Running commands such as: adb shell settings put secure install_install_non_market_apps 1 or disabling the Peloton Drawing-Over settings does not overcome it.
In summary, I still appear stumped. Any other on where the full ‘true’ APK can be downloaded?
@Jonny5isalive, you are definitely late the party. Thread has grown lot but will advise to browse through it.
1. You can still install apk provided you have active membership. Fortunately, installed app stay even after subscription is cancelled.
2. Aptoid is one of the app for sure. but when you install that and launch you will go to aptoid store where you can get xdisplay.
3. Not sure how but the full version works on Peloton tablet. If you wish to pay to developers please contact them. There was some info on this in the thread.
I just tried following this method and it no longer works. Peloton added something to their software that does not allow you to click “OK” on the “Allow USB debugging?” system prompt when you attach a PC.
When you try to click on “OK” another prompt appears stating “Because an app is obscuring a permission request, Setting can’t verify your response.” I’ve read this can be due to an app drawing a screen overlay. I’ve tried stopping all Peloton processes, but can’t stop the Peloton Keyboard process, which I suspect is the app drawing the overlay.
@SonOfDitlev, This does look like new thing since when I sideloaded an year agoI didn’t get any message.
You can just temporarily remove permission of any pelton apps to redraw. Once you are done, give permissions back or else, you will hit flashing white screen issue.
Following was still pretty useful for me
link to youtube.com
Okay…So am inching closer..
Downloaded an installed an Android Emulator for the PC. (LDPlayer). Loaded up the PlayStore and purchased the Splashtop Wired XDisplay Pro for £6.99 and installed it on the emulator
Then followed the tutorial on LDPlayer (link to ldplayer.net) and long store short, by granting root access you can copy out the original APK file which the PlayStore allows.
Sideloaded this APK onto the Peloton and am now in business. YAY!!
@Jonny5isalive, I am really happy to see what you have achieved. Especially, since you were able buy the app and support the developers.
@Jonny5isalive Would you be willing to go more in depth for those of us newly joining in the fun?
It’s now half way through 2023. Using a RB1VQ, 3rd gen display, mine hangs on the “Performing Streamed Install” using ADB. Does an active subscription still solve this issue? There doesn’t seem to be a free monthly trial right? Does someone else with a subscription logging into your device help?
Hello! I know this is old but I ran into a/n issue during the final install portion where the bike said it did not have enough free storage space. any ideas??
Hi DC Rainmaker,
I am also from DC and recently I got hold of a Peloton Bike+ Tablet. Not the full bike but just the tablet. I knew it was running over the Android OS and thought came to my mind to use as a touchscreen home automation device in my basement. Using the steps that you shared I installed the Novalauncher, Netflix, NewPipe (a youtube player) and a few others like the ES File Explorer, Aptoide etc. I see a few limitations and which is hindering my progress towards a home automation controller. Firstly, since its not recognized by Google as a registred device, we cannot just download and install the playstore, play services, Google framework etc. which is mandatory for the other Google apps like Youtube, Maps and most importantly for Google Home app. I know there are some cautious steps that can be done like finding the ARM version of the monitor and downloading the appropriate play sercvies version etc.. But a few attempts was not successful. Can you share a few thoughts about it, if you can? Also any process to root the shell OS and unlock the underlying base OS will also be appreciated.
Would you consider writing a post about how one might use the Peloton app on a smart trainer (possibly using changes in incline/grade as an equivalent for Peloton’s resistance levels)? I am looking for a way to use the Peloton app while riding on my Neo 2 and match the resistance cues as accurately as possible.
I was able to complete all the steps described to install Zwift, but ran into an obstacle trying to install. i initially got the message “Performing Streamed Install,” but that was soon followed by:
“adb: failed to install .\Zwift\com.swift.swiftgame.apk: Failure [INSTALL_FAILED_ODER_SDK: Failed parse during installPackageLI: /data/app/vmdl1120661989.tmp/base.apk (at Binary XML file line #7): Required newer sdk version #28 (current version is #24)]
I’m not quite sure how to get a more updated SDK version. The Android operating system updated right before I began this process and the Zwift app says it was updated 2 weeks ago on the download link. Any input as to how to get around these issues would be appreciated.
For Zwift, I am getting an error when trying to perform the install step:
Failure INSTALL_FAILED_OLDER_SDK Requires newer sdk version #28 (current version is #24)
I know my laptop has the most recent v34 SDK tools, so is this on the bike side?
Also tried an older version of the zwift apk back from 2022, no success, same thing.
Any chance for an update to this post / process or which pedal meter to get in 2024 if no one has cracked into the built in power metrics?
Sadly nobody has cracked those metrics yet. :(
Best power meter really comes down to budget. The Favero Assioma pedals continue to be the best priced option for sure.
I thought the DFC device solved this issue? It is showing them as available for pre-order with a expected ship date of 1/31/2024.
Yes it’s on the bike side. It’s an older version of Android than Zwift requires and no real way to upgrade it without hosing the Peloton. My fix has been to use power meter pedals on the Peloton and a tablet holder like this one: link to amazon.com
You can use your tablet or foldable laptop and use Zwift that way :)
Does anyone have instructions for adding the extra file on mac? I don’t see the bike folder anywhere on my machine
Usually you’d need the Android File transfer app
Install homebrew and use ADP via terminal to install.
link to youtube.com
The ,inks are not so,Roma for Zwift files can anyone help, I have got as far as that but says expired.
nice
No matter what I do my Peloton isn’t connecting with USB, Developer mode on & USB debugging is selected yet connecting it to my mac does absolutely nothing.
If you could email me the MAC iOS version of this I would be grateful!
Do you know what other mid-range bikes are suitable?
I was looking for something £750-£1250 for a static ‘spinning’ bike.
Would need electric resistance so can work like erg mode.
Just like the Pelaton hack I would want the ability to use my preferred apps and not be forced to use the subscription the bike makers want me to use.
Thanks
Love your reviews! Do you know if this still works with the new Bike + in 2024? I’m interested in buying an indoor bike that I can use for both simulated rides and Peloton-style spin classes!
Thanks in advance.
I truly love seeing the replies to this article still rolling in!
Joined DCRAINMAKER today. Great community. Reason for joining was for help connecting my Peloton to ZWIFT.
Ray: Excellent step-by-step instructions. However, I got stuck in Command Prompt step: adb.exe install .Zwiftcom.zwift.zwiftgame.apk …..
Command prompt won’t recognize/access the adb.exe file that I downloaded while carefully following the steps to that point.
Error message reads:
PS C:\peloton> adb.exe install .Zwiftcom.zwift.zwiftgame.apk
adb.exe : The term ‘adb.exe’ is not recognized as the name of a cmdlet, function, script file, or operable program. Check the
spelling of the name, or if a path was included, verify that the path is correct and try again.
Anyone able/willing to help? (It started to snow in Idaho and out-door season definitely is done….)
Thanks in advance.
louis@myperfectpiano.com
Louis
Pretty sure that it doesn’t work at all anymore due to zwift requirements of Android
Thank you for your reply, Eric. Do you know if that means I am out of luck trying to install and use ZWIFT with my Peloton bike?
You can definitely try. I had it working on my Peloton for a while but zwift frequently comes out with updates and an update that they came out with about a year ago required a different version of Android then is available on the peloton. I don’t know if another way around that at this point. I run zwift off of my PC and a big monitor and use Garmin pedals to communicate via Bluetooth and it works pretty well.
Eric, thank you for your care to reply and for the details. I appreciate it. Just starting with ZWIFT (to keep in shape during the winter as TheRift2025 is coming up). Got my power pedals and can run ZWIFT on laptop – or still get it on Peloton tablet screen via logging into a browser there, however it won’t pick up cadence…
Found this: link to youtube.com
Best wishes for all your endeavors!
Louis
It still works, the name of the APK changed (com.zwift.zwiftgame.apk), that is all.
BUT
ZWIFT is now very big and my Bike+ does not have enough storage to Install it anymore.
So if you want an up to date version, this is no longer possible. Or does anyone know how to upgrade storage to the Peloton Screen/Tablet :)
When you say it still works, what do you mean? Zwift now requires a specific version of Android that is not on the Peloton, so the APK won’t even install. At least the last time I tried.
I was able to get to the loading screen but could not get past it because the Peloton has not enough space.
So it won’t work, but not sure if it would if there was enough space.
My bike+ is using Android 10. according to zwift website it needs Android 9 or later.
Interesting! I had it working for a while. But then Zwift required an update and it never worked again due to their Android requirements. I wish Peloton would just release their version of it that they are evidently testing.
Same for me. Need more storage.
TrainingPeaks Virtual works if you install it through the Aurora Store (Open source frontend for Google Play). For Zwift, you can install Moonlight and stream to the Peloton from a computer. Check out the OpenPelo link on my other comment below for help installing VV
Same issue: not enough space for the latest Zwift Version. Only other installed app is Netflix. All other storage cleaned up as much as possible.
Try OpenPelo link to github.com .
It installs the Aurora Store which lets you then install almost anything from the google play store (but not Zwift). Rouvy and a few others work. It also installs Moonlight, which then lets you stream Zwift from a computer, which is really nice.
This article is from 2020. Are there any updates as of Feb 2025? Are these instructions still considered current? Can you now use speed and cadence sensor in lieu of power meter pedals?
Jonathan, things have changed a bit and there are some easier methods. Check out:
link to youtu.be
Has anyone tried this with a Bike+? Looking for a way to make TrainingPeaks control the auto resistance feature on the Bike+. Everything that I’ve seen is related to the OG Bike.
Thank you in advance!!
OpenPelo works for getting apps loaded onto your Bike +, but the automatic resistance doesn’t work outside of the Peloton app. You’ll need SmartSpin2k for automatic resistance with the Peloton and any other apps.