
In a move that’s many years in the making, Tacx has finally announced their answer to the Wahoo KICKR CLIMB, the Tacx Alpine. As one might expect, the Tacx Alpine takes the general concept of a gradient simulator, and elevates it beyond what both Wahoo & Elite have done in recent years. It’s unquestionably the most full-featured product, and as such, it’s one of the more expensive products. Of course, the question is whether or not it’s worth it.
The general gist of any gradient simulator is that it causes the front of your bike to go up and down according to the ascents and descents in your indoor training app. As with previous units, this isn’t tied to any specific app, and works with all apps (since it leverages the smart trainer as a middleman). However, the Tacx Alpine also supports turning left and right (like the Elite Rizer). But it takes it one more step beyond Elite, which is that it supports full front/back movement with its rolling track design. While Wahoo can wobble front/back, this is notably different (more on that in a moment).
I’ve been putting the Alpine through its paces with both the Tacx NEO 3M and the Tacx NEO 2T, to see how well it works. And doing so across a variety of apps: Zwift, Rouvy, FulGaz, TrainingPeaks Virtual, MyWhoosh, and the Tacx App. Likewise, my wife has also been pouring some sweat on it too.
With that, let’s dive into it.
The Key Specs & Comparison:

The Tacx Alpine simulator is in the same general ballpark as its competitors, except in almost every case it just barely edges one or both of its competitors. Be it a higher max gradient (25%), or steering with forward/back movement, or max rider weight. It feels like Garmin went through pretty much every spec line item and said “let’s just beat them a little bit…all the time.” Apparently, that mentality also extended to price.
Here are the key metrics:
– Maximum Incline: 25%
– Maximum Decline: -10%
– Steering: Yes
– Forward/Back Movement: Yes
– Manual Control: Yes (on unit buttons)
– Lockout mode: Yes (for forward/back movement, not steering)
– Supported Axle Types: Quick-Release and Thru-Axle
– Supported Trainers: Tacx NEO 2T, Tacx NEO 3M
– Max Rider Weight: 264lbs/120kg
– Firmware Updatable: Yes
– Price: $1,099/1099EUR/£929
The main difference in terms of manual control is that the Wahoo KICKR CLIMB has a corded handlebar attachment that you can use to manually go up/down, whereas Garmin/Tacx has it on the top of the pole. While I’m sure someone uses that corded Wahoo attachment controller, I never bother to hook it up, and most people I know don’t bother either (since the app is controlling it).
Here’s a little chart comparing them:

When it comes to Elite trainer compatibility, they basically support everything they’ve made in the last many years, including Avanti, Direto XR, Direto XR-T, Justo, Justo 2, Suito, Suito-T, Tuo, and Bufala.
Got all that? Good, let’s get rolling.
In the Box:

The Tacx Alpine box is big, but not super heavy (at least, compared to a Tacx NEO series trainer anyway). The entire thing is basically pre-assembled, save plugging in the power cord and throwing down the base plate.

Here’s all the parts unboxed:


Note, they are smartly separated into A & B bags (seen left above), with the B bag *only* being required if you’re using a Tacx NEO 2T. Whereas the A bag is used for both the Tacx NEO 3M & the Tacx NEO 2T. Of course, I was on a roll doing my usual unboxing/unbagging thing for you, and I ended up undoing everything. So…yeah.

In short, you’ve got:
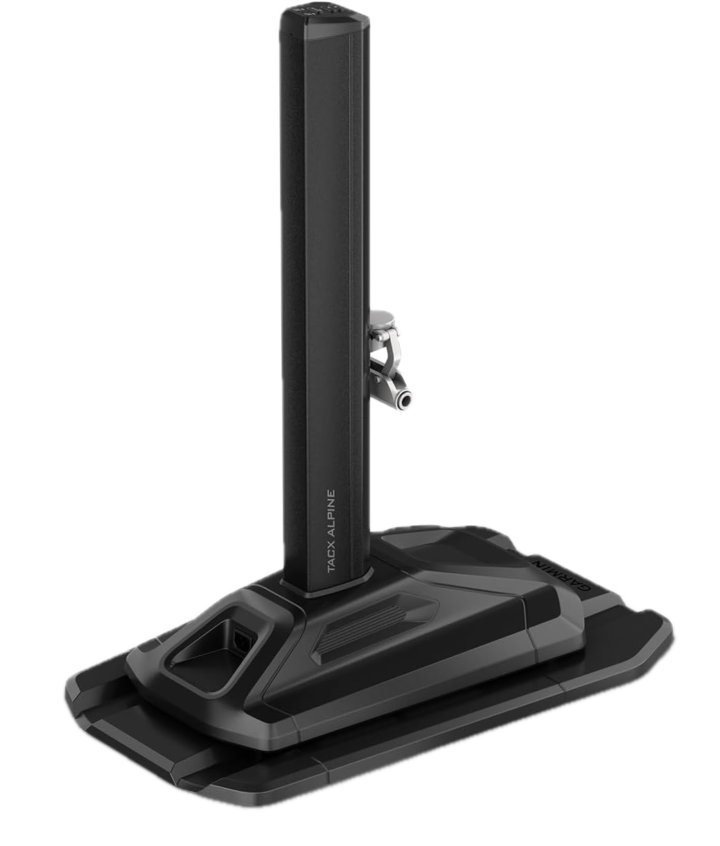
1) The Tacx Alpine tower
2) The Tacx Alpine base plate (which lets it rock back/forth)
3) Axle adapters of various types on a nifty clip for the Alpine
4) Rotating axle adapters for the NEO 2T (the 3M already has them)
5) Quick release skewer
6) Ikea-like measuring tape
7) Some sticker thingies for the NEO 2T
8) A power cable
9) Some paper stuff
In that pile of paper stuff is the manual, a safety thingy you’ll ignore, and a free trial to the Tacx App. Here’s a closer look at the adapter types for the Tacx NEO 2T to let it rotate:

So, with everything unboxed, let’s get things set up – it’s quick and easy.
Setting it up:

Now, when it comes to setting it up, there are basically two paths at this point. A NEO 3M path that’s a lot shorter, and then a NEO 2T path. The key difference is on the NEO 2T where you need to install the rotating end caps, and if you have disc brakes, also install a spacer. This is outlined in the manual, and is pretty straightforward (should take about 60 seconds – seen above).


In my case, I’ll be using it on the NEO 3M, so the path forward is a wee bit quicker since we don’t need to make those two swaps. To do so, you’ll go ahead and place the front wheel plate down, such that your fork axle is lined up directly with the little marks on the Alpine base plate:

I’d like to take a moment to point out how brilliantly simple this is. While neither the Wahoo KICKR CLIMB nor Elite Rizer are hard to align (connect fork, pick up, and place back down again), but this little touch of putting marks there for alignment just makes it super clean and, well, perfectly aligned.
Next, with that set, you’ll install the correct axle adapter in the Tacx Alpine for your front wheel. That’d be either a quick release axle, or a 12×100, 15×100, or 15×110 adapter. Again, this takes like 4 seconds, and comes from the nifty clip of axle adapters (unless it’s the full quick release skewer, in which case you grab that from the bag):

These then go into the Tacx Alpine front fork attachment:

Now, you’ll remove your front wheel, and simply attach your front fork to the Tacx Alpine, just as if it were your new front wheel:

Now obviously, you’ll want to ensure everything is nice and straight (else you’ll constantly be turning in games like Zwift, if you’ve enabled controls). You can always slightly move your trainer or the Alpine later, if things aren’t perfectly lined up.
Oh, and just because I forgot, here’s what the underside of the unit looks like – simply four little rolling wheels.

Next, you’ll want to do a calibration. If using the Tacx App, it’ll suggest it for you. Else, you can hold the two up/down buttons concurrently for 6 seconds, and it’ll trigger the calibration:

(Note: this is a good time to validate your bike doesn’t have any clearance issues in the back near the trainer, and equally, the same if you have aerobars on your triathlon bike.)
Finally, if you haven’t updated the firmware on your Tacx NEO 2T or 3M, now is the ideal time to do so (seriously, you have to, so it can pair). You can do that from the Tacx App to get them updated, just like normal:


This will also link the Tacx NEO 2T/3M to the Tacx Alpine, so that your trainer can control the gradient. You can also achieve the same thing (without the app), by holding the Auto button for three seconds until it blinks, and then do the same on the NEO 3M, putting it in pairing mode. Else, on a Neo 2T, it’ll simply search for it when in pairing mode (since the NEO 2T doesn’t have button-based pairing).
In fact, since you’re here in the Tacx app, with the Alpine found as well, you can go ahead and set your wheelbase up to ensure the exact gradient matches what you’re feeling. If you forget this, it’s likely close enough.

With that, let’s get into using it.
Daily Riding/Usage:

I suppose this entire section could basically be boiled down to: App goes up, you go up. App goes down, you go down.
But hey, we’ll dig into it more deeply than that.
All three gradient simulators out there (Tacx/Wahoo/Elite) effectively work the same way, specifically that your trainer is actually controlling the gradient simulator, rather than the app directly (except the Tacx App, which can also pair directly). I’ll dive into that later in the next section, but the key thing you need to know here is that from an app standpoint, you just pair your trainer like normal, and everything magically happens.
So, looking at the top of the Alpine, you’ll see a few basic controls and status lights:

The two top controls show whether it’s connected to the trainer and/or app. In a default Zwift/Rouvy/MyWhoosh/etc configuration it’ll automatically show just the trainer icon, which means the app tells your trainer a certain gradient (e.g. 8%), and then the trainer in turn instantly tells the Alpine also 8%. This is the same way it works on Wahoo/Elite. Whereas the secondary light (with the phone icon) is for a phone app connected to it to control steering (or, in the case of the Tacx app, to update firmware/settings).

In order to get that app light to illuminate, you need to pair on the steering side, such as seen in the Controls menu of Zwift:

Next, that ‘Auto’ light indicates whether or not it’ll follow the terrain of the app. Said differently, it could be labeled as ‘On/Manual’ or ‘On/Off’ for that matter. Basically, if lit up as ‘Auto’ (seen above), it’ll do whatever your app is doing (via the trainer). Whereas if selected off (seen below), it won’t go anywhere, and you’ll have to manually press the buttons. Using the buttons will increase it 1% per each button press. Or, if you hold it, it’ll go for as long as you hold it.
Realistically, you’ll very rarely do this. In all the years of using the Wahoo KICKR CLIMB, the only time I’ve done this was purely for demonstration purposes. Still, there may be some people who just want to set it on a 15% incline and ride that way, so this solves it for them.
Now back in Auto mode, when you’re riding, the Alpine will automatically go up and down according to the gradient of the terrain. This works seamlessly, and is generally silent on most routes, because the terrain usually doesn’t go from 0% to 15% in under a second. That’s simply not how roads are built. Thus, the motor shifts between those two points are over a period of time, and you’d never hear it.

However, in the event you do manage to go from 0% to 15% in under a second, you’ll certainly both hear it and feel it. Though it’s definitely not loud or anything. Just simply a robotic sounding whirl as it goes up or down. The entire process is smooth though, with the goal (for regular incline/decline changes) such that you don’t really notice minor changes in elevation, it just happens smoothly. And, all of my testing has shown that’s pretty smooth.

Next, there’s the steering aspect. The Alpine has steering built-in, assuming your app supports it. Within these apps, you’ll need to pair the Tacx Alpine as a control, such as you would normally pair something like the Zwift Play controllers. You’ll see it show up here:

(Don’t worry, you can still pair the Zwift Click or Play controllers as well.)
At this time, that’s only Zwift. While MyWhoosh does support steering as well, it doesn’t find the Tacx Alpine when I searched. I’m guessing they’ll add it soonish, since they support the Elite Rizer (sadly, there is no standard for steering protocols).


Now, once in the game, you can steer left and right by simply rotating your handlebars. Essentially, the same as any other Zwift steering device, in that you’re staying within the predetermined side of the road, though you can sway left and right within that realm. This allows you to take the best possible line (saving distance/time):

The entire mechanism for how it steers left/right, mechanically, is pretty crazy engineering-wise:

It’s super smooth, though, as with any indoor trainer steering device/setup, if you don’t have things aligned nice and straight before you start riding, it’ll obviously drive you nuts (or, drive you off the side of the road). That said, note you can’t lock-out the left/right steering aspect. However, what the physical steering component does allow for is more movement up on the handlebars, with slight side-to-side sway of the Tacx NEO 3M in particular. That, combined with the forward/backward movement, makes the whole thing feel pretty solid.
The only ‘challenge’ to steering in game is that most races don’t actually support it. Perhaps eventually there will be more races in Zwift that support it, but the vast majority of the time race organizers disable it, so it unfortunately ends up being kinda pointless for the key thing it’s designed for (a faster line).
Now finally, as noted earlier, the Tacx Alpine sits on its baseplate, which acts as mini-railroad to allow forward/back movement, matching that of the Tacx NEO 2T with motion plates, or the built-in plates of the Tacx NEO 3M. This works perfectly well, and I had no problems with the nice forward/back movement, just like on the NEO Motion Plates/3M previously. Obviously, there are rocker plates (and the Wahoo KICKR CLIMB) that offer a much longer range of motion, but in terms of just subtle motion to keep your core activated and your butt moving around the saddle slightly, it does the job.
You can see this more clearly in the video than I can describe in text.
App Compatibility:

The cool part about the Tacx Alpine is that it’s basically compatible with every app out there already, in terms of going up/down automatically. Whereas the steering piece is a bit more limited, since steering isn’t supported in any apps.
As noted earlier, the reason why the Tacx Alpine works automatically with all apps is that the app isn’t really talking to the Tacx Alpine unit. Instead, it talks to the trainer using established standards (ANT+ FE-C & Bluetooth FTMS), and then from there, the trainer instantly tells the Tacx Alpine what to do. This is the same logic used by Wahoo & Elite in their gradient simulators, though Elite also has a mode to support all other non-Elite trainers via ANT+ FE-C (except, it’s not quite as smooth, but hey, at least it’s better than nothing).
So in short: App talks to trainer and says “set gradient to 7%”, and then instantly, your trainer says to the Alpine “set gradient to 7%”, and boom, the Alpine goes up at the same moment your legs start feeling the suckiness of 7%.

In my testing, either myself or my wife have done rides with the Alpine in the following apps:
– Zwift (simulation mode, with steering)
– Rouvy (real world video)
– FulGaz (real world video)
– Tacx App (following GPX course)
– TrainingPeaks Virtual (simulation mode)
– MyWhoosh (simulation mode)
[Update – August 2025: It appears that with Rouvy, it is hit or miss if it works for people. Which is very odd. In my case it worked, and other DCR readers note that it works perfectyly fine sometimes, but doesn’t work other times. Hopefully, Rouvy can figure out what’s going on, as this should work without issue, or narrow down why/when it doesn’t work.]
In all of these cases, the apps are in so-called simulation mode, where basically it’s telling the trainer to simulate a given grade (e.g. 7%), and thus the Alpine 7%. Whereas if you’re in ERG mode (for structured workouts), it’ll simply tell the trainer the set point wattage (e.g. 250w), and the trainer will adhere to that. However, it won’t change the gradient on the Alpine, because there is no gradient. Thus, you have manual mode if you want to override it.
Now, in the case of the Tacx App specifically, Garmin also has a dedicated connection to the Alpine for configuring various settings, as well as the firmware update. For example, you can set the max ascent/descent incline values (such as to prevent hitting triathlon bars, or hitting the ceiling in a low pain cave).

And, you can also manually control the gradient as well:

Speaking of which, it’s notable that Garmin has rolled out ClimbPro into the Tacx app for upcoming grades, which is pretty darn nifty:

We’ve seen roughly similar things from Zwift and others over the last year or two, but it’s nice to see Garmin adapt their existing Garmin Edge/etc ClimbPro feature directly into the Tacx app. Makes a ton of sense.
In any case, again, for all other apps (including the countless numbers I didn’t list above), the Alpine will just work automatically via your existing Tacx-compatible trainer.
Wrap-Up:

As is generally (albeit not always) the case with Garmin hardware, they tend to set out to make the best hardware in a given category, price be damned. And that’s the case here as well. Riding this unit feels rock-solid, works well, and is easy to set up. Yes, it’s at a slight premium to Elite’s offering, though not horrifically so (and unfortunately, the final Tacx Alpine price we see here was also impacted by tariffs). I’d say that premium, relative to Elite’s offering, is worth it, but to each their own.
Ultimately, people have been asking for Tacx to create a gradient simulator for years, and now we finally have one (and heck, we even got Zwift virtual shifting last week too!). About the only thing I could quibble with on this design is that I wish it had a place to store all the extra adapter bits, but otherwise, the unit seems to take virtually every complaint people had about either the Wahoo or Elite units and address them in this design. Likewise, Garmin/Tacx, as I noted earlier, seemed to make a sport of finding every possible spec item and edging it out just slightly.
I will say, one of my favorite software features is the fact that it’s always-on. This might sound like a silly thing, but for those with a KICKR CLIMB, you know what I’m referring to. By default, the Wahoo KICKR CLIMB (and KICKR BIKEs) will always start in “Locked” mode, which means that every time you ride, you need to remember to enable it manually on the tower. Most of the time I ride, I totally forget to do this, and thus never really benefit from the CLIMB because it never went anywhere, and I didn’t think of it till much later (if ever). The fact that the Tacx Alpine just starts up and moves immediately is key to actually finding value in it, since it’ll actually move every time.
Should you buy this? I don’t know – as always, that’s a ‘you’ decision. But much like most of Garmin’s hardware, you mostly get what you pay for, and here, I think that value is being delivered, even if it’s not at the price my wallet wants.
With that, thanks for reading!
Found This Post Useful? Support The Site!
Hopefully you found this review/post useful. At the end of the day, I’m an athlete just like you looking for the most detail possible on a new purchase – so my review is written from the standpoint of how I used the device. The reviews generally take a lot of hours to put together, so it’s a fair bit of work (and labor of love). As you probably noticed by looking below, I also take time to answer all the questions posted in the comments – and there’s quite a bit of detail in there as well.
If you're shopping for the Tacx Alpine or any other accessory items, please consider using the affiliate links below! As an Amazon Associate I earn from qualifying purchases. It doesn’t cost you anything extra, but your purchases help support this website a lot.
Here's a few other variants or sibling products that are worth considering:
And of course – you can always sign-up to be a DCR Supporter! That gets you an ad-free DCR, access to the DCR Shed Talkin' video series packed with behind the scenes tidbits...and it also makes you awesome. And being awesome is what it’s all about!
Thanks for reading! And as always, feel free to post comments or questions in the comments section below, I’ll be happy to try and answer them as quickly as possible. And lastly, if you felt this review was useful – I always appreciate feedback in the comments below. Thanks!


Getting in early to point out that the URL, page heading and page title all talk about the Tacx Apline. Sure others will say the same, it may not be too late to correct it!
Doh! Thanks, fixed!
Also the supported trainers is Elite stuff.
Hey Ray. Is it Zwift Bike compatible?
No, there’s no fork axle on the front of the Zwift Ride
Same question for the Elite Square Frame: can the Elite Square Frame be fitted to the Tacx Alpine (I have a Neo 2T and I would like to use this combination with a fixed frame rather then my road bike).
There does not appear to be a fork axle on the Square, but it has a funky looking adapter connecting it to the Rizer, so maybe that could be repurposed here if you want to mix ecosystems.
the Garmin trainer + Alpine combination is currently not compatible with the Elite Square due to protocol limitations rather than mechanical constraints.
Specifically, when the Square is used with a third-party trainer, the commands sent to the trainer are in ERG mode instead of SIM mode. Since Alpine relies on simulation (SIM mode) to operate correctly, ERG commands do not trigger the expected behavior.
We’re actively exploring ways to improve compatibility in future iterations and appreciate your understanding.
Compatible Tacx Neo Trainers Neo 2T Neo 3M only?
No way to use my (pre garmin) original Tacx Neo (1)? Even if i would acquire the “Rotating axle adapters for the NEO 2T”? Is it incompatible on a software firmware level?
If i have to buy a new trainer, then i have to consider a move to wahoo
Hey Ray. I know it couldn’t be fitted to Zwift Ride frame, but what about Elite Square?
I’d also be interested in this as I prefer belt-drive indoors over a chain.
Several people have asked now DCR. Can the Alpine be fitted on the Square?
When I’m back from Eurobike, I’ll see if it fits physically.
But that’s actually not where I think it’ll break. Rather, it’s the non-physical side of it, specifically, the shifting. I think that’s gonna be a proper mess between the two platforms. It’s already messy shifting on Square, even in an entirely Elite ecosystem. Then adding in a Tacx trainer in and of itself is…complicated. And now atop that, assuming the Elite side is sending the correct bits to Tacx to in turn increase gradient? Eeks.
Hi Ray,
If Elite changes the Square so that the controls are simply Elites version of play controllers (for Zwift anyway), then everything works. If you think about it, with every major smart trainer brand now having trainers that support virtual shifting, there is not a good argument for Elite to use the strategy they have been with Square where it sits in between Zwift and the trainer. Currently I’m using play controllers on my Square to control virtual shifting of my TacX neo 2T. I’ve got great Square ride, great TacX virtual shifting, road feel, and hill descent and all the great Neo 2T performance. It’s clunky having redundant controls-but the ride is great. I’m hoping Elite changes direction and allows the option for the Square controls to only act as Zwift remotes. Maybe Zwift has to allow this? On the other hand is TacX about to launch a smart frame that one ups the Square in every metric slightly? Garmin has been on a tear with product releases. I was a little negative about all the watches, but really they are hitting a lot out of the park right now. Before this week it just seemed like they were consumed by watches. Then virtual shifting drops, the Alpine, not to mention MTB edge. Now I’m actually thinking about a Fenix to replace my ultra 2.
“If you think about it, with every major smart trainer brand now having trainers that support virtual shifting,”
The challenge is, that virtual shifting is the Zwift Protocol, and it’s only officially supported if Zwift blesses that hardware company (Elite, Tacx, Wahoo, Decathlon’s trainers). It’s not, for example, supported on Magene’s trainers, or a pile of other companies.
But that’s actually not the big deal. The big deal, and what Elite was trying to solve for, is that other apps can’t officially use it. Thus, FulGaz/KinoMap/Rouvy/MyWhoosh/etc… Are some of them dipping their toe into the water and seeing if Zwift gets upset? Yup. Is that a sustainable business model long term? Definitely not.
What’s funny is all these trainer companies (in private) want to have a proper virtual shifting standard. But all of them keep kicking the can down the road. Not sure how many times I can keep reminding them that conforming to a single domiment players protocol (regardless of whether it’s technically good or not), isn’t a smart business choice.
Then I hope Tacx/Garmin will come up with their own “frame” product (equivalent to the Elite Square) that could be compatible with their Neo trainers and Alpine and adding a belt drive.
The combination (Neo, Alpine, Frame) would be a nice alternative to the one piece Neo bike. Any improvement like the move from Neo 2T to Neo 3M motor requires a full new Neo Bike whereas a modular product would allow a simpler/cheaper upgrade path (replacing the trainer only or any other components that would require an upgrade).
I am actually wondering how many Tacx Neo Bike they are selling, I was considering one myself until the Neo 3M was introduced and this upgrade is not available on the Neo Bike Plus… making this product already outdated.
Ciao!
the Garmin trainer + Alpine combination is currently not compatible with the Elite Square due to protocol limitations rather than mechanical constraints.
Specifically, when the Square is used with a third-party trainer, the commands sent to the trainer are in ERG mode instead of SIM mode. Since Alpine relies on simulation (SIM mode) to operate correctly, ERG commands do not trigger the expected behavior.
We’re actively exploring ways to improve compatibility in future iterations and appreciate your understanding.
Hi Mattia,
The “simple” solution is to give the option for Square to operate as only Zwift play controllers in Zwift in the short term. This is likely 90% or more of total customer ride usage. This keeps a large majority happy-and potentially grows the Square user base more. The man-in-the-middle approach is not working well as a first class solution. As virtual shifting makes it to more platforms, the Square can transition to controller only from man-in-the-middle for each platform that adopts it.
+1 to this!
I really was hoping for a hint of a sub premium trainer from Garmin during the video but no joy there 🙄
That front fork attachment looks beautifully engineered🤩
I’m assuming it feels solid and long lasting too, can’t tell visually, it looks like it could also be an item that may fail prematurely under heavy wear and tear?
Another great review! Thanks Ray!
As an Elite XR and Rizer owner, it’s worth noting that the Rizer does have some fore/aft movement, though not as much as the Tacx. More significantly though, I was able to purchase my complete setup for around $1100 as the XR can regularly be found online for under $400 and the Rizer for less than $700. Elite doesn’t maintain the same tight price controls as Wahoo and Garmin/Tacx.
Well, this is a very nice surprise from Garmin.
Ray, have you tested it with earlier Neo 2 models? Or does “Neo 2T/Neo 3M” actually means these two trainers and not “also Neo 2” like it did for virtual shifting?
In this case, just the NEO 2T/3M, not the NEO2 SE and NEO 2 like the Virtual Shifting, due to the rotating axle bits.
At least, that’s what I’m told (and asked repeatedly). But hey, last time they changed their mind a few hours later…
The 2SE has the same axle as the 2T though…
Don’t be throwing logic in this. I don’t understand either.
Lol..🤣
Hi Ray,
Where is this manufactured?
Netherlands.
Does it also simulate the gradient when following a GPX Route on the Garmin Edge 1050?
Thank you for this quick review! Couple of comments: when mentioning compatible trainers after unboxing you mention elite trainers, not TacX. Must be copy paste from Rizer review? Also in the end of the paragraph above app compatibility section there is a truncated sentence.
Very curious if it is physically compatible with the Elite Square? It looks like it will be as long as the minimum gradient is set to not interfere in the app. I realize it won’t be compatible with current Elite firmware. At the moment I have play controllers strapped to my elite so I can use the fantastic TacX/Zwift virtual shifting. They seriously did a great job on making that feel real, and satisfying.
Ray,
You have an incomplete sentence just before the App Compatibility section “If you don’t want th”
Would this work in conjunction with a Neo 2T mounted to a rocker plate that has its own fore/aft movement?
I use the corded KICKR Climb controller all the time to give some changes in sit bone pressure during Zwift workouts. Also on long descents it’s too forward so I’ll go to 0 degrees until it’s over.
Hey, I own Elite Riser, and one thing that I found very disappointing after I purchased it, which I didn’t see covered in reviews I watched, is that if you’re riding on Zwift, the gradient simulator only works in free ride mode or during the race.
If you like me and spend most of your time doing structural training, it gives you a random gradient (based on your effort and not on what you see on the screen) – say you’re going downhill 300 watts, you will have the riser going up for you to 12 degree which makes no sense. I believe this one will have the same issue, just so you’re aware.
Yeah, because there’s no ‘gradient’ in 300w in a structured workouts, there’s really nothing to set there. 300w is a measure of trainer resistance, not an incline value. Otherwise, it’d just be going up and down for fun, and having to decide what wattage correlates to 25%, is probably a debatable thing.
That said, someone in Wahoo SYSTM you can actually have it go up/down with ERG mode.
I hear what you’re saying, but to me, the current user experience makes no sense.
If I’m going downhill (seeing -5 degrees on Zwift in my avatar) and I’m doing 300 watts (over my ftp) I must experience (near) 300w of resistance on my trainer and negative -5 degrees onthe climbing simulator.
Today’s experience is that my resistance is correct, but the climbing simulator goes up 10 degrees, which is simply inconsistent with what I see on the screen.
Ok…so fun update here.
Some Tacx engineers saw our comment exchange here, which then set off a converation with Garmin PR, and also one with Zwift PR.
Turns out, Zwift & Garmin did a special integration here (for which nobody mentioned), that actually will follow the gradient in Zwift, even in ERG mode. I had only ever tested it with SIM mode in Zwift.
So, in ERG mode, by default it’ll simply follow the terrain of wherever you are riding in Zwift. So if you want it to be up all the time, go ride Alpe d’Zwift. If you it flat, go ride Tempus ‘Eff-It (Tempus Fugit). And so on.
While Zwift did consider adding a software disablement option, they felt that was sorta silly, since the ‘Auto’ button will automaically take care of this.
The two companies are using the Zwift Protocol to achieve this, sending both incline as well as ERG set wattage to the trainer, and then the Tacx NEO series has software that in turn knows to also send onwards to Alpine the incline value.
Oh, wow, this is great!
I tried talking with Elite support and in the Zwift forum about it in the past, but there was no outcome.
I guess I have to put my Elite Riser on sale now and get an Alpine ;)
This type of comments always come up when a new product comes out. While some of them are valid (looking at Wahoo Kickr V5 and Virtual shifting) I don’t believe this applies here. The Original Neo 1 came out in August 2015. That is nearly 10 years!! If you look at the smart trainers released in 2015, you have the Kickr Snap Gen 1, some lower end Tacx trainers, Kurt Kinetic smart, and the OG Kickr was still current. None of those 2015 trainers are currently supported in 2025 nor are new accessories being developed for them. To say you are going to Wahoo for lack of support for a 10 year old product… you’re going to have a bad time thinking that your move to Wahoo will result in 10 years of support (again look at Kickr V5 and Virtual shifting). This isn’t meant to pick on you specifically, but comments like this appear on this site all the time and are written out of emotion and lack nuance and perspective.
How does it work with virtual shifting? I read somewhere that virtual shifting is implemented by sending a fake gradient to the trainer to force it to change resistance. But that would mess up the gradient simulator?
Not if it knows the virtual course gradient and the extra to add/subtract. The Alpine is told the course gradient, the trainer uses both. That may well be what the firmware upgrade was about in part.
Dear
I just saw your article.
My Tacx Neo 2T is already on a rocker plate (which moves side to side and front to back).
I see that the mount for this new equipment is also movable.
Is it possible to lock the Garmin module so that it no longer moves back and forth or from side to side, as this could cause double movement with the rocker plate ?
Kind regards,
Jérôme
Dear All
I come from to read garmin’s notice and Mainly this section: (but I don’t really understand the explanation, even with the diagram provided)
It also says to measure the wheelbase between the front wheel and the home trainer (how do you calculate this distance?)
Checking the rear chain clearance
Before performing this check, you must set the correct wheelbase for the bike and the home trainer in the Tacx Training app.
TIP: You can use the measuring tape included in the installation kit Symbol A.
Press the Up Arrow Symbol and Down Arrow Symbol simultaneously to return the Tacx Alpine to a 0% incline.
Maintain the smallest possible distance between the home trainer and the rear chain.
Open the installation kit Symbol A and select the compatibility gauge Legend number one.
You should be able to mount the gauge between the trainer and the rear chain.
Trainer with clearance tool and mark
Press the down arrow symbol and check the clearance each time you press the button.
You can also check the slope manually using the Tacx Training app in the device settings.
Repeat step 4 while monitoring the clearance between the trainer and the rear chain:
If at any point the gauge cannot be inserted between the two parts, proceed to step 6.
If there is play between the two parts at a gradient of 0% to -10%, proceed to the next clearance task (Checking the play at the bike fork).
Press the Up Arrow symbol and note the gradient.
TIP: The Tacx Training app displays the gradient.
In the Tacx Training app, go to Tacx Alpine settings.
Select Slope > Slope range.
Use the slider to set the minimum slope.
Best regards
Jérôme
Hello,
if we follow a gpx track of a pass climb with only a garmin edge 830 – so no application – will the neo2T be able to communicate with the alpine?
Hi Ray, I thought that you had gotten clarification from Garmin that virtual shifting would also work on the Neo2? If true, then why not the Alpine? My Neo2 has the same axle as the 2t so I think that the adapters would fit. Is it a firmware issue?
The NEO 2 SE has the same axle design as the NEO 2T, but the NEO 2 (previous to both of those) does not have a rotating bezel.
Now, as to why the NEO 2 SE isn’t on the list…that…I don’t know.
would also be interested to know now this would work with a rocker plate that offers side & fore/aft movement. Would the inbuilt wheels get in the way of the rocker plate doing its thing? can it be locked out to allow the rocker plate to handle all the movement?
I have a Neo 2T, never found the “slight sway” enough to save my knees from becoming painful, so one of my wants is a rocker. But I also now want this 😂😭
I use a 2T with a Velocity rocker and it’s great. I fasten the trainer to the rocker using 4 Voile straps, and it’s very secure. I don’t think the Alpine will be an issue and the manufacturer thinks it will work fine, but the base may extend over the front edge a bit. I’’Ll likely pump up the roller balls a bit to firm up the side-to-side motion initially when I receive the Alpine next week. I typically keep them at a low pressure to allow more motion.
I just used it with my Velocity rocker and it worked perfectly. The baseplate extends a bit over the front end of the plate. When I set it up and adjusted the wheelbase settings on my using my iPhone, there was a button to check or uncheck if you use the Garmin motion plates. I unchecked it because I do not use motion plates and instead have the rocker with fore/aft movement.The only issue I see is it’s going to be a bigger P in the A to put the bike on the trainer.
Silly question I know but why not make it available for use with other smart trainers? I am assuming it is not a technical issue…or is it really all proprietary signal? Would it really be the end of the world to allow it to be used with a KICKR Move (Gasp!) or others? It can’t really all come down to Lawyers, can it? I mean why put so much effort into a product and then exclude the possibility of poaching customers away from your competitors products that might buy this and think hey this rocks next time I upgrade trainers I will have to look at the latest trainer by the folks who made this? Seems narrow minded to me.
It’s because there’s no standards on how to do this. Wahoo started off many years ago saying they would share/allows others to integrate (linked to that exact comment in the opening paragraph). Then eventually backtracked on that promise.
That’s because it takes two pieces to tango: The trainer has to communiate with the gradient simulator (Alpine/Climb/Rizer), and thus, the communication between trainer & gradient simulator is proprietary, sadly.
It’s almost like you totally forgot that the Rizer does exactly that – works with other brands of trainers.
It’d be cool to see if they can integrate this sort of stuff into a smartbike.
Why not just a frame with belt drive that would couple to the NEO and Alpine: a smart bike in 3 parts.
A smart bike like the Wahoo Kickr Bike?
Have you heard if TrainerRoad will support the Tacx Alpine, similar to the Wahoo Kickr Climb?
Was able to confirm, TrainerRoad currently doesn’t work with Tacx Alpine. However, they may add support if enough people express interest.
I thought it was awesome. The steering is a little harsh, but I had memories of the Kickr Bike I had.
Nice device. Makes riding fun again.
Got the steering down, and fixed the steering to choose direction at intersections. It’s adding a missing part to the Zwift experience. (Haven’t hooked up the Cog/Click yet, next week)
Odd: I can’t find the ‘Grade’ page in Device Settings. I’ve tried connecting to the Apline, and to the 2T.
What step am I missing?
Got the prompt for firmware 7.04. Installed and now see the settings but can’t get them to come up to see or change. A case is open with Garmin support, so might hear more Monday. The update took over a half hour to install (hung) and it went to sleep. Hope it’s a limited issue. It might still work for my ride soon, and actually just be a bug that is blocking the setting displays.
Make sure you are connecting your trainer via BLE and not Ant+. Garmin support had to tell me this.
Hi! Does anybody knows if this is compatible also with an old Tacx Neo version (I guess the 1st one)?
No, no chance there due to rotating axle.
Supposedly some discussions happening on the NEO2 SE (which has a rotating axle). We’ll see what comes of it.
Anyone having issues with the Alpine and Rouvy?
I have a TACX Neo 3M and Alpine. When riding in Rouvy the Alpine will sometimes, not always, get out of sync with the Rouvy gradient shown on the app. The resistance level will be correct on the 3M but the Alpine will rise up to something like 18% when the Rouvy gradient is 3-4%, the 3M resistance is consistent with 3-4%. The Alpine will from that point stay at a higher gradient than what Rouvy is showing. If I take the Alpine out of auto mode and manually lower the riser, then put it in auto mode again, the Alpine and Rouvy gradient will get back in some form of sync.
I contacted Garmin support and they had me do a reset of the Alpine. This hasn’t resolved the problem. Out of 7 total rides it has happened 4 times so far. I asked Garmin support if any data being sent from Rouvy to the 3M could cause this sync issue. No answer so far. What is odd is when the Alpine gets out of sync with the Rouvy gradient it has been on relatively flat rolling 1-4% ride segments. It’s like there is something coming from Rouvy that makes the Alpine slowly rise way up even though the gradient shown on the Rouvy app doesn’t change significantly.
I have a TACX Neo 3M and I bought a Tacx Alpine.
It doesn’t work in the Rouvy program (Notebook) and I don’t know why.
The ride is fine but it doesn’t go up or down. When installed in the Tacx Traning application (Garmin), everything is fine and everything works.
What could be wrong?
I have contacted Rouvy and Garmin. I run Rouvy on an Apple TV. The first response from Rouvy was to make sure the Alpine isn’t connected to another app like TACX Training or Zwift which in my case it isn’t. I only use Rouvy. My first contact with Garmin they suggested a factory reset then recalibration which didn’t solve the problem.
I noticed it does not function with Rouvy either with the 3M.. I posted on he rouvy facebook group it wasnt working, and the response from one of the developers was it wasnt supported… tried several other apps with no issues…
Weird.
I had tested it back in June without issues with Rouvy (and it sounds like it’s working intermittedly for some folks above on certain rides).
I’m wondering through, that was before Rouvy had code in there for Virtual Shifting with Tacx trainers, and know that it shoudl work with virtual shifting, I’m wondering if something is up there. Specifically, because with the Tacx trainers supporting it, there’s some interesting (new) nuances to how Zwift Protocol (which is what Virtual Shifting uses, and Rouvy emulates) works with the Alpine.
I’ll poke both sides and see what’s up…
Rouvy said they haven’t tested the Alpine yet but will soon.
Since the Alpine connects to a TACX Neo VIA Bluetooth and not the Rouvy app it seems unlikely that Rouvy or Zwift for that matter would be able to grab the Alpine connection.
You might try a reset and recalibration.
The thing is, it wouldn’t surprise me if Rouvy is trying to negotiate on the ZP side, regardless of the normal FTMS connection. They are the only app that has “creatively” supported the Zwift Protocol. After all, none of the other apps are having this, because as you noted, in theory the trainer is the only thing that controls the Alpine (well, not theory, very much real, but if the trainer is receiving wonky commands, that could be the issue).
The trick is, the Tacx Alpine has worked with Zwift for an added bit of secret sauce on the gradient piece while in ERG mode, which means they’re sending additional commands via ZP. Point being, I could see that being the source of the bug here (regardless of ERG mode or SIM mode).
I can confirm it works perfectly fine with Tacx, Bigring, and Zwift.. rouvy I couldnt even get it to budge… I am going to try the both arrows for 6 seconds tonite to pair it up and see if that makes any difference..
Works on ANT connection… they must be messing with something on the BT connection with virtual shifting protocol…
Hi ,
How did you get it working in Rouvy?
I don’t know what to do next… In Rouvy I see Neo 3M on BT and Alpine on Ant+… but in Rouvy Alpine doesn’t work…
You should only connect to the 3M in Rouvy. You need to pair the Alpine via Bluetooth with the 3M before you start Rouvy.
You need to pair the Alpine to the Neo… through any app (Rouvy etc) You pair the Neo.. do not worry about the Alpine anymore… the Neo is responsible for sending data to the Alpine to function correctly.. as I noted, if you connect to rouvy with BT, the alpine will not function.. it seems all their back engineering code to make zwift virtual shifting work messes with data somehow and the alpine will not move.. connect in ANT though, and it works…
Ray, do you know if the rotaging axle adapters for the Neo 2T is available as spare parts, for use with the Elite Rizer?
Hi Ray, thanks for this review. Excellent as always. Can you confirm that the Taxc Alpine and Neo 3M are compatible with Apple TV, considering that device’s limited Bluetooth connections? Your review seems to imply that they will, but I couldn’t see you explicitly stating that. I use a heart rate monitor too.
Thanks
Tony
I would assume it would because the 3M has 2 connections available.. one would go to the Alpine and the other to the app.. the Neo just sends the gradient info to the alpine to do its deal… the alpine doesnt talk to the app.. its all integration on the hardware side..
Correct, no issues with Apple TV. Apps only use a single channel to talk to the trainer, and then the trainer handles communications with the Alpine on a proprietary channel (this is true of all gradient simulators, including Wahoo & Elite).
And the steering? I just want to be double sure before I put an order in!
Steering will only work with programs that support it such as Zwift.. rouvy/tacx/bigringvr etc do not support steering…
Bonjour, j’utilise un neo 2t avec elite rizer depuis 1 an. Lorsque j’arrête de pédaler, le rizer ne reçoit plus d’infos et revient a une pente 0 même si je suis en ‘descente’ dans l’application. La simulation correcte de la pente revient dès que je recommence a pédaler. Est ce pareil avec le tacx alpine? Question complémentaire: selon vous, est il possible de commander le sachet B pour adapter le neo 2t?
Is your 2t plugged into power? This sounds suspiciously like it’s not. The 2t can run without wall power using self generated power, but when you stop pedaling there’s no power and the electronics will turn off.
Le traîner tacx neo2t est bien connecté au secteur. Mais la pente n’est pas envoyée directemenr du tacx neo2t vers le rizer (il semble qu’avec un traîner elite, cette information est dans le protocole de communication ant+). Donc durant votre test du racx alpine avec zwift, si vous êtes en descente et que vous arrêter de pédaler, est ce que la pente reste négative (ou bien reviens a zero)?
Hello Ray,
Can you make it a little bit more clear on the use of the TACX Alpine with the TACX NEO Motion rocker plates? It sounds like in your review, that the Alpine makes it no longer necessary to get the rocking motion that was provided with the NEO Motion plates.
I have the NEO Motion plates, will they work together? Or, if I get the Alpine, will I need to no longer use the NEO Motion plates? Thanks for the clarification.
The NEO motion plates work with the Alpine motion.
The forward/back motion requires either the NEO motion plates, or the NEO 3M. Without it, the rear of your bike will stay firmly planted to the ground.
Any update on the Rouvy issue? A fix or workaround? Im considering this setup but not if it doesn’t work reliably with Rouvy. Not interested in Wahoo setup. I am using the zwift virtual shifting with TACX Neo if that matters.
I queried Rouvy a few days ago about the status of Alpine testing. The response I got back was they hadn’t started testing and no time frame for testing was offered. There are probably only a handful of people with Alpines who are Rouvy regulars at this point. So losing Alpines owners to Zwift or other apps isn’t going to break the bank.
I did a ride today with the latest Rouvy app upgrade and had the same sync issue where the Alpine would rise to something like 17% when the Rouvy gradient was 4-5%. Taking the Alpine out of Auto mode, manually setting the Alpine gradient angle to something close to Rouvy, then reenabling Auto mode had the Alpine go from the point I had set to a negative gradient which was again out of sync with Rouvy. Repeating the process and reenabling Auto mode the Alpine maintained some form of sync with Rouvy for the rest of the ride..
Ray pointed out in his review that Garmin should have included a wireless remote control which would make the Rouvy sync issues easier to live with while we wait for a fix from Rouvy.
Thanks for that. Fix seems a ways off. Very odd that there is an issue at all. I have a TACX Neo 2 not 2T so it doesn’t have the axle setup needed to tilt. I have opportunity to buy lightly used 2T with motion plates for decent price. Thinking about the Elite Rizer as another option. Seems to be well made like the TACX and is lower cost as well. What I’m not sure of is if I’d be able to use the motion plates. It looks like the Rizer has “some” fore aft movement but enough?
The big thing is, i dont even know how much I would like any of these until I actually use them. Not like the $60 gamble on the virtual shifting. This is substantially more but I’m ok spending the $ if I like it
Unsure of what exactly is the iisue with using Rouvy with Neo paired with an Alpine. I have a Neo 2T and run Rouvy on an HP laptop with Intel core I9 processor, 64 Gb RAM, and BT5. I followed Tacx’s instructions and referenced Ray’s video review as well, and after updating the firmware on the Neo, aside from initially forgetting to select the option for Tacx’s motion rails, I have had no issues wiith this setup.
Might be something with the 2T thats a little different than the 3M.. I know of 4 ppl on various groups that have the 3M and it won’t budge..the ANT side works perfectly fine…
A more recent datapoint: my Neo 3M+Alpine doesn’t work with Rouvy over Bluetooth either and as of last week (17th October) Rouvy tech support is still saying that this combo is *not* supported nor could they provide a timeline for a fix.
Why they seem to be dragging their feet over this is a mystery since IMO rides on Rouvy feel much better with a gradient simulator so it’d be counterproductive not to ensure that there is support for the Alpine.
Had been meaning to try it with a ANT+ connection, and am encouraged by the other commenters here that it works so will try that next.
Found this very interesting from GPlama @ray maker could you look at this too?
link to youtu.be
From 10:45. GPLama tried the Rizer with Wahoo trainer on Zwift. He says that the gradient isn’t simply broadcast from the trainer to the riser but needs to be calculated since gradient isn’t part of the protocol. If this is the case I can see al sorts of opportunity for things to not work correctly. Could this be what is going on with the Alpine?
That’s a bit different. Back when Shane made that video, ZP didn’t exist yet, so kinda different.
Further, in that case, that’s where Rizer is basically flipping the script a bit, in that it’s acting as the middle-man instead, one of the unique Rizer features to allow 3rd party trainers. But, as Shane pointed out, that results in a laggy so-so experience.
Do you know if the Alpine, paired with a Neo2T and that Neo2T is connected to a Garmin head unit, will simulate grades if I ride a previous Activity saved in the head unit?
Been riding the Tacx Alpine for a couple of months now. The erg mode with gradient is fantastic. The only downside I have is that when it is at an 0% gradient, the position is taller then if I have a regular 700c wheel on effectively making position like 1-2% on a flat. It doesn’t seem like I can adjust it.
Anyone else have a similar experience with the starting position?