
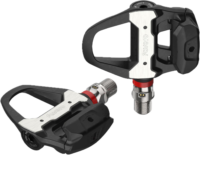
Favero has finally officially announced their new SPD Favero Assioma variant, called the Favero Assioma Pro MX-2 MTB. I say ‘finally officially’, because the unit was actually non-announced back in November or so on their site. And that followed a year or two of teasing about it. And even when it showed up on their site back in November, it was only for Italian folks to order in a public beta.
But, as of today, anyone can buy one – and it unquestionably delivers the biggest bang for your buck for an SPD-based pedal power meter, or for that matter, any pedal-based power meter. In this review, I’ll dive through my usage over the last few months, including plenty of accuracy testing, new features, and more.
Finally, note that this unit is a media loaner, and once this review is complete, it will go back to Favero. As always, I don’t accept advertising from any company I review – so, if you found this review useful, consider becoming a DCR Supporter, which gets you an ad-free site, plus the behind-the-scenes video series between both myself (and my wife) on everything that happens in the DCR Sports Tech Cave/universe.
What’s New & Key Specs:

The Favero Assioma Pro MX-2 power meter pedals will be familiar to many, due to the Favero Assioma brand lineage. However, under the covers, there are actually a number of changes – some quite significant. So while it shares the Assioma name, I’d probably think of this as an entirely new product. Some of it is clear now, and some of it coming down the road.
The key differences to the existing Favero Assioma pedals are:
– Added SPD cleat type (previous was LOOK KEO and SPD-SL)
– Got rid of battery/communications/charging pod entirely. Everything is inside the spindle now
– Added Platform Center Offset (PCO) within the cycling dynamics suite of metrics (previously they couldn’t get that specific item, while already having other cycling dynamics metrics).
– Changed battery life to 60 hours (Favero Assioma Duo is claimed at 50 hours) [Update: on Feb 14th, 2026 Favero increased this to 160 hours via firmware update]
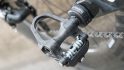
Favero says they spent a significant amount of time to entirely redesign the full spindle, seen below, such that the battery and connectivity aspects happen deeper in the spindle, rather than closer to the crank arm. As such, they believe they’ve reduced the chance of power dropouts and other power connectivity issues that might occur from impacts. Additionally, they’ve made it “easy” to swap out the spindle in the event of maintenance or failure. The downside though, is that the battery takes up nearly half the available space, and as such, has a fair bit lower battery life than their SPD power meter competitors.

Of course, there’s a ton more that comes with the off-road-focused SPD form factor around build quality and such, but we’ll dive into that in other sections.
Let’s then step back and just cover the quick top-level specs of the Favero Assioma Pro MX-2 MTB power meter:
– Claimed accuracy: +/- 1% (0-3,000w)
– Temperature Compensation: Yes – active temperature compensation
– Auto-Zero Capability: Yes
– Manual Zero-Offset Capability: Yes
– Connectivity: ANT+ (unlimited concurrent connections), and Bluetooth Smart (three concurrent connections)
– Cadence Transmitted: Yes (10-250rpm)
– Left/right Balance Transmitted: Yes
– Cycling Dynamics (or similar): Yes, full suite
– Oval/Q Chainring Compatible: Yes
– Weight per pedal: 191.4g (per pedal)
– Battery type: Rechargeable
– Battery life: Claimed 60 hours [Update: Increased to 160hrs via firmware update in Feb 2026]
– Water Resistance: IP67
– Operating Temp Range: -10°C to +55°C
– Max Cyclist Weight: 120kg
– Q-Factor: 53mm
– Stack Height: 11.2mm
– Max jump/drop: 61cm/24″ (MTB Cat 3 drops)
Note that the max jump/drops is a limitation of what Favero has tested from an accuracy of the spindle standpoint, not from a pedal breakage standpoint. Thus why Favero largely markets this as an XC pedal, rather than a pure MTB pedal. The pedal itself has been certified to meet DIN EN ISO 4210 safety standards. Downloading a full copy of that document, as it relates to pedal testing, requires paying a bunch of money. But you can find the majority of the test snippet for pedals here.
Note that Favero is selling the pedals in two versions: Dual-sided and single-sided. The pricing is as follows:
Dual-sided: $750USD/614€+VAT (e.g. on average about 750€ including VAT)
Single-sided: $499USD/368€+VAT (e.g on average about 450€ including VAT)
Also of note to those who plan to somehow kill their pedals, is that Favero’s replacement pedal body (the not-smart pedal piece that surrounds the spindle housing the smarts) is a mere 49EUR per pedal, which is substantially cheaper than Garmin’s 199EUR for a set of two. That is despite the fact that Garmin’s is made of metal+plastic, whereas Favero’s is all metal.
In the Box:

I’m always fairly impressed at how well-executed most power meter pedal boxes have been over the years. Be it Favero, Garmin, PowerTap, SRM, and more. They’ve always been pretty solid, and this is no exception.

If you remove the booklet above, you’ll find a small brown baggie of all the mounting hardware (for your cycling shoe), as well as all the various parts carefully laid out below.

Above you’ll see:
1) Two charging plugs (they attach to a Micro-USB cable I’ll show below) [Update Jan 2026: These are now finally USB-C adapters).
2) Four spacers/washers (in case you have frame clearance issues)
3) One set of cycling shoe mounting hardware
4) One tool-set (two pieces) for removing the pedal body/spindle in the event of maintenance/support
5) The two pedals themselves (still in the box)
Then, if you take those two pedals out, in that same box you’ll also find a very long dual-ended USB-C cable, seen below here along with the pedals, warranty information, and a quick install guide.

And finally, here’s a closer look at those pedals:

And for funnies, the edge of the pedals (spring) close-up:

With that, let’s move into getting them installed and set up.
Install & Setup:
Probably the biggest benefit of pedal-based power meters (compared to other forms) is the speed of installation. It’s the exact same as installing any other pedal – quick and simple. The only added item here is a one-time activation, and, if you change the crank length of the bike you’re installing it on (e.g. from one bike with 170mm cranks to another bike with 175mm cranks, then a quick update of that setting).
In any event, you’ll simply install the pedals using a pedal wrench onto your crank arms. Ideally, you’d add a tiny bit of grease if you’re feeling generous. From a torque standpoint, while Favero does specify the required torque, you’re basically looking at ‘rather snug’, but not ‘gorilla tight’.

Pedal-based power meters do need to be snug though, because if they’re loose, they won’t be accurate. However, pedals will automatically tighten as you pedal. Thus, standard practice is 2-4 nice solid sprints to get everything nice and tight (this is true even if you torque them to proper spec).

With that set, you’ll open the Favero App to get the pedals activated for the first time. This process will also offer firmware updates as well.


Once activated, it’ll walk you through a quick wizard of how to calibrate (zero offset) your pedal. Additionally, you’ll see the option to set your crank length. For pedal-based power meters, you must set the crank arm length. That’s found just inside the crank arm (where the pedal gets inserted in). It’ll be listed as a value typically between 160mm and 175mm, but can be lower/higher. The most common is 172.5mm, which is the default setting for the Favero Assioma pedals.


In addition to setting this in the Favero app, you can also set it via other bike computers (e.g., Garmin/Wahoo/etc), as well as some watches. However, not all apps (e.g. Zwift) will support crank lengths, thus it’s important to set it via the app anytime you move pedals to a bike with a different crank length.
With that all done, you can ignore this section again and instead, we’ll look at daily ride usage.
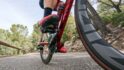
Daily Ride Usage:

From a riding standpoint, I’ve been testing it across MTB, gravel, road, and…well…beach (however you want to define which category that should be put in). Generally speaking, when it comes to MTB-focused power meters, the main thing you’re looking at is durability, along with accuracy. I touch on accuracy a bit later.
However, those two aspects aside, the data displayed from the various ride types are the same. Thus, with everything all configured it’s time to pair it up to your bike computer or watch (or app). The Favero pedals have both ANT+ & Bluetooth Smart, and allow multiple concurrent connections on both fronts. This essentially means you’ll be able to pair it to pretty much any device that can talk to a cycling power meter.
In my case, over the last few months, I’ve tested with Garmin Edge units, Wahoo Bike computers, Apple Watch, and validated enumeration in both Zwift & TrainerRoad. I’ve probably tried a few other things too, but have already forgotten. Either way, it uses industry-standard protocols, so connectivity shouldn’t really be an issue here.
As an example, on a Garmin Edge device, you’ll search for a power meter. You’ll want to connect via ANT+, rather than Bluetooth, else you won’t get the cycling dynamics information. That’s because cycling dynamics, as well as other bits like pedal smoothness and torque effectiveness, are only over ANT+, and not Bluetooth (that’s also of note if you have a Suunto/Polar watch because you won’t see that information).

Once paired, you can name the power meter however you’d like. Also, you can set the crank length here and it’ll be saved, in case you’re swapping bikes.

Further, you can enable the full set of cycling dynamics info here, as well as check firmware versions and battery:

Now on most power meters, you’ll want to calibrate (zero offset) at some point towards the start of each ride. I say ‘towards the start’, because this is really about ensuring no load is on the pedal, as well as ensuring any big temperature shifts have happened (such as taking the bike from inside to outside in the winter). Generally speaking, I’ll just stick my bike outside for 10-15 minutes as I get my cycling stuff ready. But of course, not everyone can do that location-wise. The next best thing is to then calibrate about 15 minutes into your ride.
You’ll unclip from the pedals and then choose to calibrate:

Calibration takes a few seconds, after which it’ll come back with a success confirmation. If it fails, try giving the crank a few rotations, and attempt again.

With all that set, as you’re riding along you’ll see the data broadcast to your bike computer, based on which data fields you selected. When you pair a power meter for the first time to most bike computers, it’ll offer to add the most common power meter data fields. Here’s an example of some on my bike computer, coming from the Favero MX-2 pedals (with cadence and power coming from the pedals):

Another set, this time the cycling dynamics information, which now includes platform center offset, as well as seated/standing time and power phase.

Note that while the cycling dynamics metrics are now considered an industry-open standard, only Garmin has implemented it. Thus, you won’t see this data on a Wahoo bike computer (or Stages or Hammerhead or anything else). Favero was actually the first non-Garmin entity to add it, back a few years ago, but unfortunately, nobody else has followed along.
But other metrics like simple left/right power balance aren’t technically part of the cycling dynamics features, so most bike computers/watches support that. Likewise, cadence is also shown, and doesn’t require anything special – every bike computer on the market shows that.
From there, any other data is calculated on your bike computer (e.g. 10-second power is simply the bike computer calculating that). The same goes for things like normalized power, average cadence, total pedal strokes, etc…

Further, if you don’t have a Garmin head unit, you can at least see/show the cycling dynamics information on the Favero App as well:

Now, app aside, here’s the total bits displayed by the Favero Assioma Pro MX-2 MTB power meter:
– [ANT+/Bluetooth] Total power (combined left/right)
– [ANT+/Bluetooth] Power Balance (left/right split)
– [ANT+/Bluetooth] Cadence (RPM)
– [ANT+] Torque Effectiveness
– [ANT+] Pedal Smoothness
– [ANT+] Platform Center Offset (Cycling Dynamics)
– [ANT+] Seated/Standing Time (Cycling Dynamics)
– [ANT+] Power Phase (Cycling Dynamics)
Looking at the data recorded in a file, that too will vary based on your bike computer, but going with a Garmin unit, here’s what you’ll see at the general level, noting all the cycling dynamics bits listed (here’s an actual activity file to look at, recorded with the MX-2):

Then lower down, you’ll also see more cycling dynamics details with averages and such:

And finally, if you tap the Cycling Dynamics tab, you’ll see some pretty illustrations of data:

Next, moving onto something non-data, we’ve got battery charging. The unit uses a small set of clip-on chargers. These charging pods actually have USB-C connections inside them, so while it comes with a very long dual-pronged cable, you could minimize the amount of stuff you’re bringing while traveling and just bring a smaller single USB-C cable:

That said [section updated January 2026], when the Favero MX first launched, it was micro-USB connectors for well over a year, before the newer road RS units launched, and then later in Fall 2025 they switched over to USB-C. Which, is good to see.

Favero claims 60 hours of battery life, and that seems quite viable. It’s always a bit challenging to track battery life, primarily in winter with vastly different conditions (some of my rides were with snow), which heavily impacts battery life. My general litmus test for something like this though, is ensuring it’s not abnormally short, which didn’t happen here. [Update: on Feb 14th, 2026 Favero increased this to 160 hours via firmware update]
Finally, from a cleaning perspective, I haven’t had any issues with salt water (from beach riding) and then rinsing it off later.

Nor any issues with spraying it down with a hose after a muddy ride:

With all the daily usage bit covered, let’s take a look at the accuracy in terms of power, cadence, and more
Accuracy Testing:

I’ve long said that if your power meter isn’t accurate, then there’s no point in spending money on one. Strava can give you estimated power that’s ‘close enough’ for free, so if you’re gonna spend money on something, it shouldn’t be a random number generator. Yet there are certain scenarios/products where a power meter may be less accurate than others, or perhaps it’s got known edge cases that don’t work. Neither product type is bad – but you just need to know what those use/edge cases are and whether it fits your budget or requirements.
As always, I set out to determine whether this unit is accurate and precise. In power meters today, one of the biggest challenges is outdoor conditions. Generally speaking, indoor conditions are pretty easy to handle, but I still start there nonetheless. It allows me to dig into areas like low and high cadence, as well as just how clean numbers are at steady-state power outputs. Whereas outdoors allows me to look into water ingest concerns, temperature and humidity variations, and the all-important road surface aspects (e.g. vibrations). For reference, the Favero Assioma Pro MX-2 unit has a claimed accuracy rate of +/- 1.0%.
For this testing, I’m mostly going to look at two different bike’s worth of data:
Road Bike (with some occasional gravel/offroad), equipped with:
– Favero Assioma Pro MX-2 (dual-sided)
– 4iiii Precision 3+ Pro (dual-sided)
– Wahoo KICKR CORE smart trainer (when indoors)
Mountain Bike, equipped with:
– Favero Assioma Pro MX-2 (dual-sided power meter)
– 4iiii Precision Pro (dual-sided power meter)
– Quarq XX1 MTB power meter
– Wahoo KICKR CORE smart trainer (when indoors)
I’m going to go through most of these relatively quickly, unless there’s a specific issue. You can click on any of the data sets to look at the underlying data yourself, if you’d like.
First up, let’s start with something simple – an indoor ride – an ERG workout in TrainerRoad. This one is actually on the Wahoo KICKR CORE smart trainer, and Favero Assioma Duo dual-sided pedals:

As you can see above, the green line of the KICKR CORE is settling down a bit during the warm-up, however, the two power meters (4iiii & Favero) are like best buds here, virtually identical across the board.
If I look at the left/right power balance split of one section later in the workout, you can see they trend very closely to each other. On the 2nd interval shown below, when my left leg is a bit lower there, you can see it matches on both of them that way. This is one area we’ll keep coming back to in this review. With dual-sided power meters, it can be somewhat challenging to get a bunch of them to agree exactly every time (to other units), but we want them to be pretty darn close – as total power on these units is simply the left side + right side added together.

Next, looking at cadence, again, we see the units are virtually identical – save the KICKR CORE’s estimated cadence being a bit slow in some cases, which is normal for smart trainers using estimated cadence.

And then lastly, when we look at the mean-max power graph, which is a great way to see accuracy and alignment over longer periods, we see the two power meters are near identical, with the KICKR CORE a bit higher due to that earlier warm-up phase where it was reading higher. Still, on the whole, this is actually a very pretty chart.

Next, we’ve got another structured workout, some 30×30 tests, which is a good place to look at both trainer and power meter responsiveness. This is a quickie I do with all power meters and trainers, so I won’t spend too much time on it here. Nonetheless, here’s the data (note: the colors have changed here, sorry!):

As you can see, again, near identical. The singular exception to that though is the first moment of the first interval, which seemed to catch the Favero unit a bit off guard and got a bit excited. The other units didn’t report that level of excitement.
In any event, looking at the left-right splits on a few intervals, you can see again, Favero and 4iiii are virtually identical here, especially once power is applied. We see a hair-bit more separation at some of the lower levels while soft pedaling (e.g. 90w), which can be somewhat common for power meters.

Looking at the mean-max graph, we do see more separation here at the top-end, due to the excitement shown by the Favero unit early on. Again, unclear to me if that’s real-excitement or fake-excitement. I’d argue it wasn’t real, but it can be difficult to suss out those slight nuances.

Now, let’s move from a structured workout to a non-structured trainer workout. This time in SIM mode, or simulation mode, where it’s simulating the terrain gradient in Zwift:

I know, it’s kinda a mess – such is life (and real-world pedaling). So, let’s zoom in on a few sections, starting with that sprint towards the end there. Looking at that, we can see very good alignment between the three units. There’s really not much to complain about here:

And if I look at that exact same timeframe, but now the left/right power, you can see again, they’re virtually identical between the two units. We see the Favero hold onto the sprint about 1 second longer than the other units (both above/below), which contributes to the average from Favero being slightly higher. But that’s not likely to actually be a Favero problem, but rather the simple reality of 1-second intervals for transmission/reception/recording rates (a blend thereof), driving these data differences. Said differently: It’s not likely a real-world data usage issue, just a recording/comparison issue.

Here’s another sprint, where we see the Favero and 4iiii units separated quite nicely (in a good way) on the left/right side, with both of those respective sides aligned together:

We’ve then got a blah-boring cadence graph, with things basically perfect:

And also a blah-boring perfect mean-max graph. Frankly, you won’t get much more perfect than this, save a tiny bit of differences on the KICKR CORE:

So, let’s head outside, and start to toy with things a bit. Here we’ve got a relatively efficient road-ride, and looking at the overall plot, obviously, it’s a bit variable:

So, let’s zoom in on a few sections. First up is this section here, which looks very close. Again, the reality of power meters is you’re going to see very slight differences of opinions, especially outdoors. But this is pretty darn close:

Here’s another section, again, with very slight differences here as we’re later in the ride:

And then if we look at the left/right split of that same section, it’s very very close – save a few seconds here or there we see slight disagreements. But it’s nearly impossible to know in this scenario which one is ‘most’ right. And as we can see above, practically speaking, it’s just not mattering – the total power is so close between them.

If I look at cadence, all seems identical there. There are two brief moments where cadence drops out for about 3 seconds on the Edge 1040 recording the 4iiii unit. However, this wasn’t just cadence dropping out, but all sensor data. I had a backup recording of the 4iiii on the Apple Watch (via Bluetooth), and I didn’t see the drop-out there. Thus it’s unclear to me if that’s an Edge 1040 thing, or a 4iiii ANT+ thing that happened.

And finally, the mean-max for that ride:

Next up, another outdoor ride, this one with some cobbled sections, some off-road sections, lots of road sections, and some sections I spent trying to figure out where TF the road went to. Here’s the data:

Now, I want to focus in on a few things with a bit more pickiness. Here’s a zoomed in section that’s virtually identical, for a half-hearted sprint. You can see there’s some slight disagreement on the ramp itself, but they basically get to the same spot.

And if you look at the left/right power split there, you see the two actually disagree about how I got there. The 4iiii says I had more left power, whereas the Favero says I had more right power. In total, both agree, but individually, they disagree on the composite of that.

Likewise, this section here. These two units are very similar, albeit the Favero is edging just slightly higher in some spots. Not a ton higher, but just barely higher at higher wattages. Or, one could say the 4iiii is edging barely lower in some higher-wattage spots.

You can see again that these two disagree on how that composite should be, but agree on that main sprint (point highlighted above), that the total power is the same but the left/right balances are quite a bit different for that exact second in time. Welcome to power meter analysis!

In some ways, going down the above rabbit hole can be never-ending.
However, where it becomes concerning is when a pattern develops between differences in total power. And there is a slight pattern here on some rides (but not all rides), where the Favero unit is a bit higher than the 4iiii unit:

And if we look at the breakouts there, we notice the 4iiii is reading slightly lower, primarily on the right side, than the Favero pedals. Again, this doesn’t happen often, but happens mainly on surges. Sometimes. But not every time.

Again, I can go multiple rides in a row where this doesn’t happen, but then you find a ride where it does happen – and I don’t really have a great reason for it. For my riding and power output, it doesn’t seem to be a major concern, and seems to be fairly minimal, but it does have a slight effect on higher wattages for your total power curve. You can see that here. If I look at the mean-max point for the 10-minute section, the two units are only a couple watts apart (totally normal). But as we climb higher and higher, they diverge more.

Next, let’s look at some dedicated mountain-bike testing. Because, we didn’t have enough data sets already somehow.
First up we’ve got a MTB set in chilly snow-laden weather. This starts off in the woods doing time there, before eventually heading out along the beach with salt spray (and when I say ‘spray’ that includes outright immersion at times). Here’s a look at that set at a high level, note, that this 4iiiii power meter below is actually a very different one than the previous one above. It’s one I bought a few years ago for my MTB, and is specifically designed for that.

Note that many years of comparing power meters in MTB conditions has demonstrated just how much different companies tweak algorithms to deal with all the terrain-induced impacts and craziness. Thus, I wouldn’t heavily overthink minor wattage differences on surges and such. Companies have varying amounts of smoothing to reduce errors, and some have more and others less.
Instead, it’s best to look at various points along the ride and ensure the multiple units are at least consistent, such as this snippet here:

Yes, there are differences there. But on the whole, they are more the same than different. In general, it seems that favero seems to smooth a tiny bit more than 4iiii, but on the whole they are very close, with a few moments they aren’t. I actually had a Quarq XX1 MTB unit on here, but it needed a manual calibration that I’d do later (due to changing chainrings; thus, I’ve removed it from the above set because it wouldn’t have been a useful comparison).
Anyways, below again you can see how the units varied a bit, but were generally quite close.

Here’s a look at the mean-max data for that ride. While this isn’t as crispy as the road data, I’m actually pretty darn happy with it, given the variabilities in MTB:

To demonstrate the differences between road and off-road on the same ride, here’s a set where I started off on-road, then went off-road, and kept going back and forth on a circuit. In this case, I brought the now-happy Quarq XX1 unit along for the ride, thus having three power meters:

Looking at a few random points, here’s one that’s very close, with the only disagreements being on the peak-power sprints (which were off-road sprints):

And again, very similar here on this off-road sprint, followed by other surges.

And finally, the mean-max power chart between the two. Most of the differences here come from the off-road sections, and how each company handles power smoothing/surges on rougher terrain.

All in, looking at far more data sets than I should have by this point, the units seem very good across the board. I don’t see anything of concern across any terrain types I’ve tested, with the terrain I have available to me.
Of course, this isn’t a surprise, given that Favero has always had leading-level accuracy, and many people have been using their first-gen units off-road for years (in an unsupported but functional config), so Favero has undoubtedly been using that timeframe to work out any kinks/etc….
And, that investment in time and validation seems to have paid off.
(Note: All of the charts in these accuracy portions were created using the DCR Analyzer tool. It allows you to compare power meters/trainers, heart rate, cadence, speed/pace, running power, GPS tracks and plenty more. You can use it as well for your own gadget comparisons, more details here.)
Power Meter Pedal Comparison:

I’m going to do another power meter pedal comparison video/post in the very near future. But, I typically don’t like doing these massive incredibly detailed comparison posts/videos only to have them voided a week or two later. As such, I’ll wait a week or two…because.
For funnies, here’s some quick comparison photos. Note, I wouldn’t judge the state of the Garmin Rally XC200 too harshly. It’s got about 20 months of riding under its belt, including most notably a lot of ocean beach and salt-water time. Seriously…lots of salt water. I try as best as possible to keep it clean, but…ice cream happens instead sometimes.


As you can see, certainly some visible differences. However, at the end of the day, all three units are accurate power-wise, and all three units are quite durable. Battery life, price, and weight are really the biggest differences.
Wrap-Up:

Ultimately, Favero appears to have a winner on their hands here. The units are solidly accurate, and solidly built, along with easy and reasonably priced replacements of parts should you need it. It now transmits the exact same information as Garmin’s much more expensive Rally XC-200 pedals (also SPD), but without the $1,200 price tag.
About the only real downside is the battery is substantially less than Garmin’s coin-cell units, which get a claimed 120-150 hours (more than double Favero’s). As always though, it tends to be a bit of a personal preference if you want a rechargeable battery or a coin-cell battery for your power meter. There are pros and cons to each. [Update: on Feb 14th, 2026 Favero increased this to 160 hours via firmware update]
I see it highly likely that I’d buy and equip other mountain/gravel bikes in my fleet with these, simply because they work well and are more reasonably priced. Aspects like being lighter weight is just a bonus, but one that allows me to eat more cookies – always a win in my book.
Thanks for reading!
Found This Post Useful? Support The Site!
Hopefully you found this review/post useful. At the end of the day, I’m an athlete just like you looking for the most detail possible on a new purchase – so my review is written from the standpoint of how I used the device. The reviews generally take a lot of hours to put together, so it’s a fair bit of work (and labor of love). As you probably noticed by looking below, I also take time to answer all the questions posted in the comments – and there’s quite a bit of detail in there as well.
If you're shopping for the Favero Assioma Pro MX Pedals (Dual) or any other accessory items, please consider using the affiliate links below! As an Amazon Associate I earn from qualifying purchases. It doesn’t cost you anything extra, but your purchases help support this website a lot.
Here's a few other variants or sibling products that are worth considering:
Favero Assioma Pro MX Pedals (Single Sided)
Favero Assioma Pro MX Pedals (Single Sided)
And of course – you can always sign-up to be a DCR Supporter! That gets you an ad-free DCR, access to the DCR Shed Talkin' video series packed with behind the scenes tidbits...and it also makes you awesome. And being awesome is what it’s all about!
Thanks for reading! And as always, feel free to post comments or questions in the comments section below, I’ll be happy to try and answer them as quickly as possible. And lastly, if you felt this review was useful – I always appreciate feedback in the comments below. Thanks!


I would REALLY love to put these on my enduro bike, but I bash my pedals on rocks multiple times per ride. I bought stages dual LR on XT crank which seems to work fine. But favero has special place in my heart. Price, precision, looks, user friendliness, they have it all :)
Yeah, I think we’re pretty good on that front to be honest. If we look at the Garmin Rally XC’s for example, they’ve been out about two years now, and just not hearing people killing those units on rocks (nor, people killing road-based pedal PM’s on crit pavement clips). They’re surprisingly durable.
The cool part about the Favero’s though is that in the event you do manage to kill a pedal body, it’s only 49EUR for a replacement pedal body, which is very reasonable compared to Garmin.
From the SRM Front: I hit a rock hard during track training for XCO nationals, and it killed just the cage (I think it got damaged through several hits. The good thing, SRM support is great, they sent me new kit (and one for backup). Just opening the 4 screws change the cage and fix it with 4 screws again, job done.
I killed my right XC200 hitting a rock. The lower front cleat mechanism broke off. I had to get a new pedal body. And on the left one, I hit the road while pedalling through a tight curve, since then, it seems to eat batteries quite fast, after two rides the are nearly empty. I have to remove them after the ride. Next I will send them to garmin.
I’ve got thousands of miles on my Rally XC’s in pretty rocky terrain where I regularly have pedal strikes. Haven’t had a single issue. I’m only 145 lbs so that probably helps, but the Rally XC’s have been rock solid for me.
I’ve sent two pairs of the SPD power pedal back to Garmin, they die on rocks quite easily and both times on easy cross country trails, not big rock gardens. I finally gave up and converted them to road pedals. Hoping the Faveros are better in that regard.
Thanks for another great review. Can you comment on cleat engagement and compatibility? I have XC-200’s on one bike and might consider these for another bike if I knew my shoes with Garmin cleats would work on the Assioma’s. I know they should but a real test would be helpful.
I used the same cleats that came from whatever, whenever, years ago. I didn’t swap into their cleats. But I use them back and forth between Garmin and Favero without any issues.
In my first reading of the review, I seemed to notice that you have compared stack heights of Favero, Garmin, Wahoo nad Shimano 520, but I cannot find it anymore.
Was it in some other article?
Standard Shimano cleats are supplied with the pedals. Haven’t installed them yet but I plan to continue using look SPD compatible ones
Hi,
I think there’s a typo for the single sided average price:
Single-sided: $499USD/368€+VAT (e.g on average about 750€ including VAT)
I would say they are great for Cyclocross as well ;-)
KR
Joe
Thanks!
Hi Ray and thanks for the review. Have you tried those pedals with knee savers (pedal axle extenders)?
No, I haven’t – sorry!
I would like to know how long it takes to fully charge the battery. Maybe you could provide this information.
I would see this new tech on a new road power meter pedals from Favero.
Hi,
do you think the PCO feature is released for the Assioma DUOs (roadpedals) as well?
Or is this feature hardware related?
Best
Max
It’s hardware-related IIRC
Correct, it’s due to the spindle/gauge design.
“Favero claims 60 hours of charging time,”… I hope it is a typo and you meant 60 minutes…
Hi Ray, do you think the two charger pins, too exposed, are replazable in case a future oxidation or malfunction.
We haven’t seen that issue with Favero pedals, and they’ve been using that charger style for about 7 years now. :)
Hi Ray, any word on a road pedal (shimano/look) pedal body conversion….is this the in depth review difference you spoke about. If it does come and for 49 euro, hopefully it will force Garmin to reduce their ridiculously priced conversion kits (a price I would not pay) to something more reasonable.
No word on a road pedal variant, but certainly this would seem to be their next-gen spindle design.
It would be perfect if pedal power meters could recharge their own battery by pedalling!
Like a wind up watch.
At least in the field of roadbikes, picking up a milliwatt or two won’t be accepted in the market – that would be almost as unthinkable as accepting now mass!
But in a hub based powermeter, you could do charging while coasting, a tiny little generator that works on the relative rotation between wheel and cassette. This would be awesome I think, but it won’t happen because marketing for dual sided has made buyers consider central-sensor powermeters (hub, spider) almost as bad as one-sided plus extrapolation, even if it should be the reverse, central much closer to dual than to single.
Or even better, charge off of stray WiFi like the samsung remote
Do you have a link to buy from that can support the site?
Interested as well, but the pedals are not in stock anywhere/DC site supporter.
Not yet at the moment. It’ll probably be a while!
Hi!
I also have a pre-series unit and love it. Do you have information on how to grease and use the grease-tools applied with the pedals?
Chiming in on this, the manual about grease application seems to be not done yet and all I know about the procedure is a drawing of the grease-tool. A pair of some applicator thingy and a nut: is that nut something that would screw into a grease press, and the applicator a plastic too soft to have its own thread?
If they go the grease press route anyways it would have been super awesome if they had done it like in the old days: with a hole in the pedal body that’s opened/closed by rotating a chrome-plated steel ring. A retro element like that on a computer pedal, that would have been hilarious, in the most positive way!
I can reply to my own question:
link to youtube.com
The video demonstrates the use of the greasing tool, it’s a reassembly helper that improves grease distribution and/or helps not damaging the rollers while threading the needle
While my Rally XC still work like a charm, for a new bike I’ll probably go for these instead simply to save money. I’m a bit worried about the charging pads though – I had pogo pins on my watch oxidatied to the point of not working. Given that pedals are more exposed to the elements, I fear some 3M tape might be required.
Favero has been using this same charger style/system since 2017, and no reports that I’ve seen of the charging pins being problematic.
I rushed to check if Favero App shows Live tab for Duo Shi and it doesn’t. Does anyone know if this is hardware specific? I.e. displayed only for MX pedals?
I’ve a set of the original Favero road Look pedals. I’ve enjoyed using them but can only really recommend them for summer riding.
I’m UK-based, covering 100-150 outdoor road miles a week, in the winter the bearings are trashed within a couple of months and spot-weld themselves to the axle.
Cheap and easy to replace, yes. I’m also a bike mechanic and see customer bikes with these pedals and again when ridden through the winter the bearings are shot so it’s not just my set.
I note the salt water comments and the IP67 specification but a strip down of the axle and a look at the bearings and seals would be useful to see if there have been any improvements made. It’s the crank / threaded end where the water gets in. No problems at the screw cap end.
I’d certainly hope with this new version being aimed off-road that there has been a change.
These have needle roller bearings, that are super massive compared to the tiny 15x10x4 Bepro and Assioma had on the inboard side. The spec sheet load limits of 15x10x4 aka 6700 are quite on the edge for what a pedal requires, needle rollers are much stronger.
link to cycling.favero.com grants a peek those needle rollers, and shows that they are running directly on the spindle instead of on a sleeve that would be replaced with a new pedal body. So this time, dirt ingress would be harmful not only to the somewhat consumable bearing (this time it can’t be replaced separately from the pedal body) but also to the expensive spindle. All in all I’d expect bearings to last much longer, but if they do reach their limits, you’d better have had some maintenance routine or else the valuable spindle might have gotten damaged.
Regarding the podded Keo Faveros: did you always replace bearings with the Favero kit (non-sealed bearings) or with 67002RS? I’ve shredded both kinds with enough rainy rides, but I’d expect 2RS to last at least a little longer (but not stainless ones, which are supposedly weaker, but you probably know that better than me)
I have the Assioma since 2018, as well as two friend of mine and we can’t say but good things about these pedals.
We together have probably piled up something like 200-300.000 km at this point, under any weather condition (we live in nothern Italy, not super rainy but it’s not Grand Canaria) and one of us is 101% committed to his training schedule (he will get out under the rain even if he has just a 1hr recovery hour planned by the coach) and none of us has literally done anything for the maintenance of these pedals: they simply worked every day with not a single signal of usage or wear.
The real clip&play solution.
Great reply thanks.
Yeah those needle bearings direct on the axle could be problematic for the more maintenance care fee cyclist (reminds me of the Specialized Future Shock internals).
Yes I’ve tried both the original and swapped to shielded bearings to get better results. I got airevelo to set them up for other riders on their website.
I own the Pre-Series now for almost a month and I am very happy with it. I am glad to have skipped X-Power and the Rallyes. This one was a buy and love thing. And the review confirms it.
Do these work with a spindle extender? To get my knees in the proper place I need an extender on both pedals.
I asked Favero about this (since I also use knee savers), and Favero replied that it could disturb the connectivity to a head unit.
Hello,
Do you think this axle will be updated later on the road range ?
Thanks for the review! Did you confirm the Q-factor by measurement? If they’re indeed 53mm, this would be closer to the short-axle XTR version (52mm) than to regular Shimano SPD spacing (55mm).
think we gonna have to wait for 2 months to try them out ;-)
link to cycling.favero.com
According to the BikeRadar review, it’s 54mm. link to bikeradar.com
Thanks. Given all the different numbers, now I’m even more curious about an actual measurement…
The 53mm is what Favero specified, from Favero.
I’ve long ago learned trying to measure q-factors accurately is a solid PITA.
Awesome and timely for me. I’ve been looking to get a PM for my gravel bike this spring. I’ve been very happily using Assioma Duos on my road bike for a number of years and recently put them on my gravel bike with the XPedo SPD pedal body mod. I modded a pair of old SPD shoes to clear the pods. Pretty much OK except the XPedo bodies have an edge that catches the nose of the cleat when trying to clip in. Virtually all other pedals have a ramp (where the tension adjustment screw is) that prevents this. This is the solution I’ve been looking for: Duos go back on the road bike with Look type bodies, new Assioma XPD pedals for the gravel bike, and new gravel shoes that don’t need to the soles to be modded. MTB has a crank PM.
“I’m going to do another power meter pedal comparison video/post in the very near future. But, I typically don’t like doing these massive incredibly detailed comparison posts/videos only to have them voided a week or two later. As such, I’ll wait a week or two…because.”
Hint taken, guess I’ll hold off on any purchases for a few weeks. :D
Why did the Quarq need a manual calibration? Is it an older one? I thought the DZero didn’t need calibrating with chainring changes these days?
The XX1 units do: link to support.quarq.com
That is only for the older “XX1” Quarq units, the “XX1 Eagle” Quarq abolished this requirement.
Interesting. All I know is the manul cal definitely made a massive shift back to reality, and was significantly different than the factory slope. :-/
If I let my XX1 Eagle Quarq auto calibrate on the mountain bike, I get some really wonky results. Seems to have started in the last few months – maybe I did an update I don’t remember. If I disable auto-zero and just calibrate before my rides, the data matches my Rally XC pedals much better.
I too am not totally convinced that magic zero works on the mtb. I do believe quarq have the most accurate data on rough terrain as they do less smoothing, but there is opportunity for inconsistency with magic zero.
Would really be interested in Crankbros power pedals. There must be some technical reasons things don’t fit or something
Ray, the Bluetooth Smart three concurrent connections is unique to this version, correct? The Look style UNO/DUO is only a single Bluetooth connection?
If that’s right, do you know of any plans for a Look style with updated bluetooth and more connections?
Thanks for the most exciting review! As a reminder, as a first power meter for a consumer with a few years of cycling experience (road but already using SPD pedals), is single-side sufficient or is there enough benefit to getting the dual-side in your view?
Hi Steve,
I’m not Ray, but would suggest for most people there is a good benefit in going double sided. Many people find that they have different power from each leg and the ratio can change with higher exertion. But it depends on how much you value accuracy vs money and your own power symmetry or asymmetry!
Hi Ray, do they squeak tho? 🙏 (Asking because it comes up a lot on the Garmin Rally forum…, and also my every ride 😬)
Many thanks for the review! Cheers!
No squeaking yet, but then again, my Rally’s don’t squeak either.
How about a review of the $400 Sram X0 Transmission power meter crankset? It’s only a $100 upgrade from the regular X0 crankset, which is pretty compelling (although left-sided only).
Isn’t that just for 55mm chainline bikes?
Hi Ray,
you write that if they are not installed firmly they won’t be accurate.
I saw that Assioma indicates a torque of 35Nm to install them: did you care to tighten them so much? I have them since end of November and I moved them a lot (to test them against other PMs and because I needed power or different bikes) but I did not tighten them that much every time. Since one of their advantages is the possibility to swap between bikes, I tend to tighten them just to the point where it’ll be easy to remove them when I need, and so that I’m not loading the threads each time.
Do you think this is not good? Will this impact accuracy or is that fine?
Do you have anything more detailed to say about how much they might gett off of an accurate reading depending on how you tigthened them?
thanks
Luca
I roughly know what 35nm feels like from years of installing Vector 1/2 units. :)
What I found in past testing on this subject was that basically, if you don’t install them to around 30nm, you might see oddities for the first ride. But any good sprints will pretty much tighten them up (since pedals are self tightening). It’s the core reason why most industry folks just recommend doing 2-4 nice hard sprints and a ideally 10-15 mins of riding, after installing.
I use torque wrenches at work and I feel like 35Nm won’t be easily applicable with the typical keys that will be used for these pedals.
And I can confirm that when I removed them in these days (even after races with sprints), they were nowhere near needing 35Nm to be unscrewed.
However that’s fine, I’ll thigthen them a bit more and I’ll keep an eye if I see anything abnormal in the power readings. Thanks for replying!
I use a beam torque wrench with park tool twb-15 crow foot pedal wrench. It seems to work well on my existing pedals.
“Road Bike (with some occasional gravel/offroad)”
Would be interested to know what your go-to bike is for this.
The go-to bike is whatever bike I’m on, when I’ve made a routing error. Which the last few weeks due to some closures, including a few very substantial, very off-road errors. :)
Apologies if I missed it somewhere, but “…as of today, anyone can buy one…”
Where? I see no indication of availability anywhere.
Thanks.
They were available on launch day on Favero’s site, I saw some screenshots from people that morning. Of course, out of stock now. :(
I can’t find them in the USA. After checking availability of favero spd power meter pedals 8 must agree with “MT” who wrote: “I see no indication of availability anywhere.”
Neither REI Nor Scheels and several other suppliers in us,list favero spd power meter pedal as being available for purchase.
Dennis
Omaha
Ray, have you checked the cornering clearance? I’m curious if this is any better than the look pedals from the same brand.
I haven’t re-done the bike tilt cornering tests. Will do that soon as part of the upcoming comparison.
their customer service support is very poor. They don’t respect the product warranty, I have a Favero assioma DUO, it stopped working properly and they are considering that I damaged then without any proof, and instead of proposing a repair or a replacement after me sending back the pedals, they are asking me to pay for new ones with a discount. So keep in mind that their product will work fine until it stop working and then good luck…..
That’s a pity. At least one guy on the Italian forum wrote about problems with the MX pre-series and in just about 1 week he got the replacement ones for free.
Just recently had a total different experience.
I did just ask If the my right-side Duo Shi was busted (various over and under readings) and they almost immediately offered me a free replacement – even though the warranty was already up.
Even despite the fact that in the pictures I send them it was clear that I used the thing out-of-spec; because I’am using some shimano mtb pedal bodys.
Favero accepted to replace the products as a good gesture from their side.
Hi!
I am looking into getting a power meter for my grx equiped bike. It doubles as road bike so I think I might go for the 4iiii precision 3+ left grx crank. How do the favero stack up with the 4iiii.
Thanks for the content. Big fan!
Google would like me to take a quick survey about the video. Not sure how to respond 😂
Hahahaha.
I hope you both concurrently said it’s the most fun thing, yet I dearly hope this wasn’t the most fun you’ve had this week. :)
With apologies if I’ve missed this somewhere in the article – I’d presume that the single-pedal option would reduce the available Cycling Dynamics from the full suite. Do you know which metrics you’d miss out on?
For me they should make an on-side mtb but with more platform like the PD-ES600 I’am using now (on Duo Shi). For Touring/Bike-Packing with mostly road but still lots of walking on camping grounds and stuff.
Any words about wether this axle is compatible with Xpedo Pedal Bodys like in the past?
Thanks for the review! Currently outfitting my new gravel bike and really wishing there was a pedal based crank bros power meter lol
Me too but I am giving up on my egg beaters in favor of SPDs. Do you want my old ones?
Hey Ray – thank you so much for the great reviews as always. I’ve been debating putting a Power Meter on my Fat Bike for over a year. I use it in the summer with 29ers and in the winter with studded 5″ fat tires.
The thing I’ve never been able to determine is how it will do it the extreme cold. I see that it operates down to -10c, has anyone ever tested that? That should be enough but there are days when it is colder than that.
Follow up to that is I’ve always been a Speedplay fan and I’d love to buy the Wahoo’s for my road bike to replace my aging P2s. That said I was hoping they’d come out with something more comparable as far as pedal dynamic metrics to something like the Favero or Garmin pedals. Do you see that happening?
Thanks for the great review! +1 to a question already asked, how long does it take to charge them? I’ve read 6 hours in some forum but wasn’t sure if that is related to these new MX pedals. Thanks!
Hi Ray. Do you know if these will be compatible with RockShox flight attendant to work with the on the fly electronic dampning. Thanks
Is it possible, if purchasing the dual pedals, to split them so that a left can be used one bike while the right is used on another? i.e. can the duals be split into singles and used independently? As a coach this might useful when trying to determine if clients PM is a random number generator or actually tracks against a known units accuracy
No, the left pedal is the ‘primary’ or ‘master’, and is required.
Looking for the least expensive way to get a power meter on my ROAD bike, and pedals seem simple, however, I use SPD pedals (single cleats let me use the spin bike in the gym when weather isn’t good).
These look good, I want rechargeable battery, but don’t need the toughness of a pedal for XC riding. Would you recommend these for road bikes, or is there something better? Thanks
I got mine reserved today. I’m looking forward to these pedals. They seem to be awesome!
Do you think this pedals are a good option to be used on both road and mtb bikes ?
Thanks
Totally. Just depends on what cleat you want.
I’ve been using them on a road bike the last month. I’ve often gone on long stretches with SPD cleats on road bikes.
Just ordered, can’t wait till they arrive.. been waiting for years for an Assioma SPD pedal 🥳
So mine arrived friday. Went out of a few rides…. not impressed. I get 70 seconds of power data, then 2 mintues of 0 power, and repeat…. (it’s like clockwork… its amazing). Sensor says connected the entire time – seen with both forerunner 965 and Edge 140. Anyone else experience this? Or should commit to the interval life? LOL
Eeks. Especially if on both units, that doesn’t sound like a Garmin thing (and since it’s outside, doesn’t sound like a weird interference thing). I definitely haven’t seen that (just got back from a ride with them, and no issues on any rides at all lately). I’d put a ticket into the Favero support queue, I’m sure they’ll respond first thing in the morning.
planning to when I get home from work. Thanks for chiming in. ;)
I really want to like them, so hoping I can sort it out.
I started doing manual laps to track it (some variance giving I’m on singletrack and trying to not fall over or hit anyone/anything). I got to where I could predict within a few seconds when it would fall off.
I’m now 100% certain the root cause is my FR 965 (which works wonderfully with all my other sensors, including power meters mind you…)
If I have the 965 paired to Assioma? 1 minute of powers followed by two minutes of 0 watts. Repeat
If I’m broadcasting HR (not even recording gps or paired to pedals) same.
Anyone else have the MX-2 and a 965? I’d love to know if you see the same.
1040 alone, no 965, everything looks great.
Any chance that you watch and bike computer have different crank lengths set for your pedals?
EDGE 1030 OK and when I turn on FR 955 Dito
With Dito I mean same Problem
Solved. I had paired the Garmin 955 with the favero duopedal and with the left pedal simultaniously. After removing the left pedal #######L from the sensor list from the 955 the combination edge 1030 as dashboard and 955 to record the sessions works perfect.
I have had this happen on several rides. I have them paired to my Garmin 965 and 1040. What I noted on the ride is that my watch was connecting and unconnecting and when it did that, data dropped off (and then back on). It screwed up the data submitting to the 1040 as well. I tried ANT+ with the watch–and I got the error(s). I then deleted that connection and connected via BlueTooth–and got the error. My last ride I decided to disconnect from my watch completely–and I got no drop offs on my 1040. Without any more testing (yet), it appears the watch and pedals are the issue. I plan to try my 955 and see if I get the same issue or not. Just thought I’d share.
Sorry, missed these comments early. There’s an approximately 100% chance that if this is happening, the crank length is set incorrectly on one of the units. Double-check that they are the same (e.g. both 170.0mm or both 172.5mm, etc…).
I should have been more detailed. I did set the app on the phone, 1040 and 965 (ANT+ and BlueTooth) all to 175 for crank arm length. I found that out many moons ago was a reason for units competing and changing the profile constantly while in use.
So…it is not due to the crank arm length (at least for me).
I failed to reply to your reply. :)
I should have added the detail that I had set the app on my phone, 965 (ANT+ and then Bluetooth) and 1040 all to the same crank length (175). I could see real time on the rides that my watch was losing connection (or appeared to not be connected), I would reconnect, and it would show data for a while and then I would notice on my head unit on my bike (because it’s hard to ride and look at my watch) and could see the power drop to zero and then after a while it would pick back up again to then drop to zero (and so on). I could not get this to stop until I disassociated my watch from the pedals completely.
I have exactly the same problem. 1040 works, but if I pair with 965 (and all are set to same crank length) they both drop off on data recording and come back on (off/on through the entire ride).
I remove from 965, 1040 is fine. I have yet to try another Garmin watch to see if it happens with that.
Had mine since Friday and have 5 rides / 160km with them now and they’ve been flawless (My Edge 1040 sometimes refuses to auto-connect to them, but that seems to be a Garmin problem with a lot of 3d party PMs)
For anyone in the UK wondering about the ‘true’ cost, I paid on a 0% exchange-fee card as you pay in Euros, so the pedals cost me £498 including delivery (which was within 24hrs of despatch from Italy). Favero make it very clear that you’ll get charged customs/import duties, which are billed to you by the courier (FedEx) after delivery. I’ve just had my invoice from FedEx and that was for £112.50 – pretty much just the 20% VAT and their standard ‘admin charge’, so total cost to me has been around £610.
Got my Pro MX-2 set this week (US Idaho). Great out of the box setup – except they don’t work with titanium 20mm pedal extenders (Amazon) whereas my Garmin Rally’s work fine. Extenders are open on both ends, and threaded lengths of both pedals seem identical in length (and visually w plastic window cap at end) but MX-2 loses signal immediately upon install FWIW. Garmins work flawlessly in same exact setup (minus the Garmin squeak that comes and goes).
Bummer. Really love my Shi Assiomas. Wanted the rechargeability and better oval chainring readings from Assioma for the MTB but c’est le vie.
FWIW, I realize not many will use such wide extenders (up until a year ago seemed absurd to me too), but just a heads up there is a fair bit of doco in setup describing acceptable insertion of pedal axles into crank arms, max shimming, etc, so probably this initial version of the product is quite sensitive to those parameters WRT signal strength. The Rally’s did come with about 2x the washer/shim spacing vs the MX-2 for those that need wider Q. I wonder if some of the issues above w dropout could be related to that.
It’s a good theory. I do have crank boots on mine crank – so perhaps that is in the mix. I swear they are seated well (and torqued to spec), but may be worth removing the boots and trying again.
I did have a great ride home from work monday where they worked exactly as one would hope (literally changed nothing from the morning ride other than the route). So I was hoping I was past it. Then my ride this morning, back to it. Who knows…
Ordered my MX Pro from Favero on a Tuesday and received by Friday in Louisiana the same week!
Easy installation and pairing with Wahoo Elemnt Bolt (1st gen) and clipping in with my Shimano SPD cleats flawless.
Watts are comparative to the Rouvy watts through Elite Nero rollers so I am very pleased.
Hi,
If I want to get left side power only. And then switch between my gravel and MTB bike, do I need to switch also the right pedal (currently running shimano spd on both bikes.)
Hi there,
Firstly thanks for all the really useful reviews. Not knowing much about power meter pedals, and not having purchased any yet, your site and videos have been so helpful. Keep up the good work.
I’m considering buying the Favero Assioma Pro MX MTB (SPD) Power Meter pedals to use both on my MTB but also on my road bikes (which I use a lot more than MTB) as I prefer the SPD to road cleats. Are there any disadvantages to using these pedals on road bike?
Are there anywhere is the UK that stock these to buy online?
Many thanks
Dave
Quick question: Can you charge both pedals simultaneously (with what is provided)? That is, do they provide two of the clip on chargers and a y-split in the USB cable?
Thanks!
Yes.
Thanks Griff!
Great article. Made me buy some, but….
Sadly they don’t transmit data with pedal extenders fitted. Typically not an issue on an MTB, but if using with a road/gravel set up with narrow Q-factor, two washers is the only way to make wider. Anyone used to riding Assioma Duo is not going to be able to replicate the same set up. Not always a problem, but some days, not walking around like a duck in road cleats in the cafe is welcome.
Do you think that these pedals will also come with SPD-SL pedal bodies?
Your Amazon link goes to a bundle that is out of stock. Just pedals are available.
Has anyone connected these to an Apple Watch Ultra and can confirm that the data is displayed in Apple Fitness?
Great review. I’m in the market for power meter for MTB. Overall, do you think a pedal based system is better than a crank (4iiii etc).
Wat is beter? Ik heb de wegversie nu 3 jaar zonder 1 moment van problemen ook na valpartijen schuivers etc en heb ze op verschillende fietsen kunnen gebruiken (kan met crankarmen ook maar niet verwisselen in 5 minuten). De MTBversie heb ik nu 5 maanden en ook die werken probleemloos en zijn voor mijn gevoel nog iets robuuster omdat alle elekronica nu in de as verwerkt is ipv in een pod.
Hello, i own pro mx1, can i use pro mx right instead of pro mx up to upgrade?
Amazon vendor wearu is supplying single sided for double sided price. At least that’s what is stated in the spec.
Prior to Assioma Pro MX some users converted the Assioma Duo in MTB pedals as the axle was compatible with some Xpedo pedal body (link to youtube.com)
I have any notice that Favero will launch this new power meter as road pedal, so the question is, has anybody noticed if the Pro MX is convertible into road pedal?
Looks like they switched products on you, the top link is not a dual but a single at the dual price, with a battery pack, below is the product description, costs $799.
“IN THE BOX: 1x Left pedal with power sensor, 1x Right pedal without power sensor, 1x MTB-compatible SPD cleats, 1x 4 Washers, 1x Magnetic charging connector (2x MX-2 | 1x MX-1), 1x Micro USB 2-way charging cable, 1x Greasing tools kit, 1x Guarantee and safety manual, 1x Power Bank (wa001”
Also an important difference is that in Favero’s pedals you can replace bearings for a small money.
On the other hand Garmin has a design flaw: one of the two bearings in an XC pedal runs directly on the spindle and when it eats the spindle’s surface, your pedal is done, you have to get a new one. Don’t ask me how I know :(
Ray, thank you for your review. The details, the depth of understanding on whatever product you review is amazing. Thanks for sharing your talents & knowledge, & pray that you are aptly rewarded. If I ever return to the Continent, hopefully it’s when you are holding an event.
BTW, wasn’t interested in power meters until my new bike fit showed a huge difference between L & R sides. Losing 50kg in ’23 & then a partial knee replacement in ’24 didnt create symmetry. Working on it, but need hardware to monitor.
Regards, John
Thanks for the informative review. I recently got the Favero Pro-MX-2. Paired with Garmin Edge 530. Almost everything is fine, except the rider position which is shown always as ‘Seated’. Strange, as the Favero Duo (Look pedals) displays the rider position fine on the same bike/computer. Raised a ticket with Favero, but no response yet
Congratulations on the excellent analysis, it was the most complete I’ve ever read. I bought the pedals and I think they are excellent. However, I have the Wahoo and would like the same metrics as the Garmin, I would like to have more knowledge about Cycling Dynamics.
I recently bought the single sided version and am happy to report that the charger has indeed been updated to USB-C!
I’ve read the full post and comments, but I can’t figure out the answer to this question.
Short version: I can’t get the recommended clearance and protrusion between the spindle of my drive side Favero Assioma Pro MX-2 pedals and the chain. Does it matter?
The bike is a 2022 3T Exploro Primo frame with GRX Di2 from 2024.
The Favero app indicated during setup that I need 4mm of clearance between the end of the pedal spindle and the chain (in large chainring and small cog). It also recommended 1mm of spindle protrusion from the arm. With one spacer I get 1mm of protrusion, but only 1mm of clearance. With two spacers, the spindle is even with the back of the crank arm, and I get 0mm of protrusion and 2mm of clearance. No setup satisfies Favero’s specifications.
ChatGPT said that I should not use the pedals at all, and that the lack of clearance could cause sensor damage, intermittent power issues, and a denied warranty (presumably from rubbing caused by frame flex when putting power down in the hard gear). It said the issue was well-documented, especially in setups like mine, but when pressed, it couldn’t cite any strong sources. I also couldn’t find anything about it in your review or the comments. But Favero seems to think it matters too, so I figured I’d ask.
What’s the best course of action? Can I safely use these pedals on my bike, or are these specs to be strictly followed?