It’s been about 8 months since 4iiii began shipping their Precision power meters to buyers, which is a small pod affixed to your crank arm. When the company announced their entrance into the market in September 2014, they had planned to debut a self-installable option for both left and right legs. However, both have been put on hold while they initially rolled out their first version where you send in your crank arms.
The main appeal to the 4iiii product is the low cost – from $399USD for the system, making it the cheapest direct force power meter on the market.
Now, as regular readers know – I first received a unit back in the spring, however, I had complications getting accurate power. I then received a replacement with the same issues. Ultimately, it would take nearly 6 months for 4iiii to sort out why my specific pedaling style was causing accuracy issues, which they’ve now solved. For many (perhaps most?) others, there were no such accuracy issues seen by then. Nonetheless, during that time period, in lieu of a review, I updated all existing 4iiii posts with warning banners of the problem I was seeing.
All of which brings me to now – about two months after receiving what I’ll simply refer to as a Gen2 unit. It looks nearly identical, but does contain updated firmware (which all previous units received), as well as some tweaks to the pod and installation process to address the issues I saw.
With that – let’s dive into things. Oh, and yes, as always the trial unit will go back to 4iiii here shortly.
Unboxing:
First up is getting the crank out of the box. Now keep in mind that the crank arm in my box will differ from the crank arm in your box, because you would have sent in your own crank arm. So, this is after you’ve sent in your crank for attachment. The way it works is that you buy the 4iiii Precision unit, and then as part of that you’ll ship your crank arm to them (they pay for shipping both ways).
So once it boomerangs back to you, you’ll be standing around with a nifty packaged up unit:

From there, grab your nearest Ikea knife, and slice away:

Inside you’ll find some paper goodness on top. This would be a small manual, as well as information about your specific Precision unit.

Additionally, you’ll find two stickers.

Below all that you’ll find the crank arm all packaged up, as well two CR2032 batteries (thus giving you one spare).

Now’s as good as any time to put the battery in.
Finally, here’s a closer look at the crank arm all undressed:


The pod adds 6g of weight without the battery, and 9g of weight with the battery – to your crank arm. In other words, basically nothing. With that, let’s get onto installation and configuration.
Installation/Configuration:

The installation of Precision is fairly straight forward – especially if you already removed your original crank arm. If a buddy/shop did the removal of the crank arm, then you’ll likely want to return to them for their services, as you’ll need the same tools. The exact tools will vary depending on the specific crank arm types and connection points.
In my case, things are relatively straightforward. Here’s my starting point:

From there, I’m simply going to attach the left crank arm onto the spindle:

And then tighten it down per spec. If you don’t know the exact torque requirements of your crank arm, I highly encourage you to look it up – as it can and will impact accuracy. Simply go ask Mr. Google for your crank arm manual, it’s always listed in the first few pages.

Once that’s all done, you’re ready to add pedals of your choice.
In my case, you’ll also see a magnet sensor on there – that’s simply because I use that to help validate cadence results coming from the 4iiii Precision (for testing). There’s no need/reason to have a separate magnet sensor on the unit.

With that – we’re done and ready to set the zero offset and ride (more on the zero offset in a moment).
(Note: The installation photos I took on the first unit I received, all other photos are from the second generation unit I received. There’s zero difference between the two in terms of installation. Just helping to clarify in case you see slight differences with respect to the other power meters on the bike at the time.)
General Use Overview:
When it launched, the Precision power meter was set to be a dual-leg system. That meant it would have one sensor on each crank arm, similar in concept to Verve’s Infocrank, Garmin’s Vector, Pioneer power meter, and other two-leg capable system. However, at this time, 4iiii is only shipping a single-leg system. That single leg being the left crank arm, similar to the Stages power meter, among many others.
Now, I’ll talk about their upcoming dual leg system later in the review, but for now – this is only a single leg system and this review is specifically for the single leg crank arm.
But what does that mean from a technical standpoint? Well, at its most basic premise they simply double your left leg power. Of course, most of us have two legs, both of which output power. So for single left leg systems, they aren’t accounting for your right leg power individually. Rather, that gets ignored.
This means if your legs have an imbalance (very much normal), your total accuracy might be more variable. Further, it’s very normal for people to be variably balanced depending on intensity or fatigue. For example, I tend to be generally balanced up to about 315w (my FTP), but then beyond that, I become rather imbalanced. In the event that my left leg is weaker, that means my total power is being undercut on a Precision system. Whereas if left leg was stronger, my total power would be overstated. I’ll talk more about this later in the accuracy section – but I think it’s important to understand from the get-go.
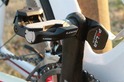
Of course, all of this left-only stuff is most easily seen in that there’s only a single pod on a single crank arm, as seen below:

This pod is effectively non-removable. While you can remove it from your crank arm, once you’ve done so you’ve ‘destroyed’ the pod. So think of it as a long-term thing. For those curious, this would be no different than the Pioneer system, Stages or others. It’s not designed to transfer from crank arm to crank arm.
The pod runs on a single CR2032 battery, which 4iiii currently says gets about 120 hours of battery life. That’s up from where it was this spring and summer, where users were getting far less than that. Firmware updates since then have improved things significantly. CR2032 batteries are cheap, so even if you’re getting slightly less battery life, you can always buy a pack of 20 them for $7 on Amazon (those are the exact ones I use).

The one area I’m not super thrilled with is the battery cap, which I found can somewhat easily bend it’s slot-system. It’s not the end of the world, since it’s just the cap part I’m annoyed with, and I haven’t seen any indications it’s causing pod leakage issues (ala Stages Gen1 units). Still, I’m hoping they’ll improve it down the road.

The 4iiii Precision broadcasts data on both ANT+ and Bluetooth Smart. While doing this it’ll broadcast your current power & cadence on ANT+, and your current power & cadence on Bluetooth Smart. Both of which use the standard power meter device profiles on both protocols.
In addition, 4iiii recently released a firmware update which enables Torque Effectiveness & Pedal Smoothness on the Precision system. However, this firmware update will only be freely available for purchasers of Precision prior to January 15th, 2016. After that, it sounding like you’d have to pay to get such capabilities. To be honest, those metrics aren’t probably super-useful in a single-leg configuration. But to each their own.
If pairing via ANT+, you’ll be able to search and find the 4iiii Precision system via any ANT+ capable power meter head unit. It’ll then display the ANT+ ID as part of that process.

You can dive in to get additional information such as battery status. In the case of Precision, setting a crank length value is not required or utilized – so there’s no reason/need to do so.
On the Bluetooth Smart side, I’ve successfully paired it to a Polar M450, and received data from that successfully as well.

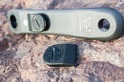
You’ll also use Bluetooth Smart to update the firmware on the 4iiii Precision, using the 4iiii app. This app is also used for other 4iiii products, such as Viiiiva and the original 4iiiii Heads Up Display. In our case though, we’re just going to use it to update/configure our Precision:

When you search/scan for it and connect to it, it’ll immediately notify you that a firmware update is available. It’ll then give you details about it:


The firmware update takes less than 60 seconds to complete – so it’s pretty painless.


You can also use the app to complete a zero offset:

Speaking of which, before you head out, you should perform a zero offset on the Precision power meter. Like many power meter companies, 4iiii recommends doing this before each ride, from their manual:

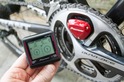
This can be done from the app, or from your head unit. If using a head unit, you’ll dive into the calibrate option:

You’ll want to align the crank arms as such, per the manual. Once it finishes, it’ll provide you two offset numbers, so if you’re recording those, you’ll want to validate you gather both of them. The first number should be between 8,000 and 11,000, and the second number between 18,000 and 21,000.
In the event your crank arm is out of alignment per the manual, it’ll notify you that calibration has failed, so just check the orientation and try again. All pretty easy and straightforward.
Once out riding, the unit will display your current power and instant power just like any other power meter. Like most power meters, it’s usually best to configure one of your data metrics for a ‘smoothed’ power meter value, such as a 3-second (3s) or 10-second (10s) power value, as it helps to reduce some of the variability that is totally normal for power meters.

Note that the 4iiii Precision single-leg system will NOT display power balance, as it’s not measuring your left/right legs independently. Down the road when they enable a full dual-leg system, that would be a feature of that two-part system.
Finally, I noted earlier that I’m on a Gen2 unit. That isn’t technically their terminology, though, it’s as close as you’ll get to it. It means that basically there are some minor hardware tweaks that came about in the September-October timeframe, along with updated firmware. That firmware is the same as those on Gen1 units. The main difference was that for me, for my ‘pedaling style’, it apparently caused accuracy issues on Gen1 issues. What is my ‘pedaling style’? Well, according to 4iiii, their explanation is as follows (in response to a reader comment a while back):
“As a bit of background, the majority of people pedal in a generally circular motion and receive accurate PRECISION values. For most of us, the crank arm and pedal cause our legs to travel in circles, but a small percentage of cyclists exert unusual forces on the pedals. This is what was happening with Ray. Anyone exhibiting an unusual pedaling style and wanting to compare power data with other meters, will benefit by the firmware upgrade…
…We understand Ray’s quirks – things like Left/Right imbalance, pronation on the pedal (EG: turning your foot in the bracket), leaning on the inside or outside of the pedal and numerous other forces and torques applied. The Precision power meter is unique in that it understands more than just simple bending with an approximate calibration. A real crank arm cannot be accurately approximated by this method for true torque sensing. Further refinement to the build process rectified an issue affecting a limited number of crank models for a small percentage of riding styles. It has been our very unfortunate learning experience that the crank model sent to Ray combined with his style was in that category. Only one person of all the 4iiii’s personnel has been able to present with similar magnitude of error.”
As for how 4iiii reconciles this for existing owners, well…I’m not sure entirely to be honest. I suspect if you’re experiencing accuracy issues, they’ll take care of you. But how you’d know you’re having accuracy issues if you don’t have another power meter (or two) for comparison is certainly rather tricky.
Power Meter Accuracy Results:

For my testing period, I used three different 4iiii Precision units (two Gen1 units, and one Gen2 unit), all of which were installed on my triathlon bike, a Cervelo P3C. Though, all my bikes are configured somewhat similar in terms of testing/validation units, normally with 3-4 power meters in total.

In the case of these tests, the following configuration was used:
A) 4iiii Precision crank-based (left-arm only)
B) PowerTap G3 wheel hub
C) PowerTap P1 pedals
D) PowerTap C1 chainring unit
For indoor tests, I’d usually place it onto a trainer that supported rear wheel usage (generally the CompuTrainer, so I could keep the PowerTap hub on the bike).
From a data collection standpoint, virtually all of the data used in the analysis was collected using Garmin Edge 510/520/810/1000 units, as well as limited M450 usage. I also recorded some data with NPE WASP units, as well as other applications. Data analysis is largely done in a custom toolset I use to ferret out differences, while also using more widely available tools like Golden Cheetah, Excel and Training Peaks to validate the results.
Just to set a baseline, the 4iiii Precision has a claimed accuracy range of 0w to 4,000w, at +/- 1%. Further, it has a claimed cadence range of 10-170RPM. Remember that the accuracy range is of the left-leg, which can be more variable if you compare it against a left/right system since it’s not capturing the right leg power holistically.
With that, let’s dive into things. I’m going to pick a few random rides that talk to specific conditions (i.e. temperature changes), sprints, stable power, trainer, etc… The goal being to find out any oddities that I might see. You can download all the ride data used in this review at the end of this section (plus a bunch of other random data I tossed in there not shown here in graphs).
(Note: You can also find a few more data points in my PowerTap C1 In-Depth Review, where the 4iiii Precision system was included in various data sets as well. These two reviews show two different sets of data.)
First up is a ride from last week, where I headed over to a local park and did loops there. As part of each loop I did a sprint up the hill on the loop.
What you see below is a non-smoothed look at that ride. Regular readers know that I always show this first, just to show how useless it is in analyzing data. This chart actually shows four different power meters plotted on the same graph.

Instead, I prefer looking at smoothed data, which helps us to easily spot where things get misaligned. In this case, I’ve applied a 30-second smoothing to the exact same chart as above, giving us the below.
In the right hand corner is the key to the different colors. The wattages you see next to it are merely the single points in time where my mouse is, it’s not showing averages.

So why not show averages? Well, they can be sorta-interesting, but also super-deceiving. A power meter can be ‘wrong’ 100% of the time, yet still actually be correct for an average. It’s the easiest bar to pass. I’ve demonstrated numerous times that simple $99 power solutions like the PowerCal can be very close using averages.
Nonetheless, for those curious, here’s the various averages and maximums from that ride:

The problem with looking at stats like 1-second power, is that it gets to the nuances of how power meters and head units talk to each other.
For fun, I’ve picked a section of the previously noted chart and zoomed in on it. I’ve also reduced the smoothing to 10s (giving more variability). In this case, it’s my first sprint of the night. You can see that all four power meters track very closely both pre-sprint at steady-state (approx. 300w), and then into the sprint (approx. 700w). Generally speaking pre/post sprint they were within 10w of each other. And then during the sprint, that grew slightly to a max spread of 31w.

But there’s a catch – which is that the above chart makes some incorrect assumptions. Specifically, it’s not actually comparing ‘like to like’. In the case of Precision, it’s technically incorrect to compare it to a PowerTap G3 or the P1, or the C1 units. Why? Because those are all measuring my left/right leg totals. Whereas the Precision (like Stages) is just measuring my left side. So in the above case, the Precision measured ‘high’ at my sprint peak.
What if instead we just compared the left-only reading from the PowerTap P1 pedal, to that of the left-only reading of the Precision? Ask and you shall receive:

So what do you see above? Well, just the left-leg power. We see that the P1 is slightly higher than the Precision, which is logical (it’s closer to your leg). We see the two agree on max power – being within 2w of each other (0.6% difference). Whereas at lower wattages, it’s in the 5-8w range.
I picked another sprint later on, here’s the difference there.

It’s actually interesting – I think this is the first time anyone has ever shown comparing one-leg portions in a power meter review. Given the bike at the time only has two left-only capable units, it’s impossible to know which one is truly correct. Once I add the WatTeam left/right capable system to the bike here shortly, I may be able to narrow it down. But we’re really at the point of splitting hairs.
Moving onto another ride…
Here’s the 30s smoothed version of this one. Quite frankly, things look really darn pretty at the 30,000ft level:

So let’s dive into some of the peak power, and reduce the smoothing to 5s:

Woah – so in this case Precision for this sprint is showing 50w higher than the others. So let’s investigate. What does the left-only data say about that?

It shows a difference of about 12w, and then grows slightly to 21w. Again, there’s no way to know which one of these is correct. It could be the P1 or the Precision (or somewhere half-way in between).
Now this is where we can start to see some of the impact of left-only, when I apply a Mean-Max graph, which plots max wattages over various timeframes. You’ll see that up through about 600w @ 30s, things align beautifully, but after that it appears that my left leg was slightly stronger during the sprint – causing some higher values once doubled. To be clear, this isn’t a negative mark on the technical accuracy of Precision, but just the reality of doubling left-leg power.

Finally, a quick look at cadence on that ride. You’ll see things largely matched quite well. There’s one blip on the PowerTap G3 around 1/3rd the way through – but that’s estimated cadence, and there’s nuances that can cause those blips. Also, don’t overthink slight differences in cadence when you stop/start pedaling. That’s really an artifact of the way each power meter and associated head unit handles that split-second where the pedals stop moving.

The above ride is interesting, as it included numerous cobbles sections, as circled on the map below. Cobbles can cause cadence ‘issues’ or variances – which we don’t see above.

Finally, one last quick one before we wrap-up. This one on an indoor trainer (note: I’ve snipped off the end of the workout where there was some interference in some data sets).

I’ve included this one for fun, merely to point out what happens when I do left/right leg drills. You can see there that when I’m pedaling with only my right leg, the 4iiii Precision will drop-out entirely (as expected, since no load is going through the left crank arm). Meanwhile, when I pedal with just my left leg – it doubles it and shows twice as much power (an artifact of the business as usual doubling of the left leg).
Beyond that, the units all track fairly well – including through the 30/30’s, though Precision is a touch bit lower. In taking a look at the left-only track of the P1, sure enough it’s also lower, indicating that for whatever reason that night my left leg was less powerful. Interestingly – this somewhat matches what I observed back when I looked at this when Stages first came out. In that I’ve seen slight variations between indoor and outdoor rides in terms of balance between my legs.
In any case, I’m not seeing anything that’s of concern when it comes to the accuracy of the 4iiii Precision units at this point, with current firmware/hardware – everything tracks very well and without issue.
(Here’s a link to all my 4iiii Precision review data, including all comparative sets.)
(Note: All of the charts in these accuracy sections were created using the DCR Analyzer tool. It allows you to compare power meters/trainers, heart rate, cadence, speed/pace, GPS tracks and plenty more. You can use it as well, more details here.)
A Brief Look at Precision Dual Sensor Systems:

Back in October I took a look at the upcoming Precision Dual Sensor. It was a simple (and rather short) test ride, mostly to validate it exists, and how well it tracked against a few other power meters.
You can find details on that in this post here, which talked through everything from the basics to the data on the test ride.
My review here (the one you’re reading) is focused exclusively on the single-leg unit. Once the ‘other half’ of the system, the right leg, starts shipping – then I’ll likely release/do a new review focused on the full left/right system. The expectation is that such a system will be simply a case of adding the drive-side crank setup to the existing left-only crank arm. Thereby allowing for easy upgrades.
4iiii has not released a timeframe for when that’ll occur, thus, I don’t have a dual-leg system at this time and am therefore not working on a review currently for such a system…because again, I don’t have it yet.
Power Meter Recommendations:

Note that while this is a power meter review, I tend not to put purchasing recommendations/comparisons to the rest of the market in these. The reason being simply that I’ve created an entire post dedicated to that – with boat loads of information about all the options available on the market.
Now – what about comparing between the different left-only options? Well, at a high level I’d focus on compatibility first. Eliminate those crank arms that won’t mate with your bike (or your crank arm religious beliefs). All of the various left-only units have nuances in terms of compatibilities, so that’s the first step. The next is looking at price. Right now, the 4iiii Precision is the least expensive out there (simple fact), with Stages closely behind it at about a $129 premium. Finally, consider whether you plan to upgrade to a dual-sensor system down the road. If that’s the case, you’d want to narrow down to: 4iiii, Pioneer, Garmin, Polar, bePRO. All of which offer currently shipping options that allow you to ‘upgrade’ to a dual-left/right system down the road. But, let’s not get so far ahead of ourselves, read the buyer’s guide post first.
So grab a cup of your favorite caffeinated beverage and swing on over to that guide for more than you ever wanted to know.
Summary:

There are so many variables and parameters to consider when choosing a power meter. I’ve discussed all of those in the aforementioned buyer’s guide.
That said, once you have narrowed down your selections, the current 4iiii Precision is a solid left-only option. I’m especially interested to see how things look once they layer in the right-side of the equation next year. If they can maintain the same level of accuracy they have now, and still hit the same price ranges as previously advertised ($749), it’ll be one of the cheaper full left-right capable options (with only WatTeam being cheaper).
Until then, it takes the KOM for the least expensive direct force power meter on the market – and one that’s just as accurate and easy to use as ones that cost significantly more.
Found this review useful? Or just wanna save 10%? Read on!
Hopefully you found this review useful. At the end of the day, I’m an athlete just like you looking for the most detail possible on a new purchase – so my review is written from the standpoint of how I used the device. The reviews generally take a lot of hours to put together, so it’s a fair bit of work (and labor of love). As you probably noticed by looking below, I also take time to answer all the questions posted in the comments – and there’s quite a bit of detail in there as well.I’ve partnered with the retailers below. Any shopping done through those links helps support this website. Thanks!
4iiii Precision Power Meter – Amazon
For European/Australian/New Zealand readers, you can also pick up the unit via Wiggle at the links below, which helps support the site too! With Wiggle new customers get 10GBP (or equivalent in other currencies) off their first order for anything over 50GBP by using code [Currently Disabled] at check-out after clicking the links below.
4iiii Precision Power Meter (EU/UK/AU/NZ – Wiggle)
Thanks for reading! And as always, feel free to post comments or questions in the comments section below, I’ll be happy to try and answer them as quickly as possible. And lastly, if you felt this review was useful – I always appreciate feedback in the comments below. Thanks!