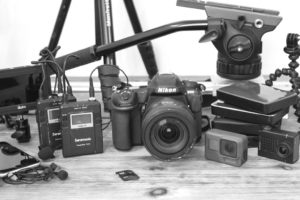
I’m often testing a multitude of devices on the bike at once, usually just due to the limited time I have to try and gather data across the 4-5 products I might have in the queue for the bike alone. One of the reasons I do a lot of testing on the trainer is because it’s one of the easiest places to discover and learn a new bike computer, app or device. Inaccuracies become easily apparent in a highly controlled environment, and are also easy to document photographically.
The problem though is where to stash all these gadgets during testing. Sure, I’ve got a 4-cup Oxo measuring cup that usually holds some devices (and my remote control), but triathlon bike aerobars don’t make for a good place to balance fragile items – especially during a hard interval session when the bike might be a rockin!
Last year I picked up a CompuTrainer head unit stand that took a microphone stand and added a modified piece to allow you to clip in a small portion of pipe that the CompuTrainer controller would latch onto. The problem was that while the unit wasn’t too expensive ($40), it didn’t actually allow much room for expansion beyond holding two CompuTrainer controllers.
So I set about trying to figure out how I could make put together a unit that cheap, easy to assemble, and would hold at least three devices. Turns out, it was far easier than I realized.
After a bit of shopping online, I ordered a whopping two pieces (plus a third component I’ll talk about later). The suspects: A microphone (mic) stand, and a boom attachment. One component cost $20, and the other $10. Bingo – $30 in total.
Here’s what they looked like when they arrived:

And after approximately 27 seconds of intense unboxing, I ended up with this:

Following an even shorter assembly period, I had the mic stand all set:


The boom arm could rotate any way and in any angle – basically just about 360* of movement options – ideal for cases where you may want things at an odd angle or coming from an unexpected direction. And then the large nob you see there has teeth in it to grip and lock tight. I’m reasonably certain The Girl could hang off of it without it sliding.
From there I decided to start loading it up. First I grabbed the Tacx handlebar unit, since that has actually been my biggest pain in the butt from a mounting standpoint – since they don’t make an adapter to mount to a triathlon bike. It easily fit though on the mic stand:


What I realized though is that while the Tacx handlebar unit clipped on – it would actually be better if the boom arm was a bit thicker. So I simply solved that like any other bike handlebars…I just added bar tape:

Now, I could have bar taped the entire length, but I simply just did a few loops around the relevant sections for the different mount types:

Note that if you don’t have bar tape handy, you can probably just use a bunch of duct tape. It just won’t look as pretty. Or, you could really use anything else to act as a wedge depending on the device your mounting. Most ziptie mounts won’t need it, but some of the screw-based ones have limited range and thus the bar tape covers the gap.
Next up was the Joule 3.0 head unit for the PowerBeam Pro:

But don’t worry, there’s room for both of them:

And we have the CompuTrainer controller as well:

Or perhaps we breakout a Garmin Edge 500/800 and mount it there. Also works with the FR310XT and FR910XT quick release kits. Or you can just use the generic watch mount.


Since some of my tests result in use of an iPhone app, how about a cheap iPhone mount:

And, even better is that now I have a handy place to mount my phone (including the Sony Ericsson Xperia Active with the new Sportypal mount). Also, this would prevent any sweat/water issues since it’s a bit away from my body. Don’t worry though, I won’t mention the name of any certain Seattle individual that recently killed their phone through sweat on a trainer…

But…that got me thinking. I was starting to fiddle with the Kinomap Trainer software, which is iPad driven – so how could I mount that? Well, turns out that there’s a nifty iPad mount designed for music and mic stands. A couple days later it arrived, and it simply snaps right onto the existing mic stand:


You can orient it either portrait (up) or landscape (side). And the thing is rock solid with little rubber snaps, no concerns about falling or being pumped off.

Combine that with the Wahoo ANT+ dongle and I’m ready to roll! Or, you can just pull up Netflix and watch movies instead. Or play Angry Bird HD. Your choice.

As you can see, I didn’t exactly re-invent the wheel and create some whacky concoction of 27 parts from Home Depot, RadioShack and Michaels…instead, I just used off the shelf pieces to put together the simplest, most versatile and most stable stand I could think of. And, the whole thing only takes a minute or two to install (or take apart for storage/moving).
Further, it’s really not limited to a bike trainer. You could just as easily use it to mount an iPad or other device in front of a treadmill, or really any other place where you want to watch data from. You could also use it to hang nutrition off of near a trainer, like a giant rope of gel packets or something.
Now, in the plausible event that you have your trainer near-permanently stationed near a wall (like in a garage), I found this little doohicky that would allow you to just buy the boom part (non-stand) and then for $4 mount it straight to a wall with the boom sticking out from the wall. Basically saves you $20 for the stand.
Cool, huh?
So, in summary, here’s the parts I used:
(Note: There are a slew of mic stands out there, I selected this one primarily because it had a heavy round base that wasn’t shaped like a tripod – but was still small. I figured the tripod style ones would be easy to trip over.)
And optional components:
1) iPad mount – $35
2) Generic iPhone mount – $13
3) Wall mount (no mic stand needed) – $4
4) Bar tape – $7
5) Wahoo Fitness iPhone key (review here) – $80
6) Generic/Garmin watch bike mount – $12
7) Cup holder for remote controls that clips on mic stand- $10
(Note: There are a gazillion iPhone bike mounts, the one I selected is kinda bulky, but it gets the job done. You can probably pick something more elegant…but it’ll likely cost ya. Similarly, you can use any bike mount that floats your boat for other phone types.)
With that, enjoy! Oh, and as always, if you use any of the links above, it helps support the site. Though, you could also just as easily hit up a local music store for most of the same parts.
Thanks for reading!
FOUND THIS POST USEFUL? SUPPORT THE SITE!
Hopefully, you found this post useful. The website is really a labor of love, so please consider becoming a DC RAINMAKER Supporter. This gets you an ad-free experience, and access to our (mostly) bi-monthly behind-the-scenes video series of “Shed Talkin’”.
Support DCRainMaker - Shop on Amazon
Otherwise, perhaps consider using the below link if shopping on Amazon. As an Amazon Associate, I earn from qualifying purchases. It doesn’t cost you anything extra, but your purchases help support this website a lot. It could simply be buying toilet paper, or this pizza oven we use and love.