A few weeks ago The Girl brought home her new bike, the Trek Speed Concept, which is one of the very few bikes out there that includes the option to add a frame-integrated ANT+ speed/cadence sensor. The sensor kit fits into the frame itself – becoming quite aerodynamic, as well as simply just ‘out of the way’. The goal here is having a speed/cadence sensor that just flows with the bike, allowing you to gather speed (thus distance as well) and cadence data – whether indoors or outside.
Now despite this feature being only available on Trek’s higher end bikes (around $2,000+), it doesn’t actually come with the bike. For that you have to order the separate $59 kit from Trek. The kit is actually made by Bontrager though, which of course makes a variety of bike-related components as well as a few ANT+ enabled products.
Upon realizing that the bike didn’t come with the kit I went ahead and ordered it – I was probably more eager to play with it myself than The Girl was. But of course if you read here often, you probably figured as such. After ordering it on Trek’s site, it came a few days later. Here’s what it looks like in its package:


Before we get all started – I should probably show you what’s in the bike prior to installing the above kit. The bike by default comes with a little plastic placeholder kit. From a distance you might assume this is the real deal, but once you get a bit closer your notice the ‘DuoTrap Ready’ wording – indicating the need to buy the actual kit.

Once I was ready to install the real deal I went ahead and got the package all taken apart next to her bike.

Inside the packaging was the DuoTrap frame sensor, a rubber crank magnet (pretty cool actually), and then a screw and rubber screw cover. In theory it also comes with a small magnet for the wheel (to gather speed), but mine was missing. No worries though, any standard wheel magnet will work – so I just used the one on the wheel from another sensor kit. It’s only a $2 part from a bike store, so I wasn’t about to make a big deal out of trying to get the kit replaced.
And for fun – here’s what the main component looks like up close:


Here’s a general size comparison to the more common GSC-10 speed/cadence sensor:

And finally, here’s a comparison between the real and fake one:

Once I was ready to start I needed to remove the fake plastic DuoTrap. This involves finding the correct hex bit to fit in the tiny screw:

After that’s done you simply unscrew it. Fear not – it only takes one triathlete to unscrew it:

From there you’ll notice that you can actually see through the frame. Like a little window on the world…or rather…the wheel:

This window allows you to slide the speed sensor portion of the kit through the frame, ultimately putting the magnetic sensor portion close to the wheel magnet:

Once you’ve got it slid into the frame, you repeat the same screwdriver process as earlier – this time tightening instead of loosening:

With that, the sensor kit is set. We just need to add your normal spoke magnet onto the wheel. In my case that was all already set (no tools required!), so I moved onto getting the cadence magnet on the crank. However unlike every other cadence magnet ever created on earth – this one doesn’t use zip ties. Nope, it uses a fully integrated rubber band system. Industrial strength rubber though – not like something that rolls up your newspaper.

The only tradeoff with not using zip ties is that you’ll have to first remove your pedal though, to be able to slide it over and down the crank:

Once you do that, you’ll get your mojo on and push this thing down the crank. It’s an incredibly tight fit – so you don’t have to worry about it sliding around. Again, only one triathlete required…though non-triathlete cyclists may need to find a friend that has arm strength.

Once that’s on – reattach your pedals and you’re good to go – kit installed!

The last step you’ll need to do of course is pair up your ANT+ head unit to the speed/cadence sensor. What’s really cool here is that it uses the standard ANT+ device profile of “Speed/Cadence” – which means EVERY ANT+ cycling focused device out there supports it out of the box (as opposed to some of the newer speed-only and cadence-only ANT+ accessories). Just a few devices off the top of my head that work without issue are:
Garmin: Edge 500/705/800, Forerunner 305/FR310TX/FR405/FR410/FR60
CycleOps: Joule
Timex: Timex Global Trainer
Bontrager: Node 1/Node 2 Computers
Phone: Wahoo Fitness iPhone ANT+ Dongle, Android Sony Ericsson ANT+ enabled phones, Enki Fitness iPhone ANT+ Dongle, Digifit iPhone ANT+ Dongle/Case
(And many more of course, these are just the most common)
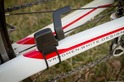
Here’s what it looks like once it’s paired up (using an Edge 800 as an example) – you’ll see the sensor display connected, as well as during normal operation:

Then you simply bike like normal. The speed/cadence information is transmitted wirelessly via ANT+ to your head unit.

(Normally I’d suggest placing the display near your handlebars, and not the rear cages, but it made for an interesting picture back here. And more importantly – The Girl was away…so I had to crank, watch and shoot all by my lonesome…on a bike small enough for a circus clown).
You’ll want to configure your wheel size on the head unit – thus allowing accurate distance and speed measurements using simple math calculations. Also note that the unit uses a standard coin cell battery, which is replaceable just by removing the DuoTrap and unscrewing the battery compartment.
While overall the DuoTrap is indeed more expensive than the more commonplace Garmin GSC-10 sensor (at $30, compared to the DuoTrap at $60) – I feel that if you’ve got yourself such a nice bike, you might as well pay the little bit extra and have it be fully integrated. Additionally, because there’s no adjustment arms – you don’t have to worry about the occasional never ending re-configuration issues with it moving over time. It just works.
FOUND THIS POST USEFUL? SUPPORT THE SITE!
Hopefully, you found this post useful. The website is really a labor of love, so please consider becoming a DC RAINMAKER Supporter. This gets you an ad-free experience, and access to our (mostly) bi-monthly behind-the-scenes video series of “Shed Talkin’”.
Support DCRainMaker - Shop on Amazon
Otherwise, perhaps consider using the below link if shopping on Amazon. As an Amazon Associate, I earn from qualifying purchases. It doesn’t cost you anything extra, but your purchases help support this website a lot. It could simply be buying toilet paper, or this pizza oven we use and love.