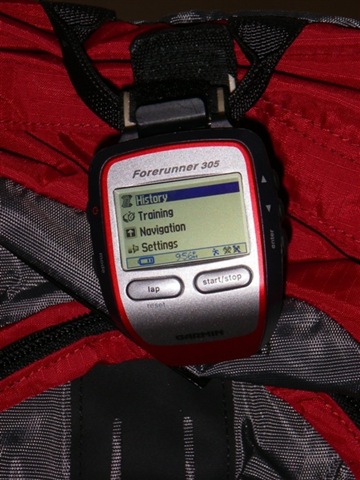
Like most Garmin users, I’ve run with my Forerunner, as well as the normal mountain or road bike journeys. But as frequent readers will know, I’ve also pushed mine a bit more. I’ve taken it on lake and ocean swims, as well as multi-day kayak trips. So it was natural to kick it up a notch and venture into the French Alps for some high altitude downhill skiing with my little red friend.
Over the course of a number of ski days I’ve been able to perfect the tricks to skiing with your Forerunner (or really any GPS for that matter). Nothing I mention here voids your warrant in any way/shape/form. By the same token – don’t blame me if you crash and burn and somehow manage to break your watch. But do keep in mind that the watch is actually very durable. If you crash hard enough to break it – it’s likely because you hit some other object (besides snow), in which case you’ve probably got other issues. Really no different than crashing on a bike at that point.
With that…here’s my guide to skiing with your GPS. Pretty much everything I say here will also apply to snowboarders…assuming you actually get off the ground ;).
Getting into position:
As any user of GPS technology will tell you – the most important piece to the puzzle is positioning. Location, location, location. This holds even more true for skiing. With skiing you’ll be constantly turning and changing the position of the watch relative to the satellites. Furthermore, you’re rate of speed is probably higher than a run and thus a lack of coverage will quickly lead to bad data.
The good news is you have a few options to work with. Let’s break them out: in order of preference
-
The Wrist: Ok, this may seem obvious – but there’s a few things to keep in mind here. First you want to ensure it’s ABOVE your heavy ski coat. Putting it below your coat will only reduce satellite coverage at times when you need it most. Don’t worry about the temperature – the Forerunner 305 is designed to operate in temps down to -4*F (or -20*C) – per page 66 on the operating manual. And of course it’s more than water resistant for our purposes.The advantage to the wrist is that you can easily see it while you are skiing – or at the base of a run/chair/etc… The disadvantage is that if your coat is uber-thick – the wrist strap may not fit all the way around. I’m using the Velcro strap that comes with the quick release kit and it has much more flexibility with respect to adjustability.
The downside to putting it on your wrist is that if it’s not tight I could see a case where you might lose it if it fell off. One way to solve this problem is just take a simple piece of string and tie off the wrist band to your coat/glove/straps. Problem solved.

-
On your head: This is technically the best position for reception. But the problemo is you can’t see it without taking off your hat/helmet. If you have a helmet, the best place is to use the goggle strap button/clip that’s on the back of most helmets to also feed the watch through. The problem here is you quite simply look like a dork. Nuff’ said.
-
On a backpack. This actually isn’t half bad and what I did for a few hours one day. Most outdoorsy backpacks have plenty of places to securely clip in your GPS. Just do it on the upper half so it has a semi-clear view of the sky. The only downside to this place is you can’t easily see it. But if you just want to analyze it after the fact – it may be the best overall location with respect to security.


For the record, here’s places that don’t work:
-
Hanging under your wrist using the glove strap. Reception sucks – doesn’t work. Simple as that.
-
In your coat pocket. I tried upper chest, arm pocket, inside pocket. None of them gave great reception in most cases. Sure it kinda sorta works in some cases – but not all.
-
Inside a backpack. Unlike #3 above, inside the backpack is basically as bad as being inside your coat. Bad reception means bad data.
-
On your pole strap: This one isn’t horrible, but it’s not ideal. The problem is that you’re likely to either rip it off accidentally or otherwise lose it during the day.
Ok, got it all placed? Give it a quick test run and make sure that you don’t get the dreaded “No Signal” error message. Once that’s set, let’s move onto using it on the hill.
Using it on the mountain:
Ok, before we go into details – let’s get one thing straight. Actively toying with a GPS device while at the same time skiing at a rate greater than 5MPH is a recipe for disaster. Not so much for you – but for the people you manage to run into. So let’s keep the toying to a minimum…mmkay?
With that said – I use four data fields on mine. I start with the ‘Other’ baseline, but then modify it with four fields that I want. To add fields, go to:
-
Settings > General > Data Fields
-
(I selected biking, because it shows MPH instead of Pace), but “Other” also works
-
Set it to four data fields, then enter
-
Then select the data fields you want
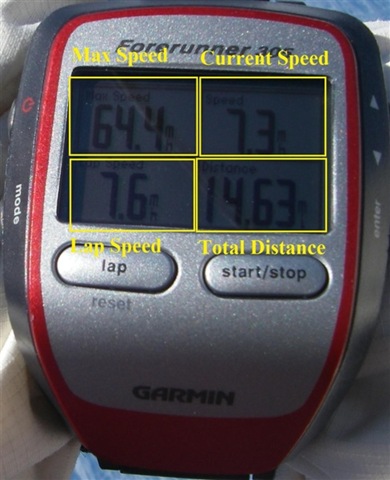
Here are the four fields I use:
-
Max Speed: This tells me the overall max speed for the day
-
Current speed: This is the ‘in the moment’ speed, keeping in mind that this usually lags behind about 5-7 seconds.
-
Lap Speed: This is the average speed for the lap. A lap is whatever you want it to be. I generally hit a laptop at the top/bottom of the chair to get a good understanding of my average speed
-
Distance:Quite simply – the total distance for the day. You can instead do Lap Distance if you want the total run’s distance.

On the hill you pretty much have two options with respect to stopping or starting it. Your first option is to leave the watch running the whole day (perhaps except lunch). This means it captures your chairlift rides, lift lines and really anywhere you go. The second option is to stop/start the timer at the start/end of every run.
I’ve tried both methods and really just leaving it running is the easiest. Sport Tracks allows you to easily split out the data as you see fit, so it’s just not worth the hassle of stopping/starting it all day long.
Finally…there is splits. Creating a lap point/split is useful if you want to know exactly how long a given run is without the messiness of sorting through 8 hours of data. One day I did splits all day long at the top/bottom of runs, and the next I only did it for a few select runs. It doesn’t affect anything other than just way points you can look at and check later.
Analyzing the Data:
Now you’ve completed a day’s worth of skiing and it’s time to see just how much descending you did. For this, we’ll use Sport Tracks 2.0. Sure, you could use something else – but why use something sub par when you can use the best for free?
The first thing I did was to create a new Downhill Skiing profile. You don’t have to do this, but this allows me to easily sort out the data from the rest of my sports. To do so open Sport Tracks and then:
-
(Other Tasks in the lower left) > Select View > Categories
-
Click the ‘Add Category’ button at the top
-
Give it a new category name, I use ‘Downhill Skiing’
-
Leave the subcategory as ‘My Activities’
-
Uncheck the options box, and change the ‘Pace or Speed’ option to ‘Speed’.
-
If you’re a metric person, then change your unit of measure to what floats KM/meters.
-
Now switch back to the main view (Select View > Daily Activity)
Go ahead and import your data as normal from your GPS device. Except this time choose Downhill Skiing as the category type. After I import, I use two free plug-ins to import the weather and auto-correct the elevation. These are optional, but are kinda neat.
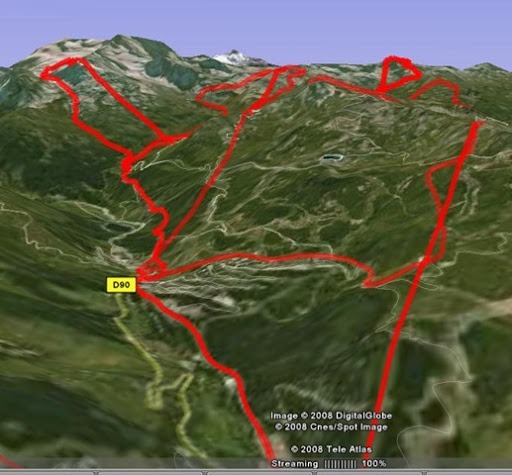
Once that’s done – you’ll have your data viewable on a map. There’s really a few different things that are interesting. First up is the route view:
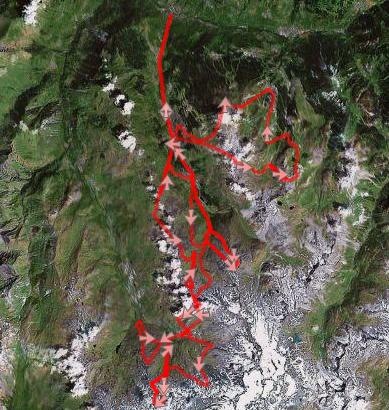
The problem with the above is that since most aerial photography/satellite imagery is bought from the summer seasons – you can’t really tell where you skied.
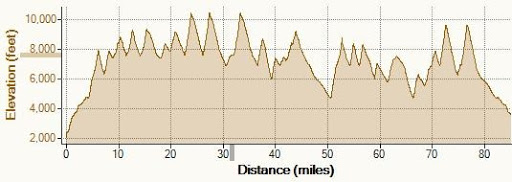
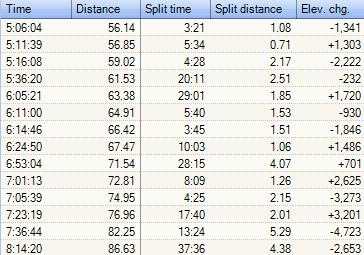
Next up is the elevation over time map. This is accessible from the middle drop-down that normally says ‘Summary’, change it to ‘Elevation’. And you can see your little up and down graphs. It will also show you your total ‘Descending’ for the day. This is of course the number that all skiers boast about – how many vertical feet they skied that day.
What’s also kinda cool is using Google Earth to ski your route overlayed onto a 3D view of it. From Sports Tracks simply click “Export > Google Earth”. This assumes you’ve installed the free Google Earth application.
You can easily see the lengths of each run by looking at splits (if you did splits above):
So there ya go…some tips on how to use the Garmin Forerunner 305 while skiing. If you’ve got any suggestions, feel free to pass them along.
FOUND THIS POST USEFUL? SUPPORT THE SITE!
Hopefully, you found this post useful. The website is really a labor of love, so please consider becoming a DC RAINMAKER Supporter. This gets you an ad-free experience, and access to our (mostly) bi-monthly behind-the-scenes video series of “Shed Talkin’”.
Support DCRainMaker - Shop on Amazon
Otherwise, perhaps consider using the below link if shopping on Amazon. As an Amazon Associate, I earn from qualifying purchases. It doesn’t cost you anything extra, but your purchases help support this website a lot. It could simply be buying toilet paper, or this pizza oven we use and love.


I’ve always wondered this – does Garmin correct your horizontal distance for the elevation gain? Now when most of us are running or biking, the hills aren’t so steep that a huge error would be induced by measuring the horizontal distance instead of the along slope distance. But I imagine when skiing this could be significant…
Yeah, the Garmin in general isn’t super-great with elevation. Some of the Polar units use a barometric measurement, instead of a GPS-determined one.
However, the easiest way to deal with that is to simply use an elevation correction plug-in. I use one with Sport Tracks (noted above), that automatically does it anytime I import any activity in. It grabs known elevation data from NASA that’s far-far more accurate than either the GPS or barometric data from most watches.
That’s fun.
I probably won’t bother on my one ski trip this year, but the max. velocity has an appeal….
Great post…are you vying for a job with Garmin?
i’m not gonna lie, i couldn’t get all the way through this post. for one, i don’t ski anymore, but i sure wish i did. for two, it’s just too many numbers, too many charts. that probably explains why i can’t put anything from IKEA together either!!! but i totally respect that you’re so in to it.
really, Garmin oughta snatch you up. you could lead the R&D department for sure!!
Good Job! 🙂
I used my 705 and had it in my pocket and it worked like a charm:
link to connect.garmin.com
My glove has a strap on the back of it that is just the right width to attach the 305 like it was the watch strap. This positions it just like a watch right at my wrist. I clip the remote control for my cell phone to the same place, so I look like dick tracy when I talk on the phone.
Wow, all this information is so cool and useful.
I have been skiing with my eTrex Vista for about 2 years already along with the “mountain dynamics” SW and maps which are awesome and I recommend to anyone. Getting a forerunner will free me from the bulky eTrex hanging from my neck during the whole day of Ski. I am already looking forward to get one and see if it as good as my eTrex. Thanks a lot for all your information.
Luis
I found this site using [url=http://google.com]google.com[/url] And i want to thank you for your work. You have done really very good site. Great work, great site! Thank you!
Sorry for offtopic
Thank you for this helpful info !
Just wanted to post and say thanks for yet another useful article on your phenomenal site. I bought my 310XT a few months ago after your review filled all the gaps in my research, and since then it’s been my constant companion in the gym and on the run. I’m off skiing in New Zealand in a couple of weeks, and am really looking forward to a permanent record of our routes and descents.
No problem Tom!
Skiing in NZ is on my list of things to do someday…looks awesome. Enjoy!
As Luis said, GPS maps are a great asset in the mountains. There’s also this Skidea.com site that offers free ski maps for Garmin, mostly in the Alps.
Thanks for the article…I turned it on and then just did the spilts for each of the runs…attached to the strap on the back of my glove, 3 days and it seemed to be secure, even with the wicked bails I had.
Kinda sucks the map is the summer, even worse when the resort added a new chair on the backside (which rocks, thanks for asking) and the map is froma few years ago…
link to connect.garmin.com
Thank you so much for taking the time to explain all this to us, this will save us lots of effort and minimise the learning time on the ski hill!
Great post! After snowboarding with a buddy who had a GPS watch a month ago, I was determined to get one myself. At the moment I’m using a tracklogging program on my Nokia E71 instead. The phone is kept in my jacket pocket and there are some glaring anomalies in the data (max speed of 123 km/h at the bottom of one run??? no way).
Otherwise it’s a great tool. I may try to get my hands on a garmin Forerunner and run both devices simultaneously to compare the accuracy. Here’s a few of my charts. Oh and I found connect.garmin.com to be the best free analysis tool so far…
link to connect.garmin.com
link to connect.garmin.com
link to connect.garmin.com
Thank you it is a great guide, now to ski with our garmin forerunner 305 gps is definitely very easy with your recommendation. Kudos
I use my 305 all the time snowboarding, but, my main complaint is that when I fall, I almost always turn it off.
I usually keep it in my chest pocket. I probably need to switch locations, though, since I keep turning it off.
I used my 305 while skiing, I had it on the wrist above the coat, and it worked perfectly. I agree that it was easiest to just leave it running.
But… You should have mentioned this…. The calorie calculations it does are then useless. When going straight downhill at 40 km/h, it would record calories as if I were _running_ at that speed. When actually pushing myself forward on a flat surface or actually climbing a little bit, it wouldn’t record any calories, although of course I would have expended at least as much energy. Here a heartbeat-based calorie algorithm would have really helped.
Dear DC Rainman!
First of all, I would like you to know that you are very inspiring to me! Keeps me motivated to keep on runnin’! Thanks!
Second, since this is an older post, I would like to now if this kind of “toying” is also possible with the Polar RC3? And would the astonishing 3D-view be possible when I would use the RC3 ?
I’m also a bit in doubt for wich watch i should buy: the Polar RC 3 (+HRM & GPS) or the Timex Ironman Global (+HRM & GPS). Do you have any tips for me? I read both your depth-reviews, wich are very well explained and detailed. They both have essential pro’s and con’s. So what would you recommend for me (I’m a dutch (trail)runner)?
Thank you very much in advance!
Thomas Frissen
(The Netherlands)
Yup, all there – just need to export out the GPX file from the Polar site and import it into Google Earth.
For skiing, I’d actually go with the TGT over the RC3, primarily due to the bigger nature of the watch/strap and being a bit longer on the GPS side.
Hi,
Thanks for all your reviews. I really appreciate it. Just wanted to ask if you had suggestions for a snowboarding gps watch. I would like to calculate time, vertical, speed and gps locations. At first I thought of the Ambit and then I read your review on the Garmin Fenix. I really like the waypoints for traveling also, but the cost of multiple maps is definitely a concern. I would like to preprogram locations so that I can have rough directions of where I should be heading.
Based on your experience, what would you recommend? Thanks you in advance.
Keep up the great reviews and site.
Check out the Fenix skiing post I did. I think this is really what you’re looking for, with the addition of the waypoints: link to dcrainmaker.com
Grr, sorry. Thought you had left this on my in-depth review post.
For you, I’d go Fenix. Waypoint is easier and cleaner with Fenix over Ambit because you can do it from your phone (with BT4.0).
Hey Rainmaker,
Since this post is almost 6 years old, I was wondering if you still use SportTracks to analyze your ski data or if you would recommend something else today? I’m still rocking the 305 (it just won’t die!) and I’m planning on using it while skiing the first time. I use Garmin Connect and Strava to analyze my run and cycling data but I’m not sure how well skiing data will translate on these applications.
Thanks!
I use it sparingly these days. I use Training Peaks, Garmin Connect, and Strava. Fwiw, Garmin Connect has a skiing mode, though, it just simply switches into MPH.
I didn’t realize GC had a skiing mode until your review of the Fenix2 today.
If I understand this correctly I could ski all day with my forerunner 620 recording data (as a run, I guess) and then when I upload it to GC simply tell GC it was skiing not running and it’ll do the rest?
If so, awesome!
Yup, basically.
Thank you for the great guide to skiing with the Forerunner. I would add that you should turn on Auto Pause, unless you ski all of your runs without stopping. Also, if you are hitting the lap button at the top and bottom of every lift, why not push the timer on/off at the same time so that you eliminate the chair rides? I don’t understand why you chart doesn’t alternate between + and – elevation gain unless you are hitting the lap button part way through a run.
For the most part I tend to sky all runs as one shot. The main reason I don’t use stop/start, and use lap instead is that this way if I forget to lap, I just simply don’t have a lap marker – but I still capture the run. Whereas if I forget to press the start button…I’m missing data.
Of course, all of this is moot with all of the newer/higher end Garmin’s now having a dedicated ski mode that does it for you.
Great article, came across it searching to see if other people do this as well. I have a garmin 410 and have no issues with it under my ski coat and glove. Just my 2 cents.
I am pleased to learn that you swim with your Forerunner as I have been thinking of doing the same. The question I have is how does it work with GPS? As your wrist is submerged much of the time, how regularly does it get a signal?